> ## Documentation Index
> Fetch the complete documentation index at: https://bloodhound.specterops.io/llms.txt
> Use this file to discover all available pages before exploring further.
# Manage Extensions
> Learn about extension components and management workflows, including initial setup and ongoing maintenance.
 As described in the [OpenGraph Overview](/opengraph/overview), extensions that include an extension definition schema enrich collector-generated data payloads to produce structured graphs. Structured graphs enable enhanced features in BloodHound, such as pathfinding, findings, and metrics.
Extensions that do not include an extension definition schema produce generic graphs.
Extensions can include the following components:
| Component | Description |
| ------------------------------- | ------------------------------------------------------------------------------------------------------------------------------------------------------------------------------------------------------------------------------- |
| **Extension definition schema** | A file that defines graph structure, including node types, edge types, traversability behavior, and visual configurations. Both BloodHound Community and BloodHound Enterprise use the same extension definition schema format. |
| **Collector** | A tool (for example, OpenHound, AzureHound, or SharpHound) that authenticates to a third-party platform, collects the data of interest, and packages it into a standardized data payload that BloodHound can ingest. |
| **Cypher saved queries** | Custom Cypher queries provided by extension developers. |
| **Privilege Zone rules** | Custom rules provided by extension developers to categorize nodes into Privilege Zones based on their properties and relationships. |
| **Findings** | Insights or observations provided by extension developers derived from the ingested data, which can be used to identify risk and remediation guidance. Findings are visible in BloodHound Enterprise only. |
SpecterOps has developed several extensions that follow this model, including:
Visualize and analyze your GitHub configurations in BloodHound.
Visualize and analyze your Jamf configurations in BloodHound.
Visualize and analyze your Okta configurations in BloodHound.
Visualize SCIM-provisioned users and groups as nodes in BloodHound.
Only users with the Administrator [role](/manage-bloodhound/auth/users-and-roles#user-role-definitions) can upload and delete extension definition schemas. Non-administrator users can view installed extensions, findings, and edges.
## Extension management models
BloodHound uses several extension management models. Understanding the distinction helps you know which extensions BloodHound manages automatically and which schemas Administrators must manage manually.
| Extension type | Examples | Management behavior |
| -------------------- | -------------------------------------------- | ---------------------------------------------------------------------------------------------------------------------------------------------------------------------------------------------------------------------------------------------------------------- |
| **Built-in** | Active Directory, Azure | Included in BloodHound and BloodHound Enterprise. Administrators cannot delete these extensions. |
| **Pre-installed** | GitHub, Jamf, Okta | Included in BloodHound Enterprise v9.3.0 and later. Administrators can verify, update, or delete them, but BloodHound Enterprise reapplies the latest versions at startup according to [automatic update rules](/opengraph/extensions/manage#automatic-updates). |
| **Manually managed** | SCIM, custom, and community-built extensions | Administrators must upload and maintain these extensions manually. |
## Before you begin
Complete the following steps before you verify or install an extension and upload structured graph data:
Only users with the Administrator [role](/manage-bloodhound/auth/users-and-roles#user-role-definitions) can manage extensions.
The OpenGraph Extension Management feature must be enabled before you can manage extensions.
Enable this feature on the **Administration** > **Early Access Features** page.
Support for extension-defined **Findings** in BloodHound Enterprise is a SpecterOps-managed feature. If it is not enabled in your environment, contact your account team for assistance.
How you obtain extensions and collectors depends on your BloodHound edition and how they are distributed:
* **BloodHound Community**: Users can download and use [publicly available](/opengraph/library) community-built extensions and collectors from GitHub repositories.
* **BloodHound Enterprise**: In v9.3.0 and later, GitHub, Jamf, and Okta are supported as pre-installed extensions. Use the **OpenGraph Management** page to verify the installed version. You can still manually upload publicly available, companion, or custom extensions as needed.
If you need a newer version of a pre-installed extension outside the standard BloodHound Enterprise release cycle, coordinate with your account team.
Pre-installed extensions can include detailed findings and remediation guidance when that feature is enabled in your environment. Contact your account team for availability.
After you obtain an extension and collector, review the prerequisites in the extension-specific setup documentation.
For [OpenHound](/openhound/overview)-based collectors (GitHub, Jamf, and Okta), review edition-specific deployment information (Enterprise or Community) and the collector-specific documentation for details on permissions, platform API configuration, and deployment options.
## Workflow
The workflow for generic and structured OpenGraph data is largely the same. The main difference is that structured graphs require an extension definition schema to be installed. An Administrator can ensure availability either by verifying a pre-installed extension or by uploading one manually.
After that, users with read access can view installed extensions and use the resulting structured graph data. If changes are needed, only Administrators can upload or delete extension definition schemas. See [User Role Definitions](/manage-bloodhound/auth/users-and-roles#user-role-definitions) for a full breakdown of permissions.
For [OpenHound](/openhound/overview) collectors (GitHub, Jamf, and Okta), upload behavior depends on both deployment model and BloodHound edition. Only BloodHound Enterprise can accept payloads directly through the API. BloodHound Community requires manual file upload.
### Initial setup
The following diagram provides a high-level overview of the recommended workflow to prepare BloodHound for producing structured graphs from OpenGraph extensions.
The initial setup workflow is not strictly linear and not all steps are required. For example, importing Saved Queries and creating extension-specific Privilege Zone rules are optional.
For generic graphs, the workflow is minimal: users may optionally import Saved Queries (if any). Verifying or installing an extension definition schema and updating Privilege Zone rules is not required.
```mermaid theme={null}
flowchart TB
subgraph prepare[Configure and Run]
a["Download extension
As described in the [OpenGraph Overview](/opengraph/overview), extensions that include an extension definition schema enrich collector-generated data payloads to produce structured graphs. Structured graphs enable enhanced features in BloodHound, such as pathfinding, findings, and metrics.
Extensions that do not include an extension definition schema produce generic graphs.
Extensions can include the following components:
| Component | Description |
| ------------------------------- | ------------------------------------------------------------------------------------------------------------------------------------------------------------------------------------------------------------------------------- |
| **Extension definition schema** | A file that defines graph structure, including node types, edge types, traversability behavior, and visual configurations. Both BloodHound Community and BloodHound Enterprise use the same extension definition schema format. |
| **Collector** | A tool (for example, OpenHound, AzureHound, or SharpHound) that authenticates to a third-party platform, collects the data of interest, and packages it into a standardized data payload that BloodHound can ingest. |
| **Cypher saved queries** | Custom Cypher queries provided by extension developers. |
| **Privilege Zone rules** | Custom rules provided by extension developers to categorize nodes into Privilege Zones based on their properties and relationships. |
| **Findings** | Insights or observations provided by extension developers derived from the ingested data, which can be used to identify risk and remediation guidance. Findings are visible in BloodHound Enterprise only. |
SpecterOps has developed several extensions that follow this model, including:
Visualize and analyze your GitHub configurations in BloodHound.
Visualize and analyze your Jamf configurations in BloodHound.
Visualize and analyze your Okta configurations in BloodHound.
Visualize SCIM-provisioned users and groups as nodes in BloodHound.
Only users with the Administrator [role](/manage-bloodhound/auth/users-and-roles#user-role-definitions) can upload and delete extension definition schemas. Non-administrator users can view installed extensions, findings, and edges.
## Extension management models
BloodHound uses several extension management models. Understanding the distinction helps you know which extensions BloodHound manages automatically and which schemas Administrators must manage manually.
| Extension type | Examples | Management behavior |
| -------------------- | -------------------------------------------- | ---------------------------------------------------------------------------------------------------------------------------------------------------------------------------------------------------------------------------------------------------------------- |
| **Built-in** | Active Directory, Azure | Included in BloodHound and BloodHound Enterprise. Administrators cannot delete these extensions. |
| **Pre-installed** | GitHub, Jamf, Okta | Included in BloodHound Enterprise v9.3.0 and later. Administrators can verify, update, or delete them, but BloodHound Enterprise reapplies the latest versions at startup according to [automatic update rules](/opengraph/extensions/manage#automatic-updates). |
| **Manually managed** | SCIM, custom, and community-built extensions | Administrators must upload and maintain these extensions manually. |
## Before you begin
Complete the following steps before you verify or install an extension and upload structured graph data:
Only users with the Administrator [role](/manage-bloodhound/auth/users-and-roles#user-role-definitions) can manage extensions.
The OpenGraph Extension Management feature must be enabled before you can manage extensions.
Enable this feature on the **Administration** > **Early Access Features** page.
Support for extension-defined **Findings** in BloodHound Enterprise is a SpecterOps-managed feature. If it is not enabled in your environment, contact your account team for assistance.
How you obtain extensions and collectors depends on your BloodHound edition and how they are distributed:
* **BloodHound Community**: Users can download and use [publicly available](/opengraph/library) community-built extensions and collectors from GitHub repositories.
* **BloodHound Enterprise**: In v9.3.0 and later, GitHub, Jamf, and Okta are supported as pre-installed extensions. Use the **OpenGraph Management** page to verify the installed version. You can still manually upload publicly available, companion, or custom extensions as needed.
If you need a newer version of a pre-installed extension outside the standard BloodHound Enterprise release cycle, coordinate with your account team.
Pre-installed extensions can include detailed findings and remediation guidance when that feature is enabled in your environment. Contact your account team for availability.
After you obtain an extension and collector, review the prerequisites in the extension-specific setup documentation.
For [OpenHound](/openhound/overview)-based collectors (GitHub, Jamf, and Okta), review edition-specific deployment information (Enterprise or Community) and the collector-specific documentation for details on permissions, platform API configuration, and deployment options.
## Workflow
The workflow for generic and structured OpenGraph data is largely the same. The main difference is that structured graphs require an extension definition schema to be installed. An Administrator can ensure availability either by verifying a pre-installed extension or by uploading one manually.
After that, users with read access can view installed extensions and use the resulting structured graph data. If changes are needed, only Administrators can upload or delete extension definition schemas. See [User Role Definitions](/manage-bloodhound/auth/users-and-roles#user-role-definitions) for a full breakdown of permissions.
For [OpenHound](/openhound/overview) collectors (GitHub, Jamf, and Okta), upload behavior depends on both deployment model and BloodHound edition. Only BloodHound Enterprise can accept payloads directly through the API. BloodHound Community requires manual file upload.
### Initial setup
The following diagram provides a high-level overview of the recommended workflow to prepare BloodHound for producing structured graphs from OpenGraph extensions.
The initial setup workflow is not strictly linear and not all steps are required. For example, importing Saved Queries and creating extension-specific Privilege Zone rules are optional.
For generic graphs, the workflow is minimal: users may optionally import Saved Queries (if any). Verifying or installing an extension definition schema and updating Privilege Zone rules is not required.
```mermaid theme={null}
flowchart TB
subgraph prepare[Configure and Run]
a["Download extension
and collector"]
a-->b["Configure
collector"]
b-->c["Run
collector"]
end
subgraph upload[Verify or Install Extension]
f["Verify or install extension
definition schema"]
f-->g["Import Cypher
saved queries"]
g-->h["Update Privilege
Zone rules"]
end
prepare-->upload
```
### Operational cycle
After initial setup, the following diagrams illustrate the recurring cycle of operations to keep extension data current.
For OpenHound collectors, upload behavior depends on edition and runtime model: Enterprise can ingest through the API (often automatic when using a collector client), while Community requires manual file upload from locally run collector executables.
The following diagrams illustrate the OpenHound workflow for both Enterprise and Community editions.
**BloodHound Enterprise (containerized)**
```mermaid theme={null}
sequenceDiagram
autonumber
box rgba(128, 128, 128, 0.14) Human actors
actor Admin
actor User
end
box rgba(96, 96, 96, 0.12) Systems
participant CollectorClient as BHE Collector Client
participant OpenHound as OpenHound Container
participant TargetPlatform as Target Platform
participant BloodHound
end
Admin->>CollectorClient: Run on demand or configure schedule
CollectorClient->>OpenHound: Trigger collector job
OpenHound->>TargetPlatform: Extract data
TargetPlatform-->>OpenHound: Return source data
OpenHound->>OpenHound: Normalize and load data
OpenHound->>BloodHound: Auto-upload data payload
BloodHound-->>CollectorClient: Ingest complete
User->>BloodHound: Explore and analyze data
```
**BloodHound Community (CLI)**
```mermaid theme={null}
sequenceDiagram
autonumber
box rgba(128, 128, 128, 0.14) Human actors
actor Admin
actor User
end
box rgba(96, 96, 96, 0.12) Systems
participant OpenHound as OpenHound CLI
participant TargetPlatform as Target Platform
participant BloodHound
end
Admin->>OpenHound: Run openhound CLI
OpenHound->>TargetPlatform: Extract data
TargetPlatform-->>OpenHound: Return source data
OpenHound->>OpenHound: Normalize and load data
OpenHound-->>Admin: Generate data files locally
Admin->>BloodHound: Upload data files
BloodHound-->>Admin: Ingest complete
User->>BloodHound: Explore and analyze data
```
## Verify or install an extension
Before you upload structured OpenGraph data, make sure BloodHound has the matching extension definition schema.
In BloodHound Enterprise v9.3.0 and later, GitHub, Jamf, and Okta are supported as pre-installed extensions and usually only need verification. Administrators still manage custom or companion extension definition schemas, such as SCIM, manually.
In BloodHound Community, Administrators manage all extension definition schemas manually.
Only users with the Administrator [role](/manage-bloodhound/auth/users-and-roles#user-role-definitions) can install, update, and delete extension definition schemas.
After the extension is installed, BloodHound produces structured graphs for data payloads that conform to the extension.
In the left menu, click **Administration** > **OpenGraph Management**.
Choose the path that matches your scenario:
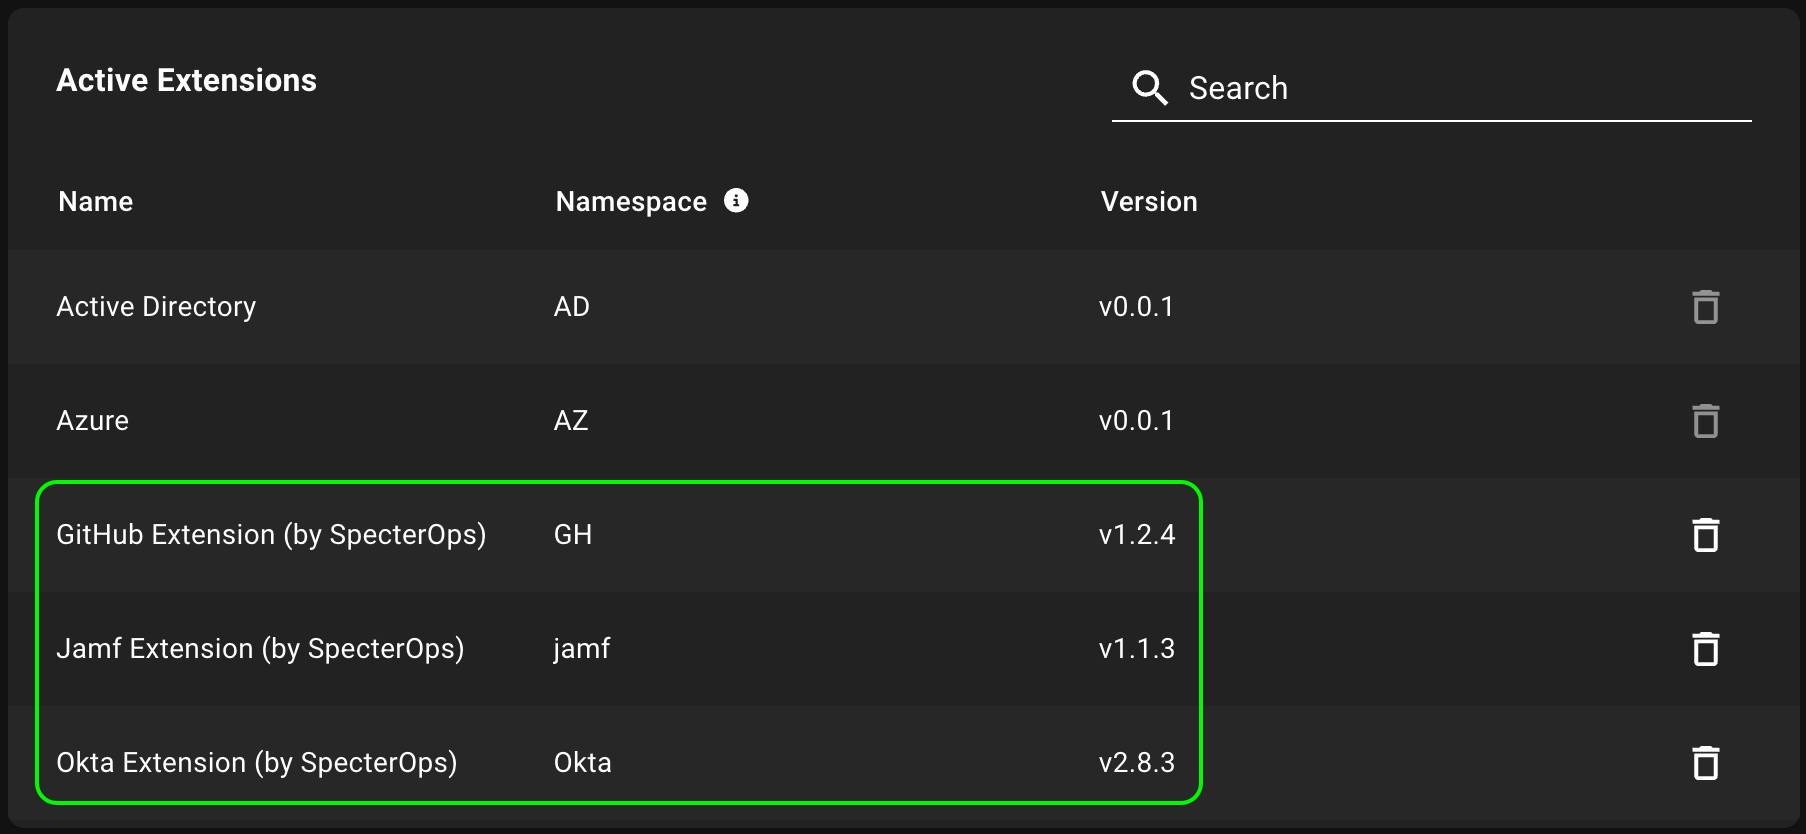
Confirm the extension appears in the list of active extensions.
For example, confirm that BloodHound Enterprise lists the built-in Active Directory and Azure extensions and the pre-installed GitHub, Jamf, and Okta extensions.
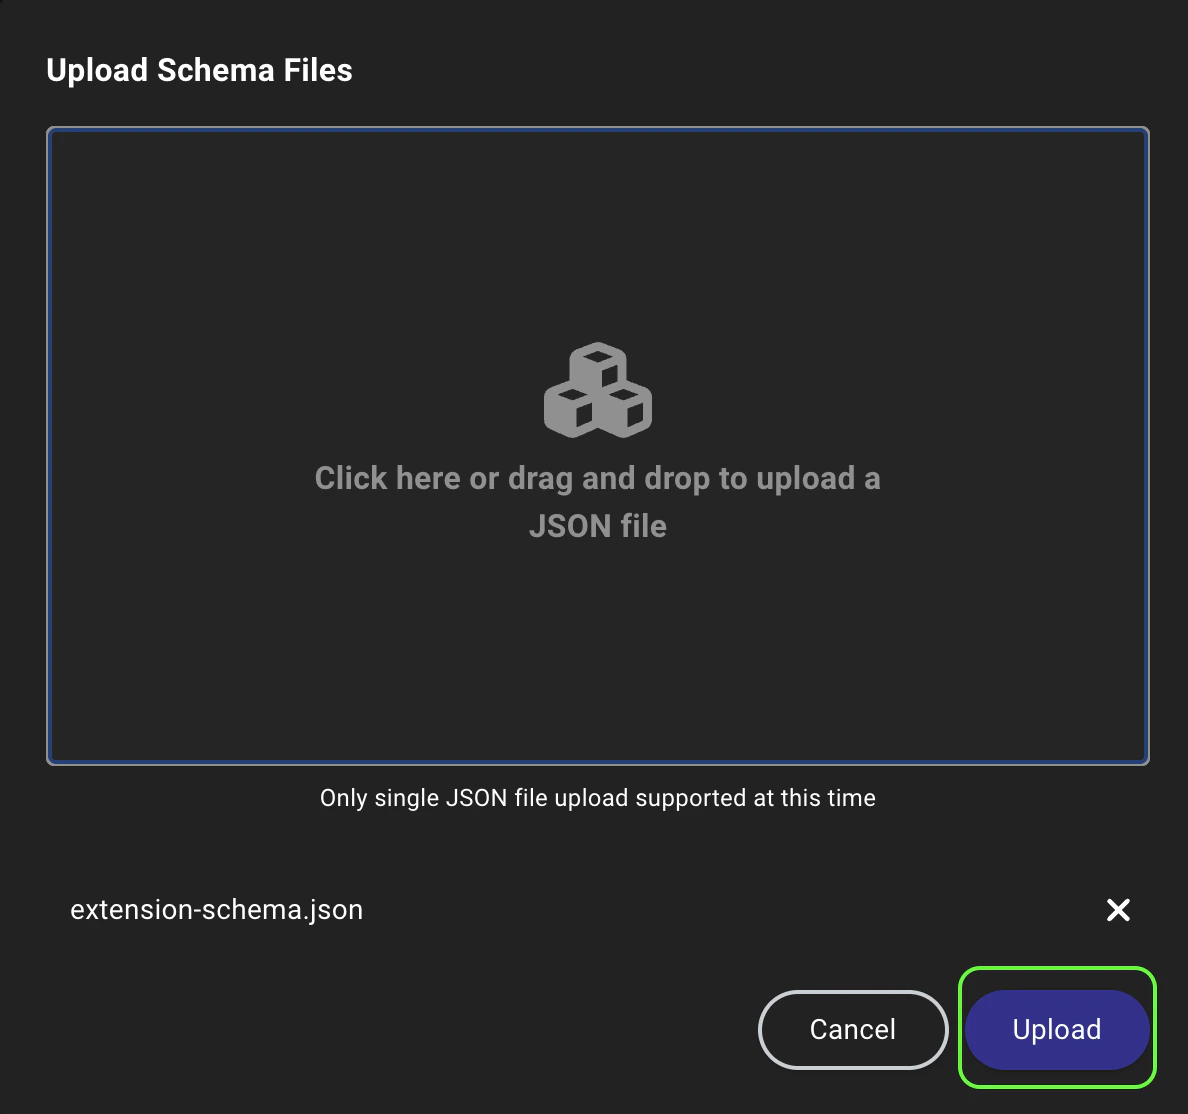
 1. Click **Upload File** to open a file system dialog or drag and drop an extension definition schema file onto the canvas.
2. Click **Upload** to begin the schema installation and validation process.
1. Click **Upload File** to open a file system dialog or drag and drop an extension definition schema file onto the canvas.
2. Click **Upload** to begin the schema installation and validation process.
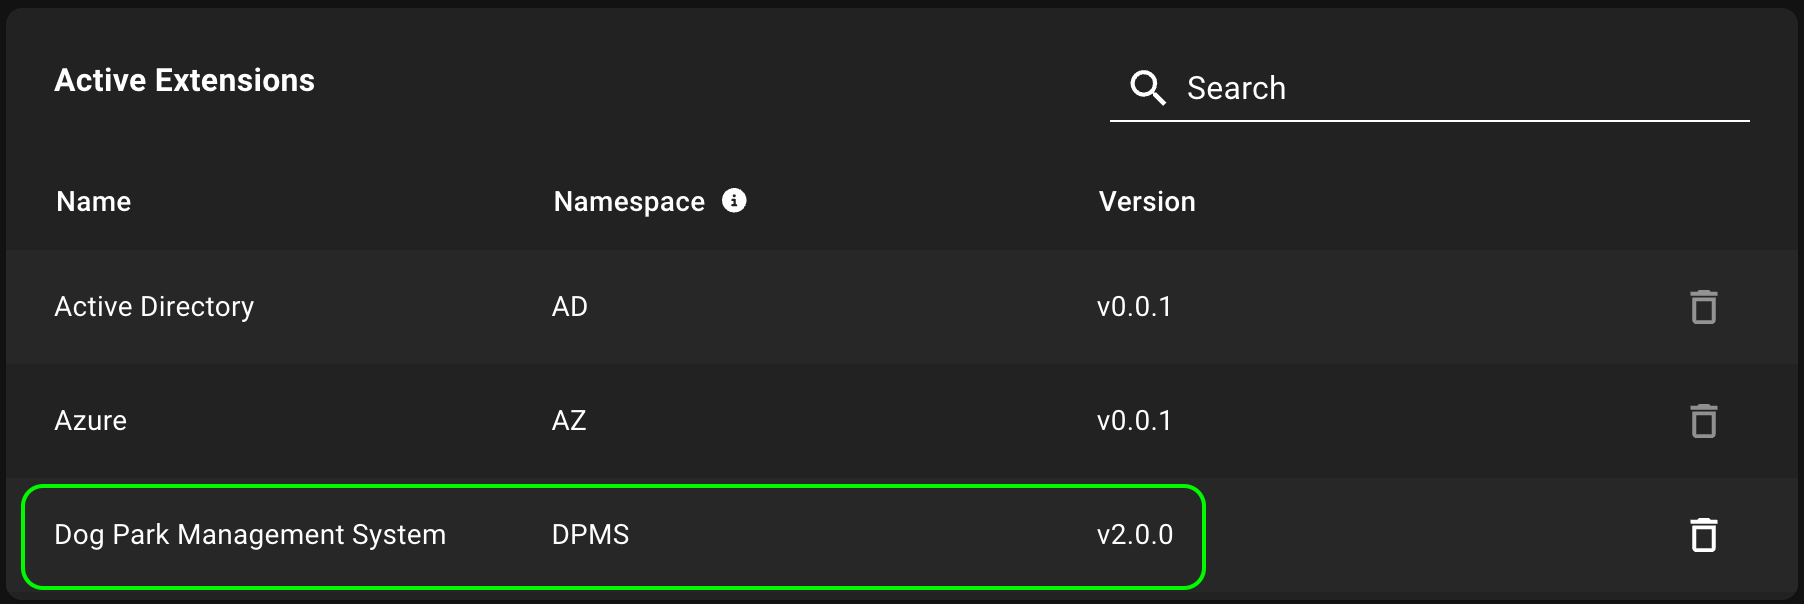
 3. Confirm the extension appears in the list of active extensions and that the version shown matches the schema you expect BloodHound to use.
You may need to refresh the page to see the newly installed extension in the list of active extensions.
3. Confirm the extension appears in the list of active extensions and that the version shown matches the schema you expect BloodHound to use.
You may need to refresh the page to see the newly installed extension in the list of active extensions.
 ## Update an extension
Collectors and extensions are versioned separately. To avoid compatibility issues, do not update collectors independently without confirming extension compatibility. Update collectors and extension definition schemas together whenever possible.
To update an extension, upload the new version using the same process as installing a new extension. BloodHound validates the new extension definition schema and replaces the earlier version with the new one.
### Automatic updates
In BloodHound Enterprise v9.3.0 and later, the pre-installed GitHub, Jamf, and Okta extensions follow automatic update rules.
At application startup, BloodHound Enterprise compares each pre-installed extension with the embedded version included in the current release and keeps whichever version is newer:
| System condition | System action |
| ------------------------------------------------------ | ----------------------------- |
| No installed version | Installs the embedded version |
| Installed versions are older than the embedded version | Installs the embedded version |
| Installed versions match the embedded version | No action taken |
| Installed versions are newer than the embedded version | No action taken |
If you want to update a pre-installed extension outside the standard BloodHound Enterprise release cycle, coordinate with your account team.
You can manually install an older version of a pre-installed extension. However, this rollback does not persist across application restarts.
At startup, BloodHound Enterprise reruns the automatic version check and reinstalls the embedded version if it is newer. Contact your account team if you need help maintaining a rollback across restarts.
## Delete an extension
Deleting an extension removes the extension definition schema from BloodHound, but leaves the underlying data intact. Associated data reverts to generic graphs, which means structured graph capabilities are no longer available. You can still use node search and Cypher queries on the [Explore](/analyze-data/explore/search#search) page to explore the data.
If you want to delete the data associated with an extension, you can do so separately on the **Database Management** page.
To delete an extension, click the (trash) icon next to it in the list of active extensions and confirm the deletion in the prompt.
You cannot delete built-in extensions (Active Directory and Azure).
In BloodHound Enterprise, Administrators can delete pre-installed extensions (GitHub, Jamf, and Okta), but BloodHound Enterprise [reinstalls](#automatic-updates) them at the next application restart.
## Upload data
After an Administrator installs an extension or verifies that an extension is present, users can upload data payloads that conform to the extension definition schema and take advantage of structured graph capabilities in BloodHound.
For extensions that use OpenHound collectors (GitHub, Jamf, and Okta), AzureHound, or SharpHound, how data is uploaded depends on your BloodHound edition:
* **BloodHound Enterprise**: The collector client can upload data directly through the API. In containerized deployments, upload is typically automatic.
* **BloodHound Community**: After running the OpenHound, AzureHound, or SharpHound collector executables locally and generating data files, follow the manual upload steps below.
For extensions that do not use OpenHound collectors, follow the manual upload steps below.
Upload a data payload that conforms to the installed extension definition schema.
1. In the left menu, click **Quick Upload**.
2. Click the **Upload File** canvas to open a file system dialog or drag and drop the data payload file(s) onto the canvas.
3. Click **Upload** to begin the data ingestion and validation process.
The file either uploads successfully or fails in the modal. You can then go to the [File Ingest](/collect-data/enterprise-collection/monitor#file-ingest) page to review ingest and analysis progress.
Use the enhanced features enabled by the extension to explore and analyze your OpenGraph data in BloodHound.
| Feature | Description |
| ------------------------ | ---------------------------------------------------------------------------------------------------------------------------------------------------------------------------------------------------------------------------------------------------------- |
| Pathfinding | Use [Pathfinding](/analyze-data/explore/search#pathfinding) to identify attack paths and analyze traversable relationships across all platforms and environments, including built-in and extension-defined kinds. |
| Saved queries | [Import](/analyze-data/explore/cypher-search#import-and-export) extension-specific saved queries so you can quickly run pre-defined Cypher queries on the **Explore** page. |
| Privilege Zone rules | If your Administrator configured extension-specific Privilege Zone [rules](/analyze-data/privilege-zones/rules) during initial setup, BloodHound automatically assigns matching nodes to zones, giving you clearer prioritization and zone-aware analysis. |
| Findings and remediation | When available, use findings and remediation information to prioritize and address issues in your environment. |
## Update an extension
Collectors and extensions are versioned separately. To avoid compatibility issues, do not update collectors independently without confirming extension compatibility. Update collectors and extension definition schemas together whenever possible.
To update an extension, upload the new version using the same process as installing a new extension. BloodHound validates the new extension definition schema and replaces the earlier version with the new one.
### Automatic updates
In BloodHound Enterprise v9.3.0 and later, the pre-installed GitHub, Jamf, and Okta extensions follow automatic update rules.
At application startup, BloodHound Enterprise compares each pre-installed extension with the embedded version included in the current release and keeps whichever version is newer:
| System condition | System action |
| ------------------------------------------------------ | ----------------------------- |
| No installed version | Installs the embedded version |
| Installed versions are older than the embedded version | Installs the embedded version |
| Installed versions match the embedded version | No action taken |
| Installed versions are newer than the embedded version | No action taken |
If you want to update a pre-installed extension outside the standard BloodHound Enterprise release cycle, coordinate with your account team.
You can manually install an older version of a pre-installed extension. However, this rollback does not persist across application restarts.
At startup, BloodHound Enterprise reruns the automatic version check and reinstalls the embedded version if it is newer. Contact your account team if you need help maintaining a rollback across restarts.
## Delete an extension
Deleting an extension removes the extension definition schema from BloodHound, but leaves the underlying data intact. Associated data reverts to generic graphs, which means structured graph capabilities are no longer available. You can still use node search and Cypher queries on the [Explore](/analyze-data/explore/search#search) page to explore the data.
If you want to delete the data associated with an extension, you can do so separately on the **Database Management** page.
To delete an extension, click the (trash) icon next to it in the list of active extensions and confirm the deletion in the prompt.
You cannot delete built-in extensions (Active Directory and Azure).
In BloodHound Enterprise, Administrators can delete pre-installed extensions (GitHub, Jamf, and Okta), but BloodHound Enterprise [reinstalls](#automatic-updates) them at the next application restart.
## Upload data
After an Administrator installs an extension or verifies that an extension is present, users can upload data payloads that conform to the extension definition schema and take advantage of structured graph capabilities in BloodHound.
For extensions that use OpenHound collectors (GitHub, Jamf, and Okta), AzureHound, or SharpHound, how data is uploaded depends on your BloodHound edition:
* **BloodHound Enterprise**: The collector client can upload data directly through the API. In containerized deployments, upload is typically automatic.
* **BloodHound Community**: After running the OpenHound, AzureHound, or SharpHound collector executables locally and generating data files, follow the manual upload steps below.
For extensions that do not use OpenHound collectors, follow the manual upload steps below.
Upload a data payload that conforms to the installed extension definition schema.
1. In the left menu, click **Quick Upload**.
2. Click the **Upload File** canvas to open a file system dialog or drag and drop the data payload file(s) onto the canvas.
3. Click **Upload** to begin the data ingestion and validation process.
The file either uploads successfully or fails in the modal. You can then go to the [File Ingest](/collect-data/enterprise-collection/monitor#file-ingest) page to review ingest and analysis progress.
Use the enhanced features enabled by the extension to explore and analyze your OpenGraph data in BloodHound.
| Feature | Description |
| ------------------------ | ---------------------------------------------------------------------------------------------------------------------------------------------------------------------------------------------------------------------------------------------------------- |
| Pathfinding | Use [Pathfinding](/analyze-data/explore/search#pathfinding) to identify attack paths and analyze traversable relationships across all platforms and environments, including built-in and extension-defined kinds. |
| Saved queries | [Import](/analyze-data/explore/cypher-search#import-and-export) extension-specific saved queries so you can quickly run pre-defined Cypher queries on the **Explore** page. |
| Privilege Zone rules | If your Administrator configured extension-specific Privilege Zone [rules](/analyze-data/privilege-zones/rules) during initial setup, BloodHound automatically assigns matching nodes to zones, giving you clearer prioritization and zone-aware analysis. |
| Findings and remediation | When available, use findings and remediation information to prioritize and address issues in your environment. |