> ## Documentation Index
> Fetch the complete documentation index at: https://bloodhound.specterops.io/llms.txt
> Use this file to discover all available pages before exploring further.
# Integrate BloodHound Enterprise with ServiceNow Security Incident Response
> Learn how to install and configure the integration to automate the creation of security incidents based on attack path findings.
export const app_3 = "Security Incident Response Integration with SpecterOps BloodHound"
export const app_2 = "Security Incident Response Integration with SpecterOps BloodHound"
export const app_1 = "Security Incident Response Integration with SpecterOps BloodHound"
export const setup_0 = "Guided Setup"
export const app_0 = "Security Incident Response Integration with SpecterOps BloodHound"
export const role_0 = "x_spop_security_in.app_admin"
 The [Security Incident Response (SIR)](https://store.servicenow.com/store/app/5400757f1b45a610a85b16db234bcb85) integration for BloodHound Enterprise supports the following use cases:
* Create SIR ticketing workflows for BloodHound Enterprise attack path findings
* Integrate BloodHound Enterprise attack path findings into existing ticketing workflows
* Monitor identity vulnerabilities over time
## Prerequisites
Before you begin the installation and configuration process, ensure the following prerequisites are met:
* Admin access to a ServiceNow instance with the [Security Incident Response (SIR) module](https://www.servicenow.com/docs/r/security-management/security-incident-response/install-and-configure-sir.html) installed and configured
* Access to the ServiceNow Store to install the BloodHound Enterprise app
* Admin access to a BloodHound Enterprise tenant
* A BloodHound Enterprise [non-personal API key/ID pair](/integrations/bloodhound-api/working-with-api#create-a-non-personal-api-key%2Fid-pair) with the **Auditor** role
## Install the application
Installing the BloodHound Enterprise app on ServiceNow involves the following steps:
1. Log in to your ServiceNow instance as an admin.
2. Click **System Applications** > **All Available Applications** > **All**.
1. In the search bar, enter *SpecterOps BloodHound* to find the app.
2. Select the app from the search results.
1. Click **Install** to install the app on your ServiceNow instance.
2. Follow the prompts to complete the installation.
## Create an application user
The integration requires creating a user and assigning the **{role_0}** role.
The integration runs on behalf of the user account that you create in this step. It should be a dedicated service account associated with the non-personal API key/ID pair you created in BloodHound Enterprise.
1. Click **All** > **User Administration** > **Users**.
2. Click **New**.
3. Enter required user details.
4. Click **Submit**.
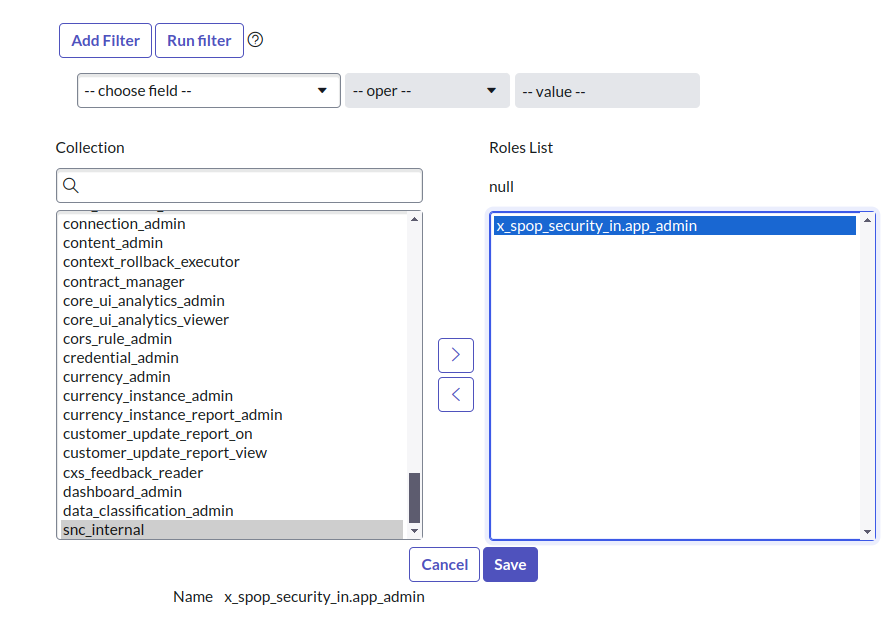
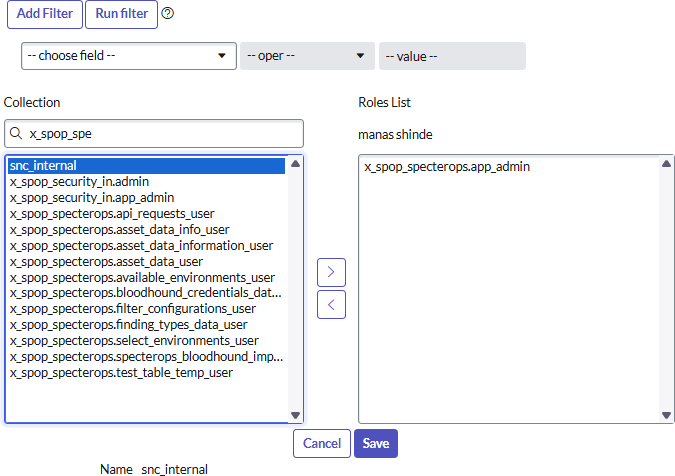
The user must have the **{role_0}** role to perform necessary actions, such as creating and updating ServiceNow tickets.
1. In the **Roles** related list, click **Edit**.
2. In the **Collection** list, select the **{role_0}** role and click **Add**.
3. Click **Save**.
{role_0 === 'x_spop_security_in.app_admin' && (
The [Security Incident Response (SIR)](https://store.servicenow.com/store/app/5400757f1b45a610a85b16db234bcb85) integration for BloodHound Enterprise supports the following use cases:
* Create SIR ticketing workflows for BloodHound Enterprise attack path findings
* Integrate BloodHound Enterprise attack path findings into existing ticketing workflows
* Monitor identity vulnerabilities over time
## Prerequisites
Before you begin the installation and configuration process, ensure the following prerequisites are met:
* Admin access to a ServiceNow instance with the [Security Incident Response (SIR) module](https://www.servicenow.com/docs/r/security-management/security-incident-response/install-and-configure-sir.html) installed and configured
* Access to the ServiceNow Store to install the BloodHound Enterprise app
* Admin access to a BloodHound Enterprise tenant
* A BloodHound Enterprise [non-personal API key/ID pair](/integrations/bloodhound-api/working-with-api#create-a-non-personal-api-key%2Fid-pair) with the **Auditor** role
## Install the application
Installing the BloodHound Enterprise app on ServiceNow involves the following steps:
1. Log in to your ServiceNow instance as an admin.
2. Click **System Applications** > **All Available Applications** > **All**.
1. In the search bar, enter *SpecterOps BloodHound* to find the app.
2. Select the app from the search results.
1. Click **Install** to install the app on your ServiceNow instance.
2. Follow the prompts to complete the installation.
## Create an application user
The integration requires creating a user and assigning the **{role_0}** role.
The integration runs on behalf of the user account that you create in this step. It should be a dedicated service account associated with the non-personal API key/ID pair you created in BloodHound Enterprise.
1. Click **All** > **User Administration** > **Users**.
2. Click **New**.
3. Enter required user details.
4. Click **Submit**.
The user must have the **{role_0}** role to perform necessary actions, such as creating and updating ServiceNow tickets.
1. In the **Roles** related list, click **Edit**.
2. In the **Collection** list, select the **{role_0}** role and click **Add**.
3. Click **Save**.
{role_0 === 'x_spop_security_in.app_admin' && (
 )}
{role_0 !== 'x_spop_security_in.app_admin' && (
)}
{role_0 !== 'x_spop_security_in.app_admin' && (
 )}
## Configure the application
The integration provides a guided setup experience to connect to BloodHound Enterprise, filter attack path types, configure field mapping, and set the import schedule. Follow the steps below to complete the configuration.
### Change application scope
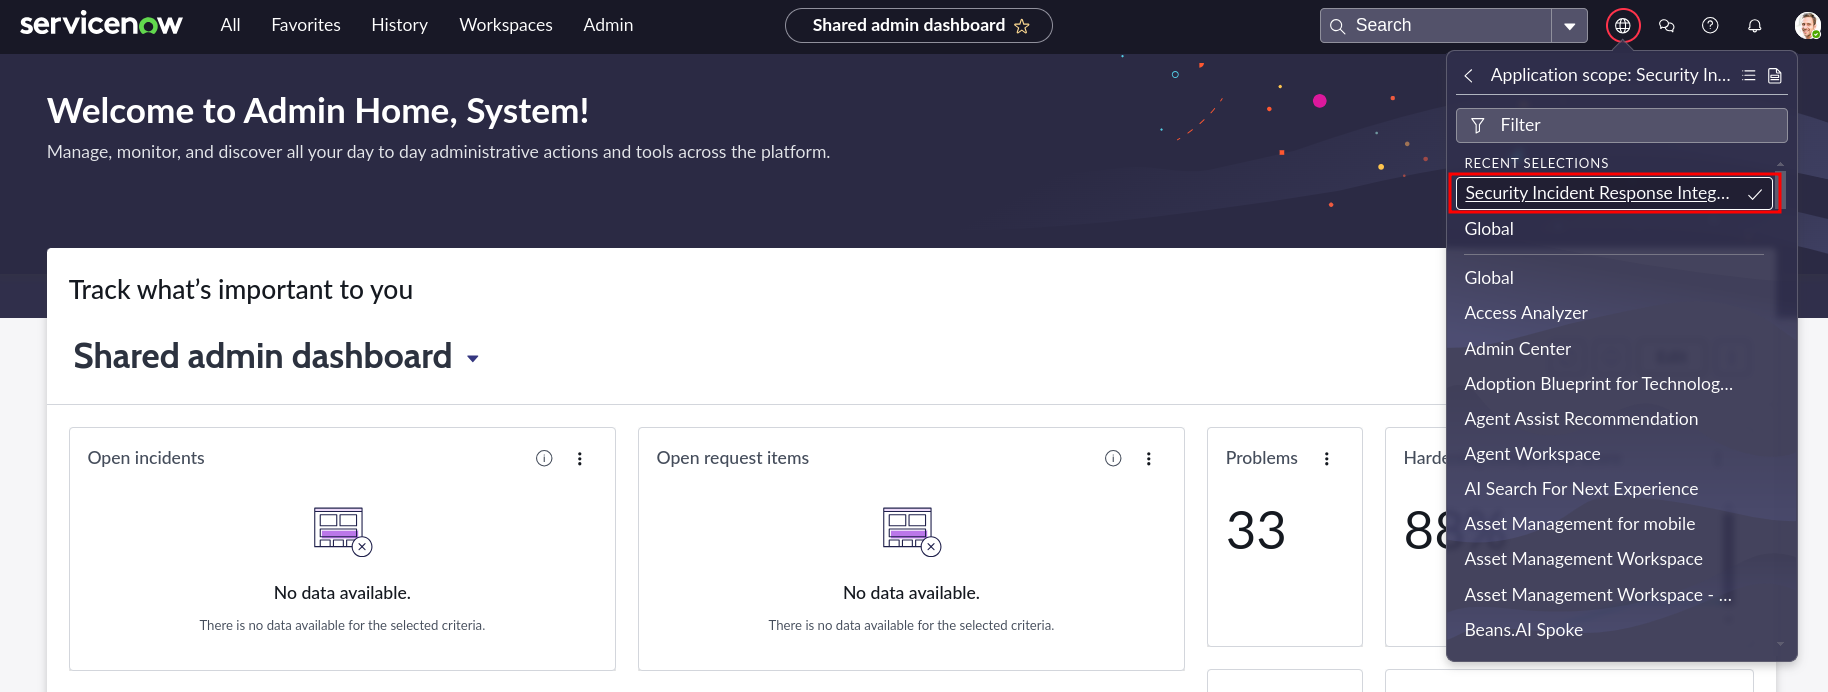
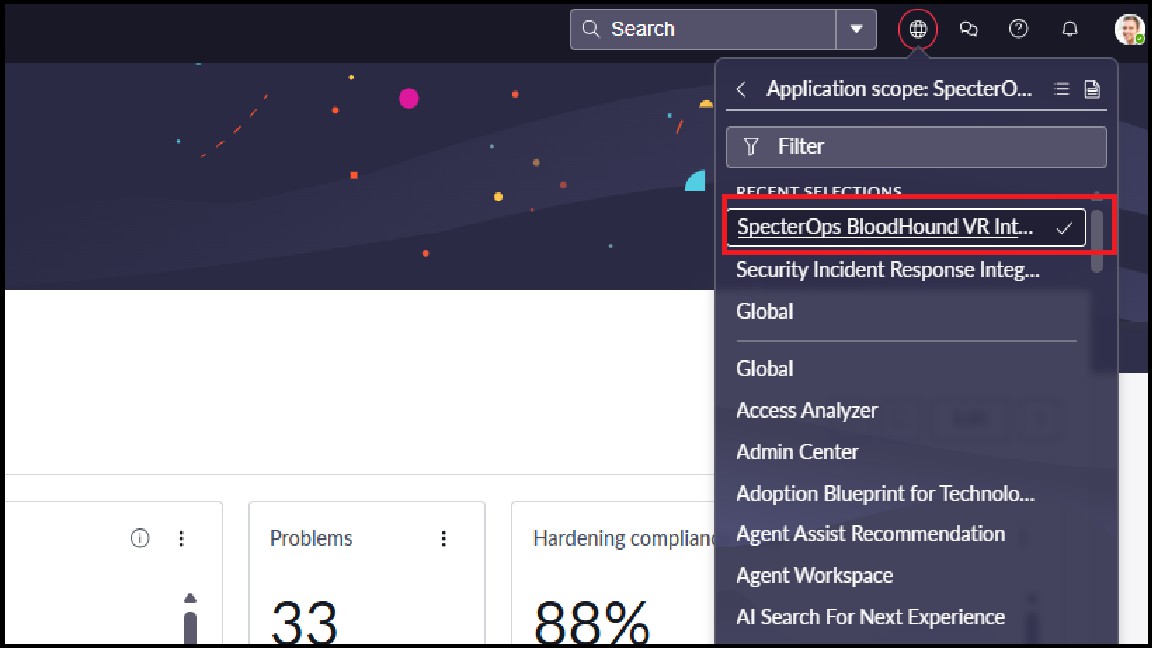
Before starting the configuration, change the application scope to *{app_0}* to ensure that you have access to all necessary components and configurations.
1. Click the (globe) icon in the top-right corner and select **Application Scope**.
2. In the search filter, enter *{app_0}* and select it.
{app_0 === 'Security Incident Response Integration with SpecterOps BloodHound' && (
)}
## Configure the application
The integration provides a guided setup experience to connect to BloodHound Enterprise, filter attack path types, configure field mapping, and set the import schedule. Follow the steps below to complete the configuration.
### Change application scope
Before starting the configuration, change the application scope to *{app_0}* to ensure that you have access to all necessary components and configurations.
1. Click the (globe) icon in the top-right corner and select **Application Scope**.
2. In the search filter, enter *{app_0}* and select it.
{app_0 === 'Security Incident Response Integration with SpecterOps BloodHound' && (
 )}
{app_0 !== 'Security Incident Response Integration with SpecterOps BloodHound' && (
)}
{app_0 !== 'Security Incident Response Integration with SpecterOps BloodHound' && (
 )}
### Connect to BloodHound Enterprise
The first step in the guided setup is to connect to your BloodHound Enterprise tenant by providing the tenant URL and API credentials.
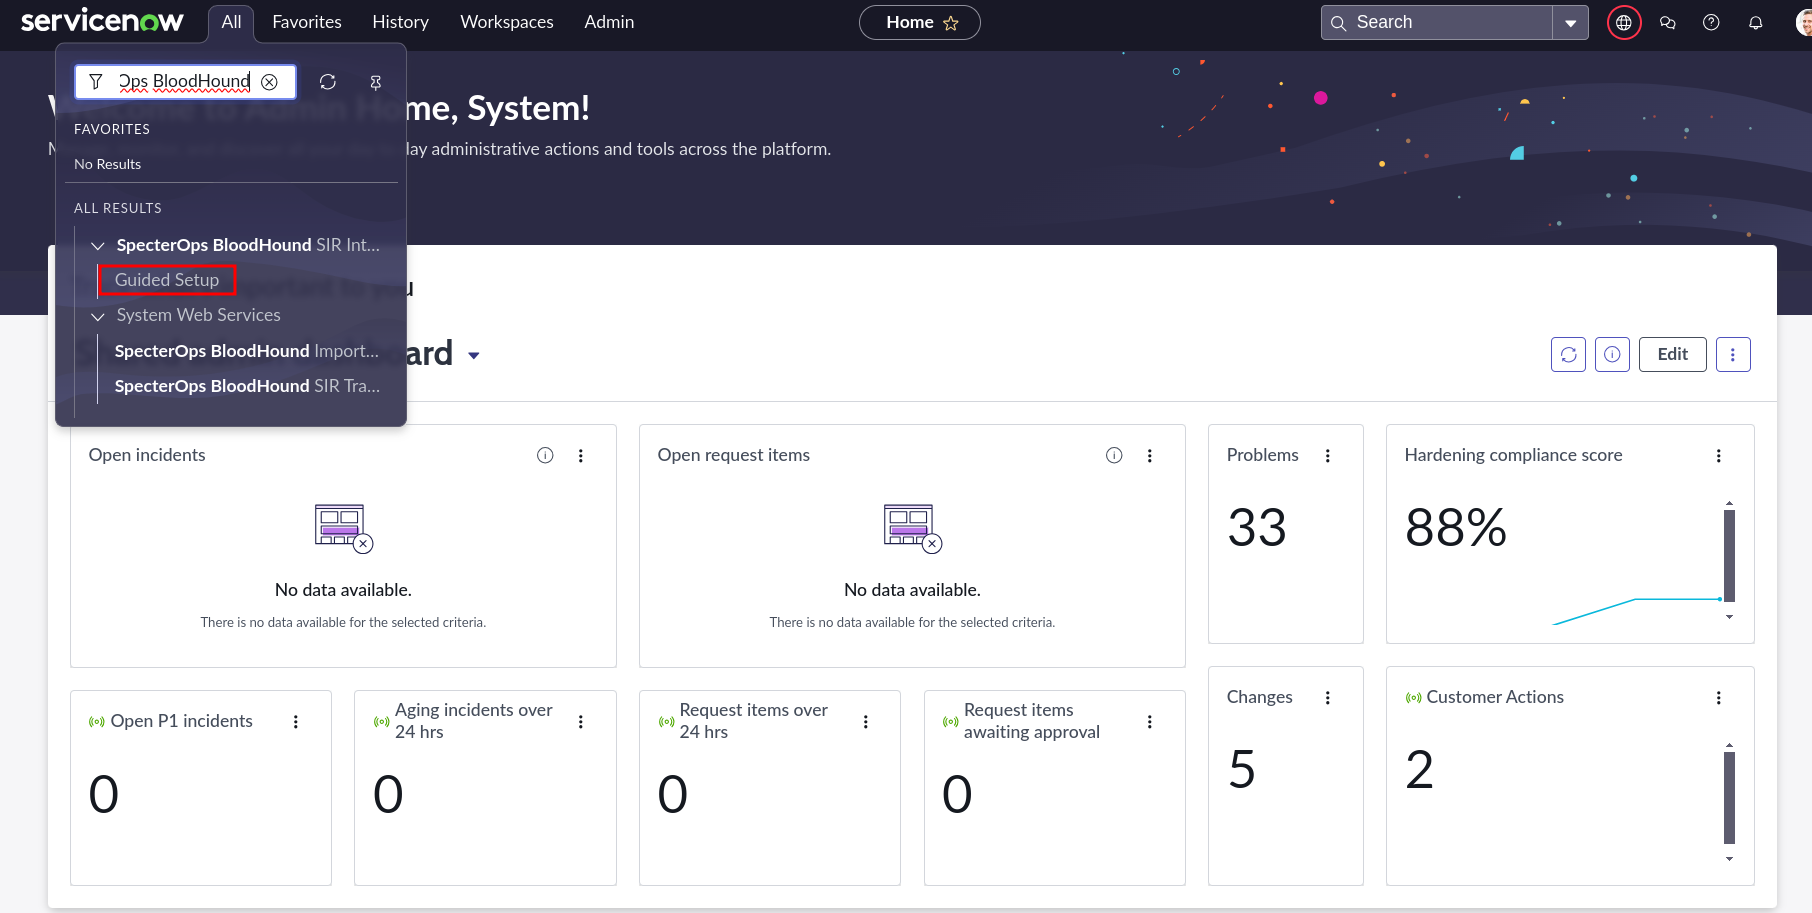
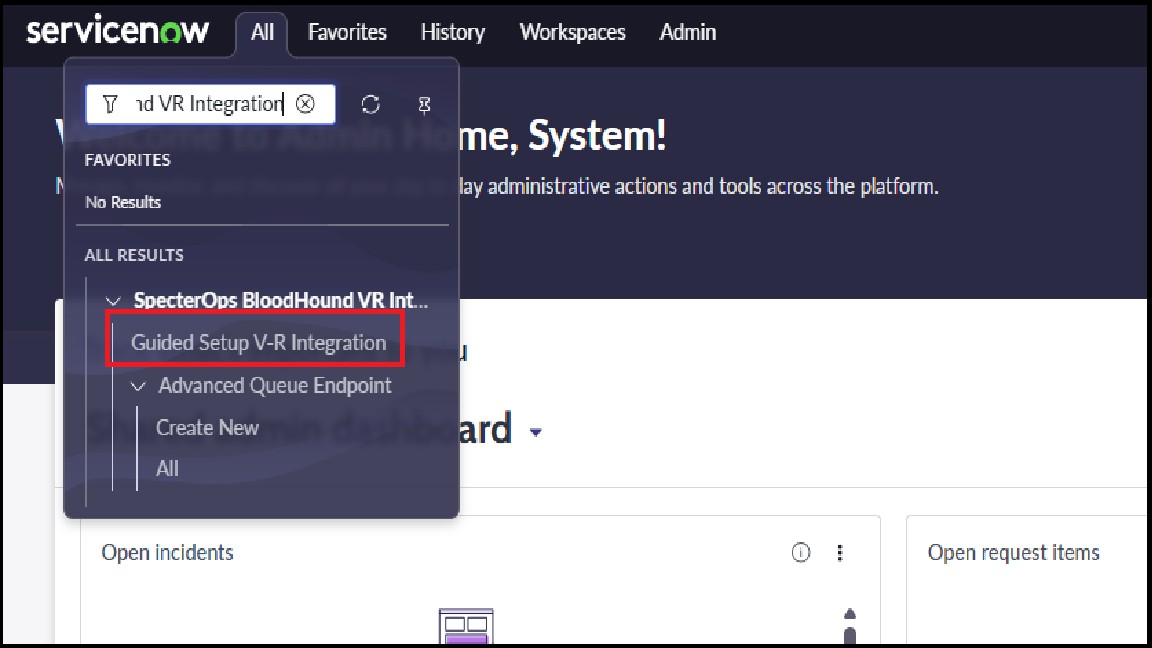
1. In the top-left corner of ServiceNow, click **All**.
2. In the search box, enter *{app_1}* and select **{setup_0}**.
{app_1 === 'Security Incident Response Integration with SpecterOps BloodHound' && (
)}
### Connect to BloodHound Enterprise
The first step in the guided setup is to connect to your BloodHound Enterprise tenant by providing the tenant URL and API credentials.
1. In the top-left corner of ServiceNow, click **All**.
2. In the search box, enter *{app_1}* and select **{setup_0}**.
{app_1 === 'Security Incident Response Integration with SpecterOps BloodHound' && (
 )}
{app_1 !== 'Security Incident Response Integration with SpecterOps BloodHound' && (
)}
{app_1 !== 'Security Incident Response Integration with SpecterOps BloodHound' && (
 )}
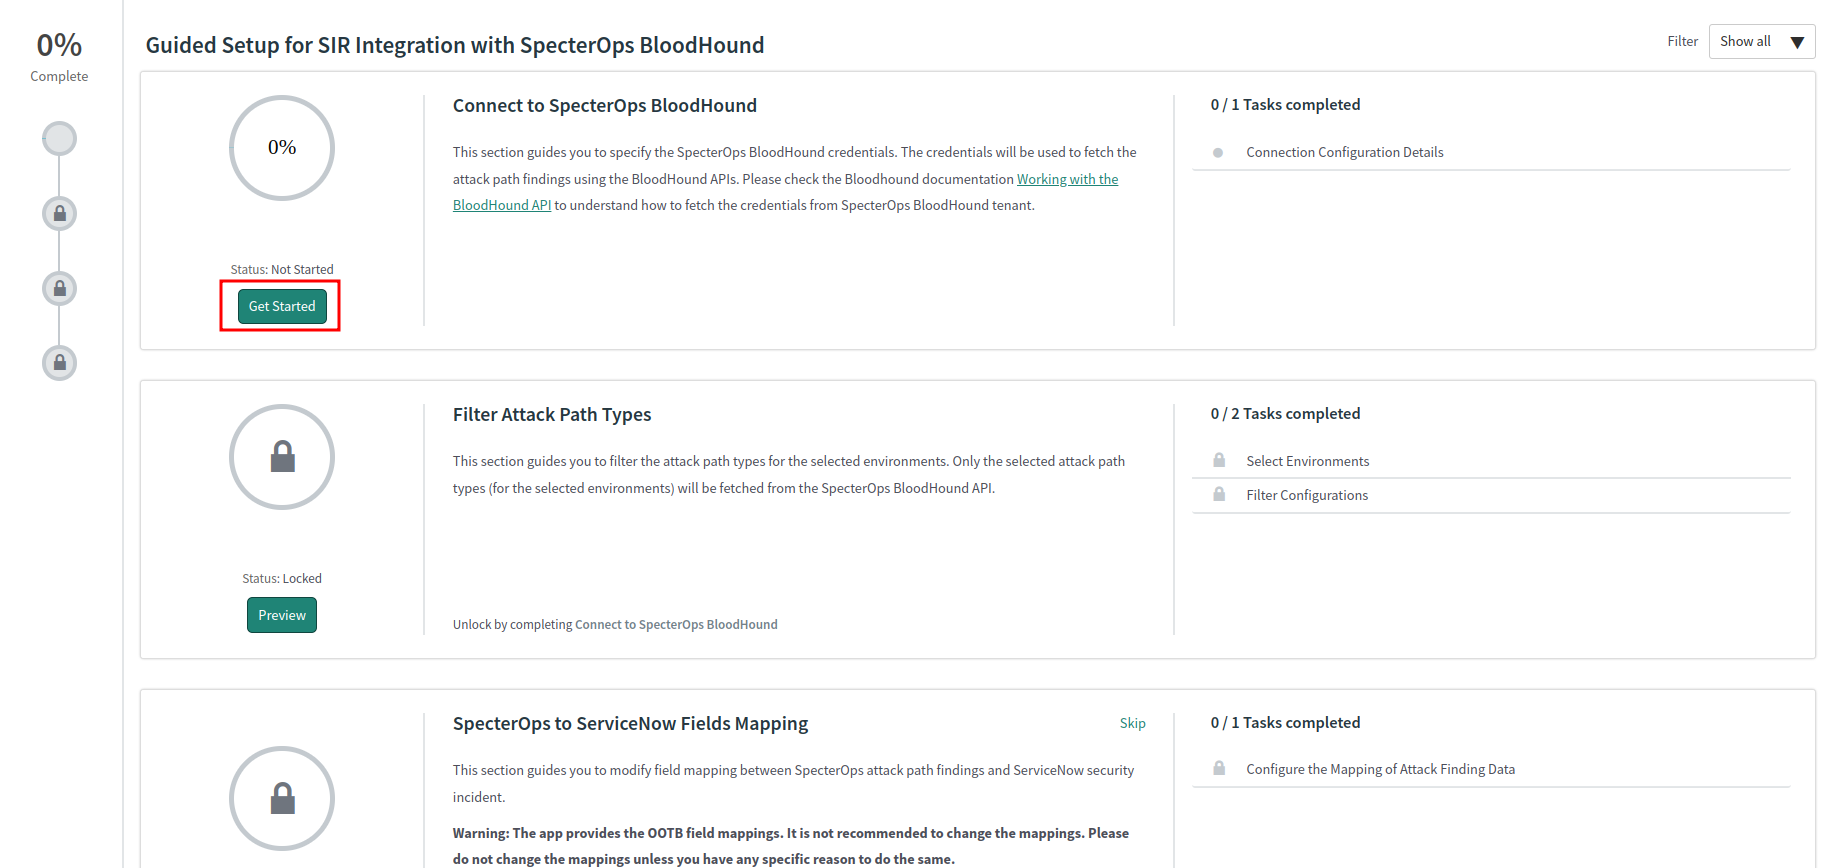
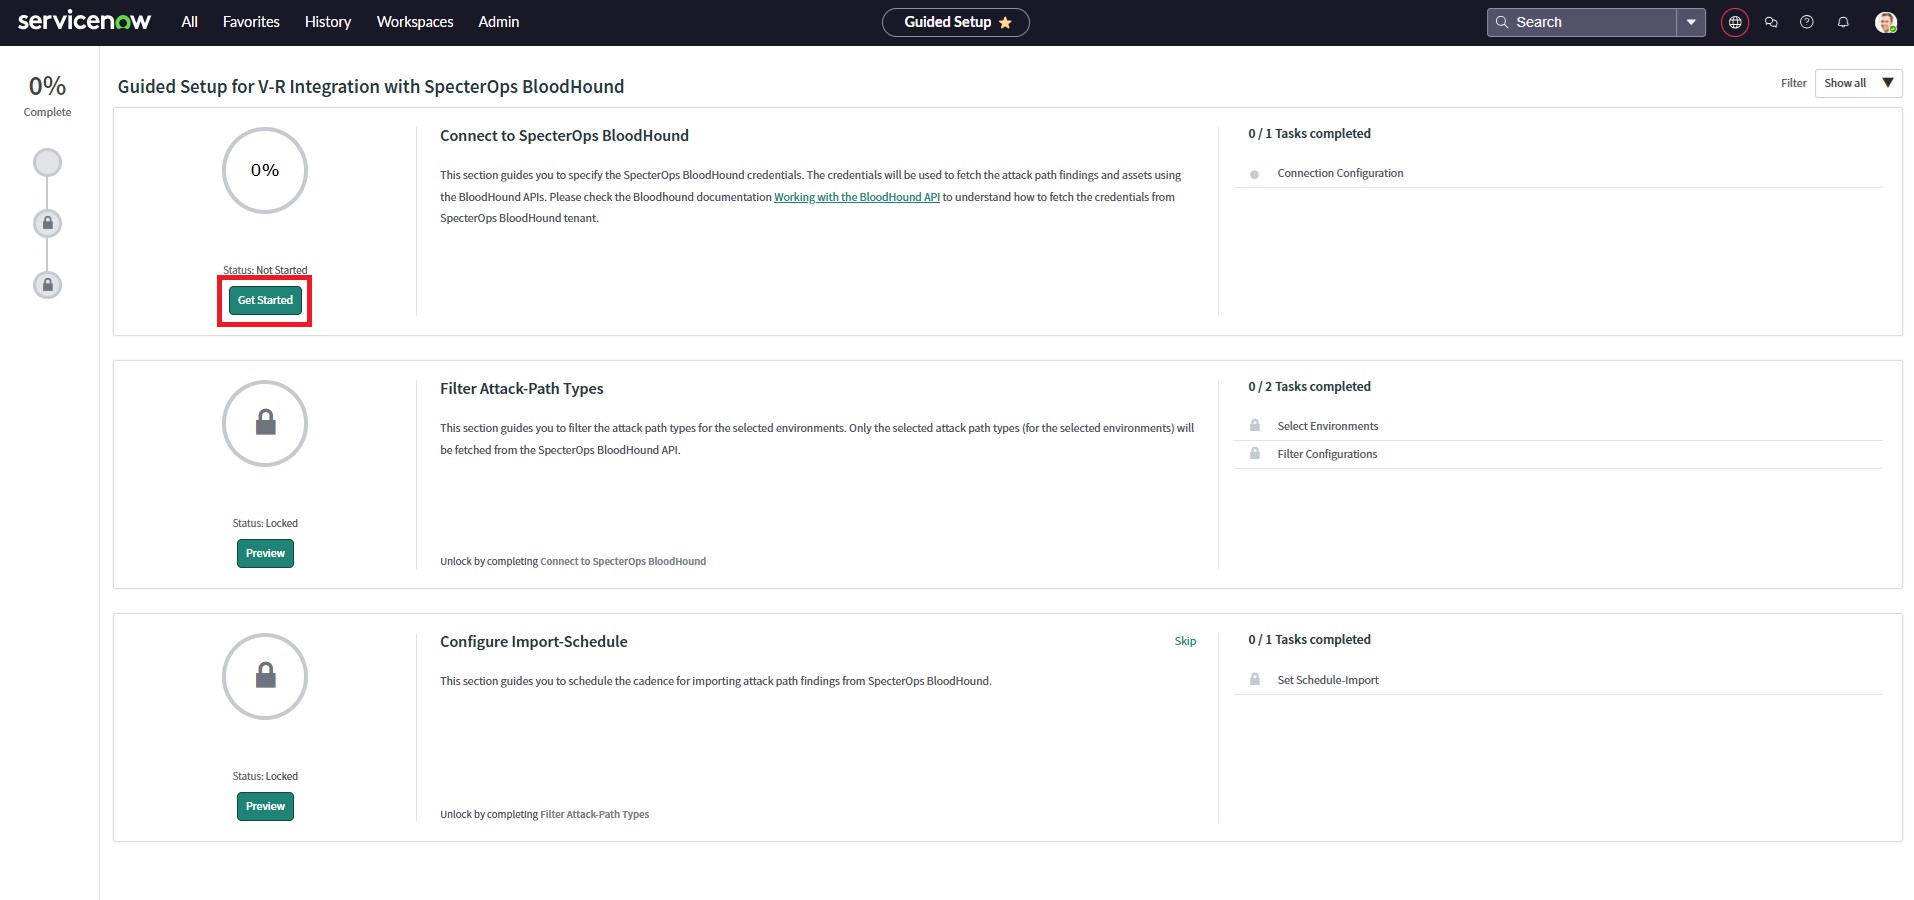
3. Click **Get Started** in the *Connect to SpecterOps BloodHound* section to start the configuration process.
{app_1 === 'Security Incident Response Integration with SpecterOps BloodHound' && (
)}
3. Click **Get Started** in the *Connect to SpecterOps BloodHound* section to start the configuration process.
{app_1 === 'Security Incident Response Integration with SpecterOps BloodHound' && (
 )}
{app_1 !== 'Security Incident Response Integration with SpecterOps BloodHound' && (
)}
{app_1 !== 'Security Incident Response Integration with SpecterOps BloodHound' && (
 )}
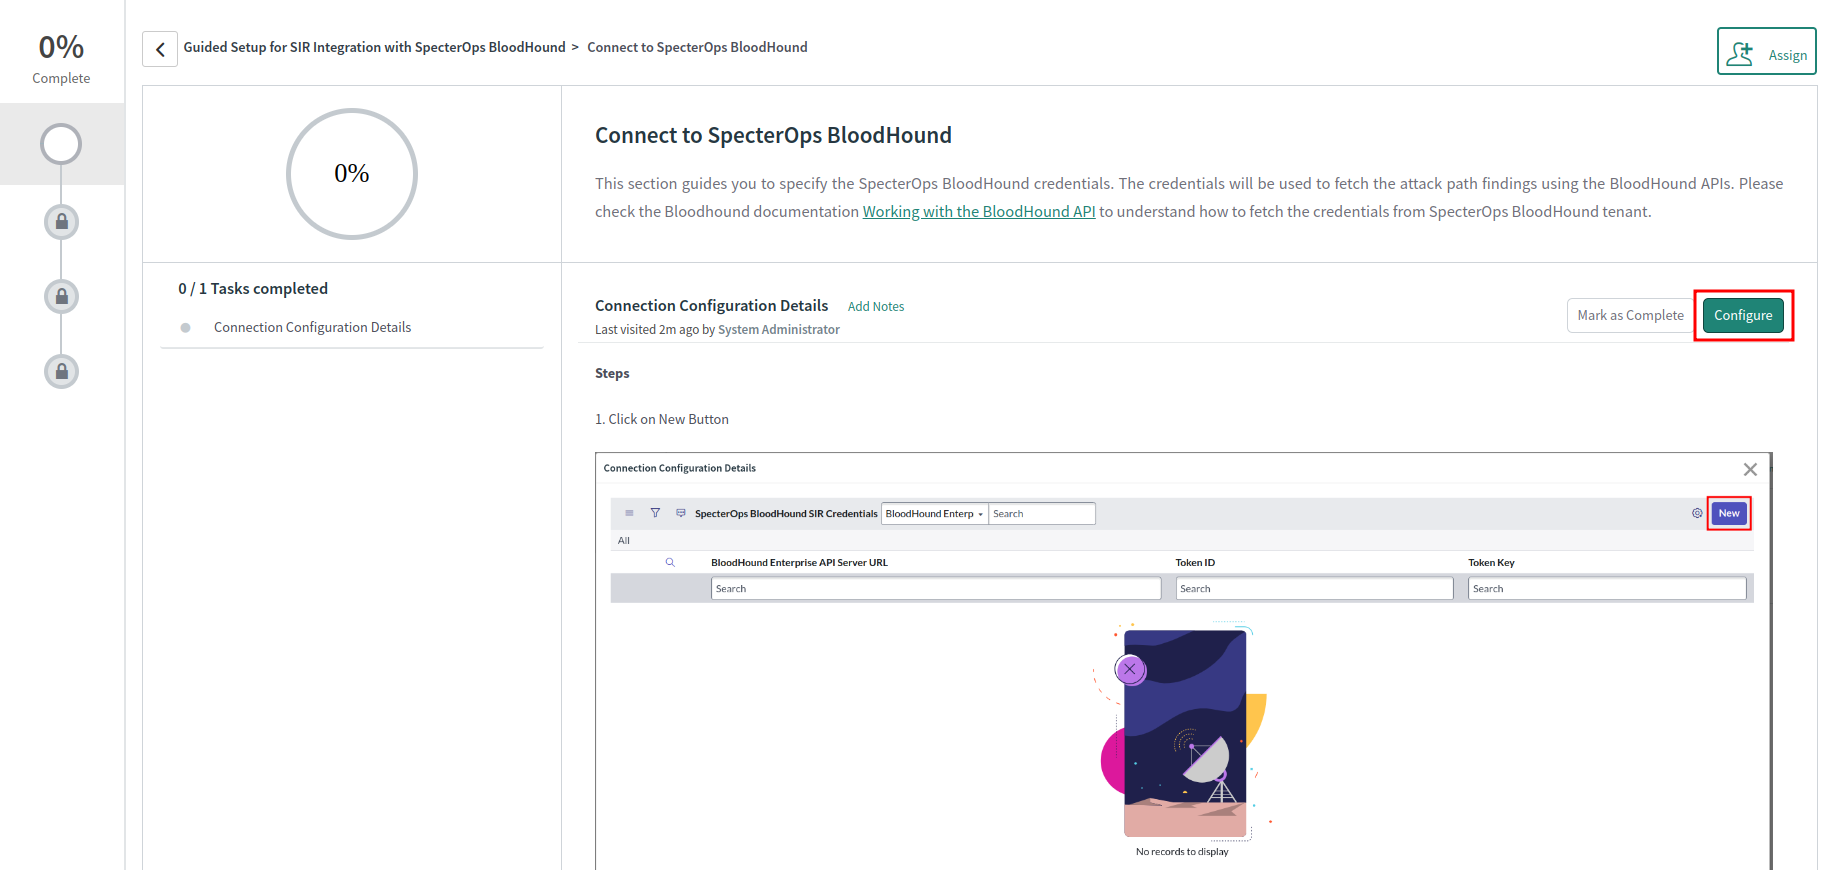
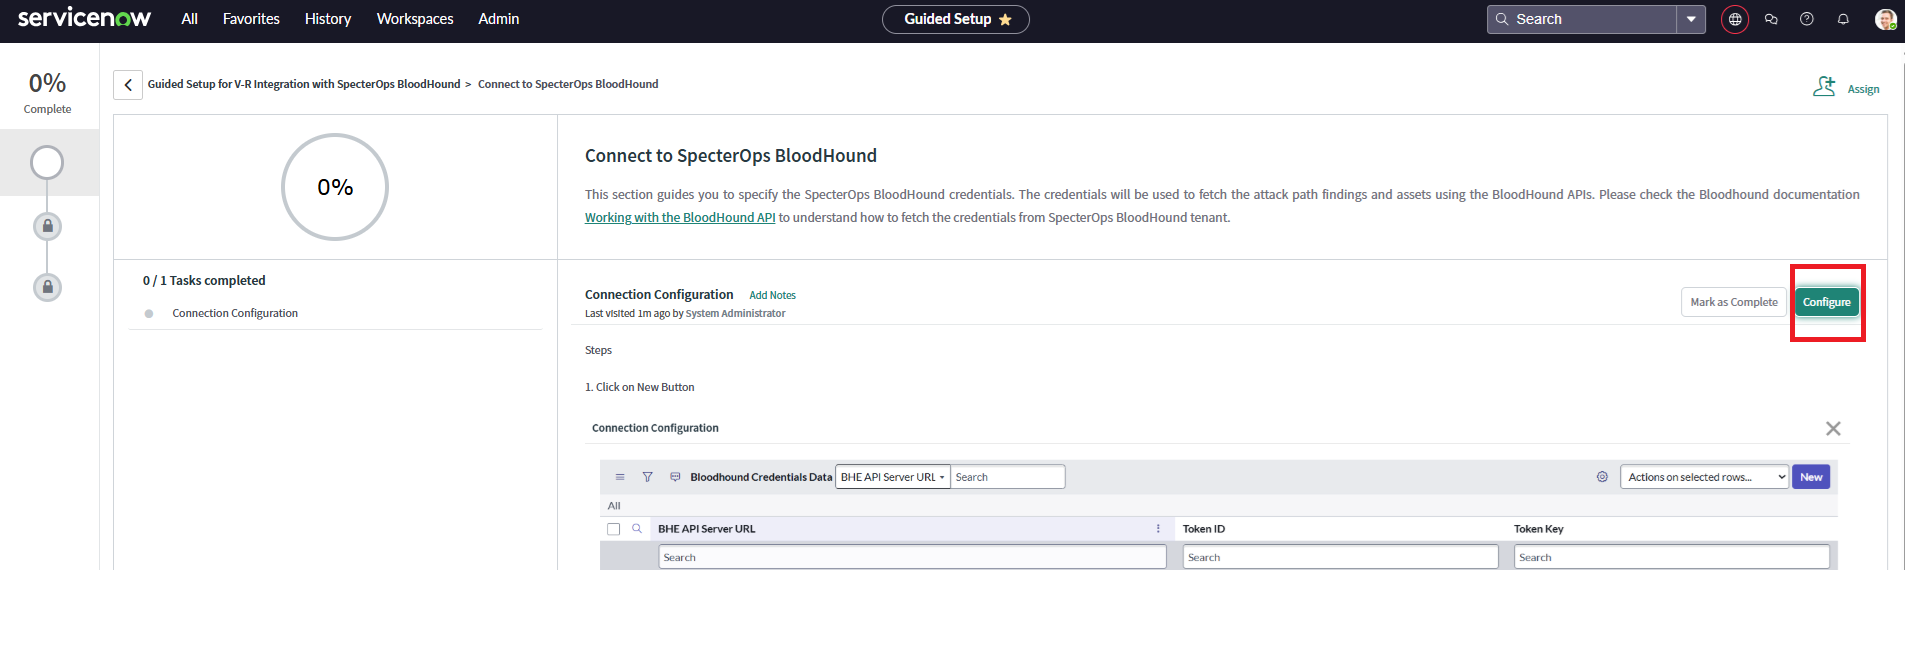
4. Click **Configure**.
{app_1 === 'Security Incident Response Integration with SpecterOps BloodHound' && (
)}
4. Click **Configure**.
{app_1 === 'Security Incident Response Integration with SpecterOps BloodHound' && (
 )}
{app_1 !== 'Security Incident Response Integration with SpecterOps BloodHound' && (
)}
{app_1 !== 'Security Incident Response Integration with SpecterOps BloodHound' && (
 )}
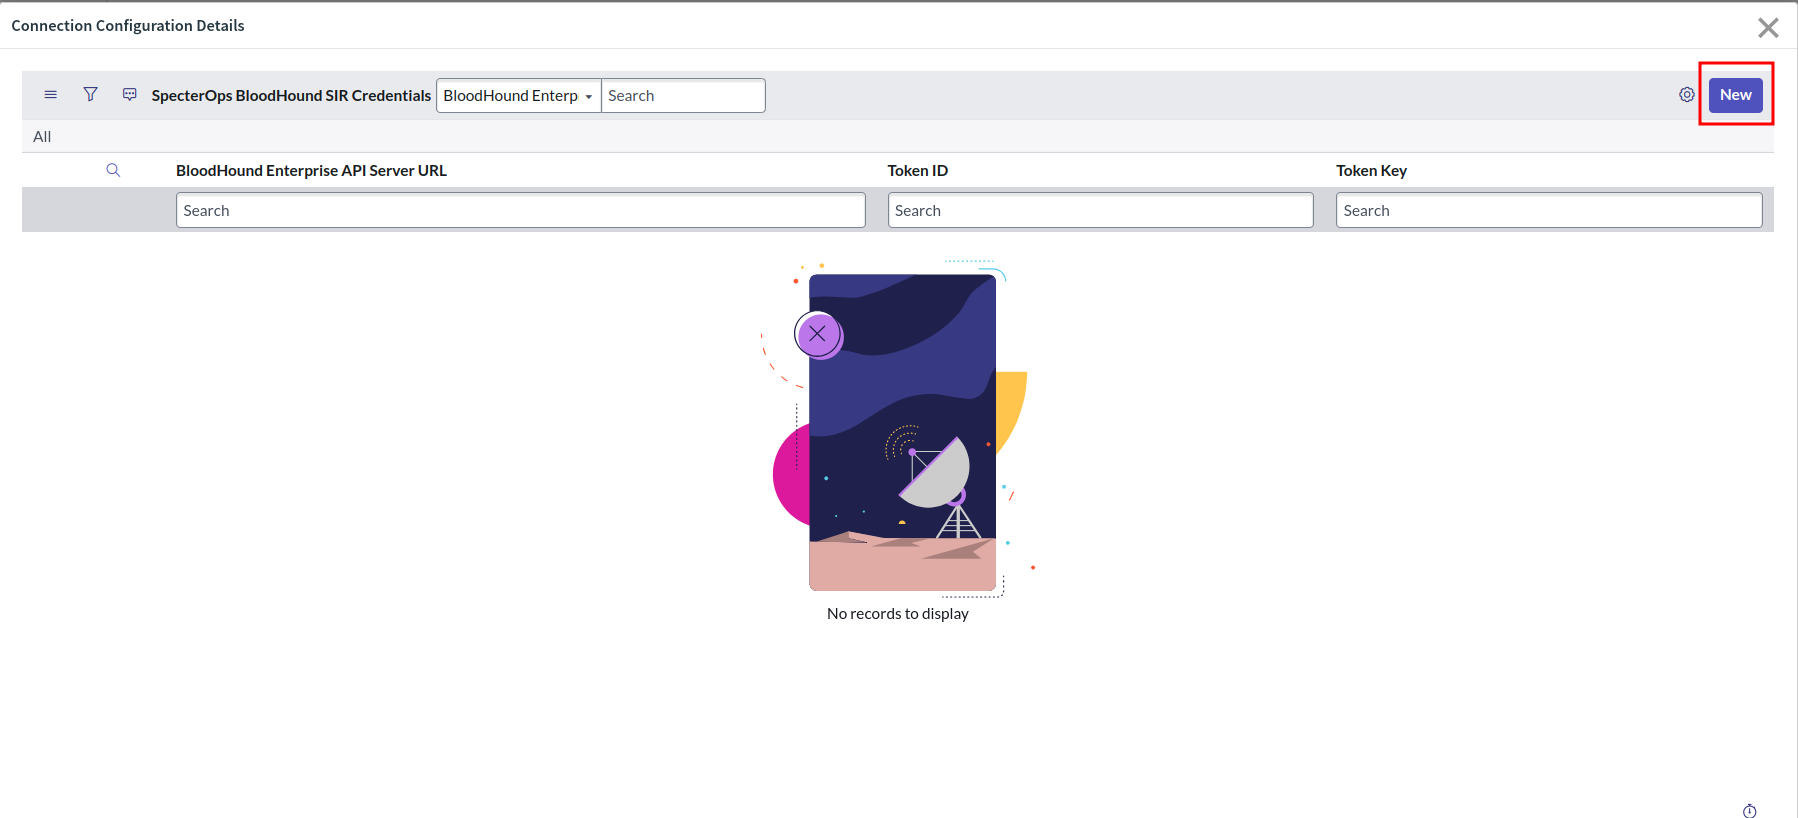
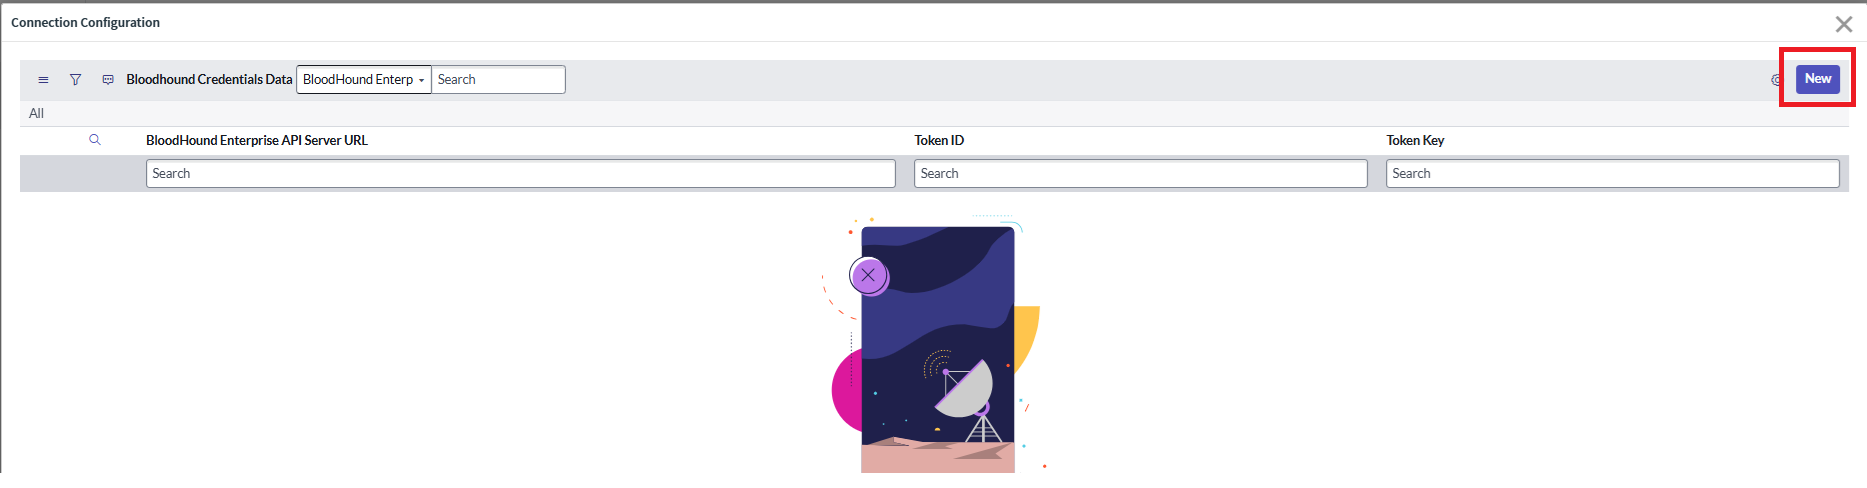
5. Click **New** to add credentials.
{app_1 === 'Security Incident Response Integration with SpecterOps BloodHound' && (
)}
5. Click **New** to add credentials.
{app_1 === 'Security Incident Response Integration with SpecterOps BloodHound' && (
 )}
{app_1 !== 'Security Incident Response Integration with SpecterOps BloodHound' && (
)}
{app_1 !== 'Security Incident Response Integration with SpecterOps BloodHound' && (
 )}
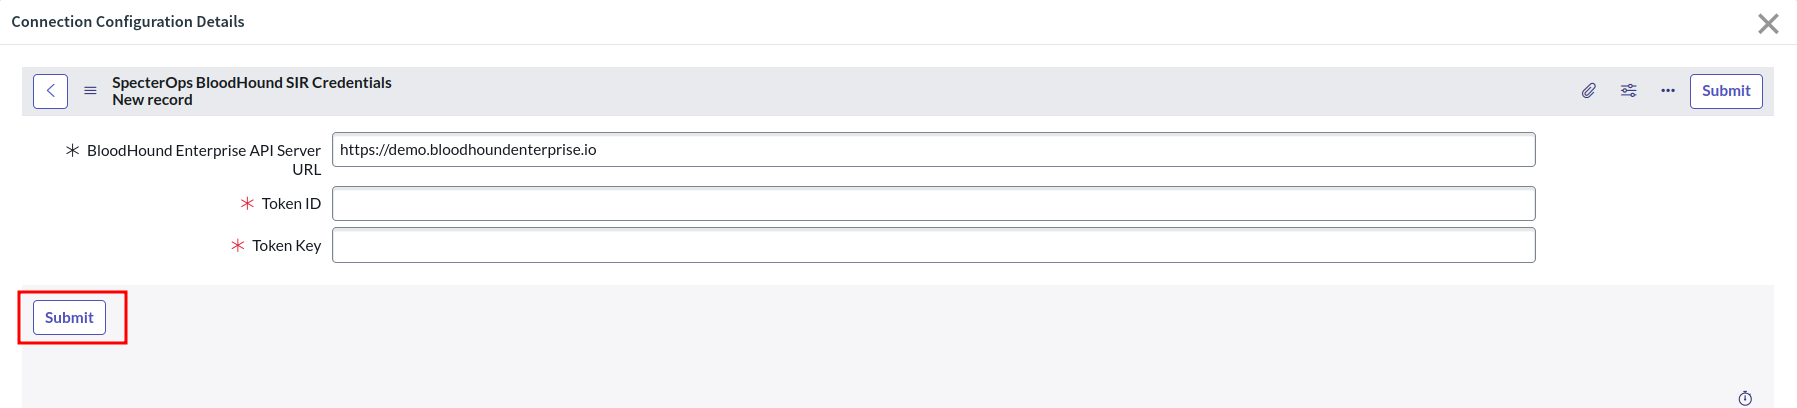
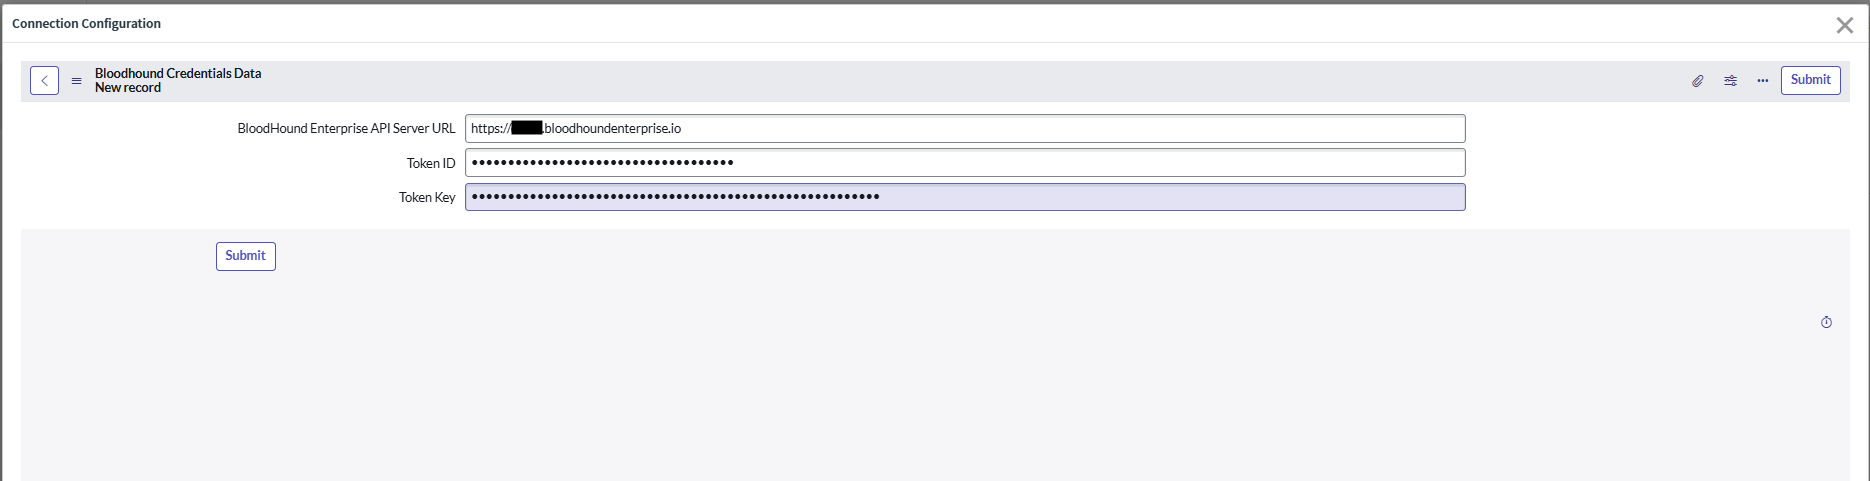
6. Enter your BloodHound Enterprise tenant URL, token key, and token ID and click **Submit**.
The token key and ID refer to the non-personal API key/ID pair you created in BloodHound Enterprise. The tenant URL is the URL you use to access your BloodHound Enterprise tenant.
{app_1 === 'Security Incident Response Integration with SpecterOps BloodHound' && (
)}
6. Enter your BloodHound Enterprise tenant URL, token key, and token ID and click **Submit**.
The token key and ID refer to the non-personal API key/ID pair you created in BloodHound Enterprise. The tenant URL is the URL you use to access your BloodHound Enterprise tenant.
{app_1 === 'Security Incident Response Integration with SpecterOps BloodHound' && (
 )}
{app_1 !== 'Security Incident Response Integration with SpecterOps BloodHound' && (
)}
{app_1 !== 'Security Incident Response Integration with SpecterOps BloodHound' && (
 )}
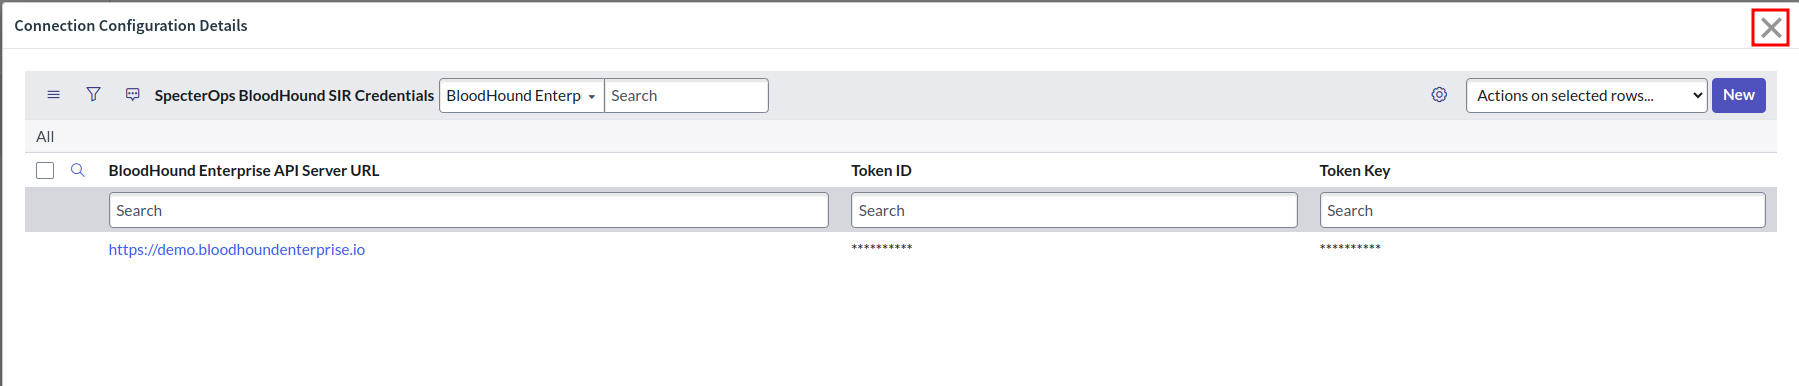
7. Click the (close) icon.
{app_1 === 'Security Incident Response Integration with SpecterOps BloodHound' && (
)}
7. Click the (close) icon.
{app_1 === 'Security Incident Response Integration with SpecterOps BloodHound' && (
 )}
{app_1 !== 'Security Incident Response Integration with SpecterOps BloodHound' && (
)}
{app_1 !== 'Security Incident Response Integration with SpecterOps BloodHound' && (
 )}
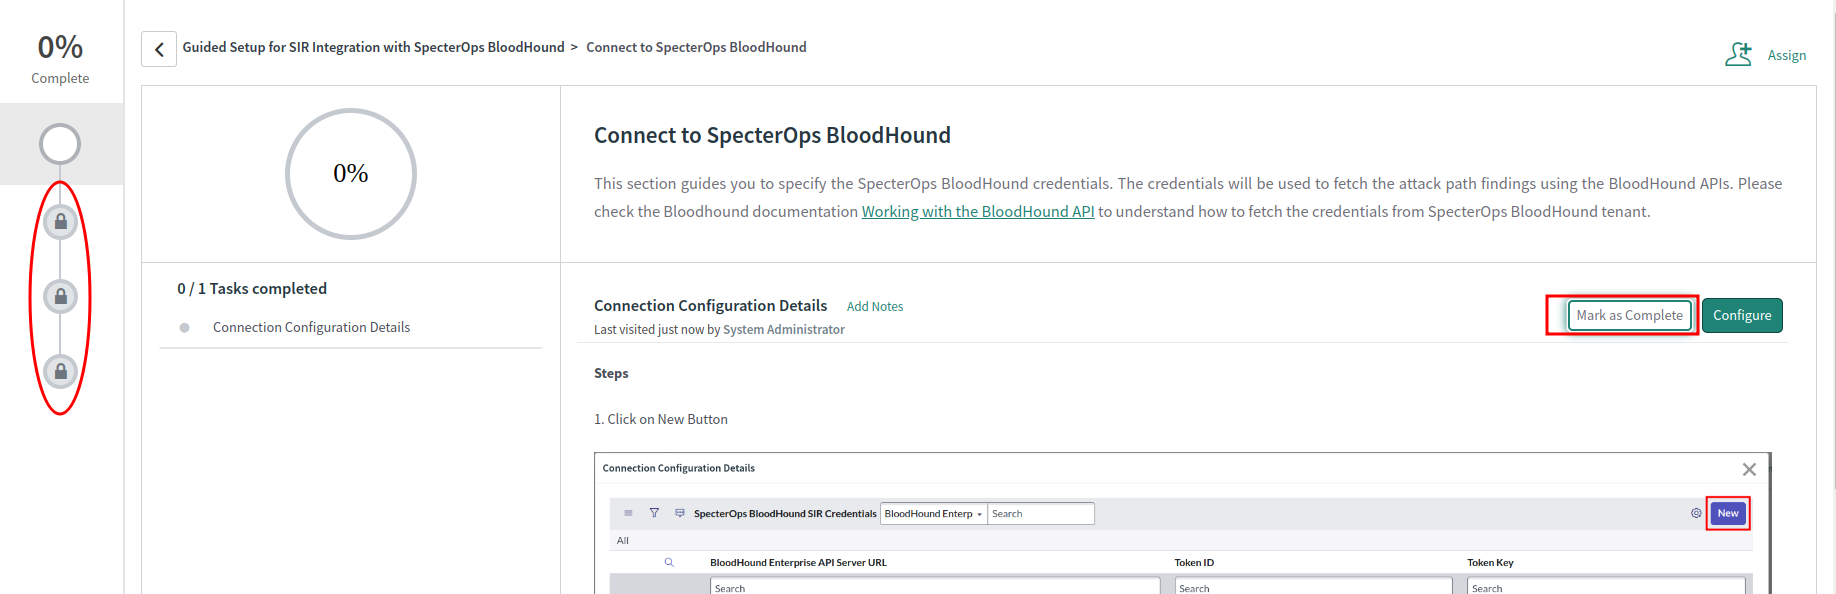
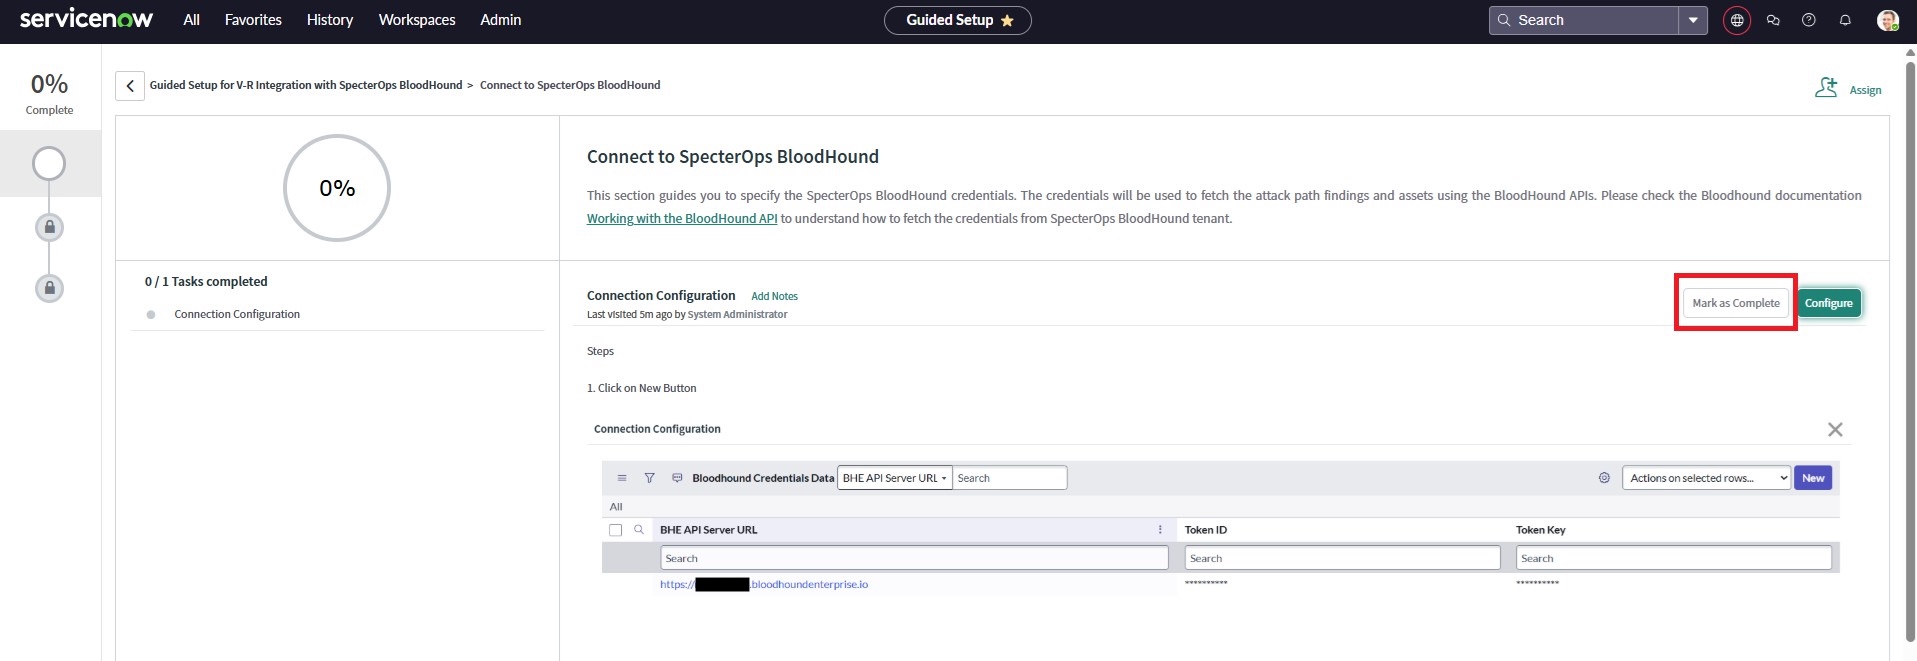
8. Click **Mark as Complete** to proceed to the next configuration step.
{app_1 === 'Security Incident Response Integration with SpecterOps BloodHound' && (
)}
8. Click **Mark as Complete** to proceed to the next configuration step.
{app_1 === 'Security Incident Response Integration with SpecterOps BloodHound' && (
 )}
{app_1 !== 'Security Incident Response Integration with SpecterOps BloodHound' && (
)}
{app_1 !== 'Security Incident Response Integration with SpecterOps BloodHound' && (
 )}
### Filter attack path types
Next, configure filters to specify which attack path findings should create ServiceNow tickets. You can filter by environment and attack type to control the scope of findings that generate incidents.
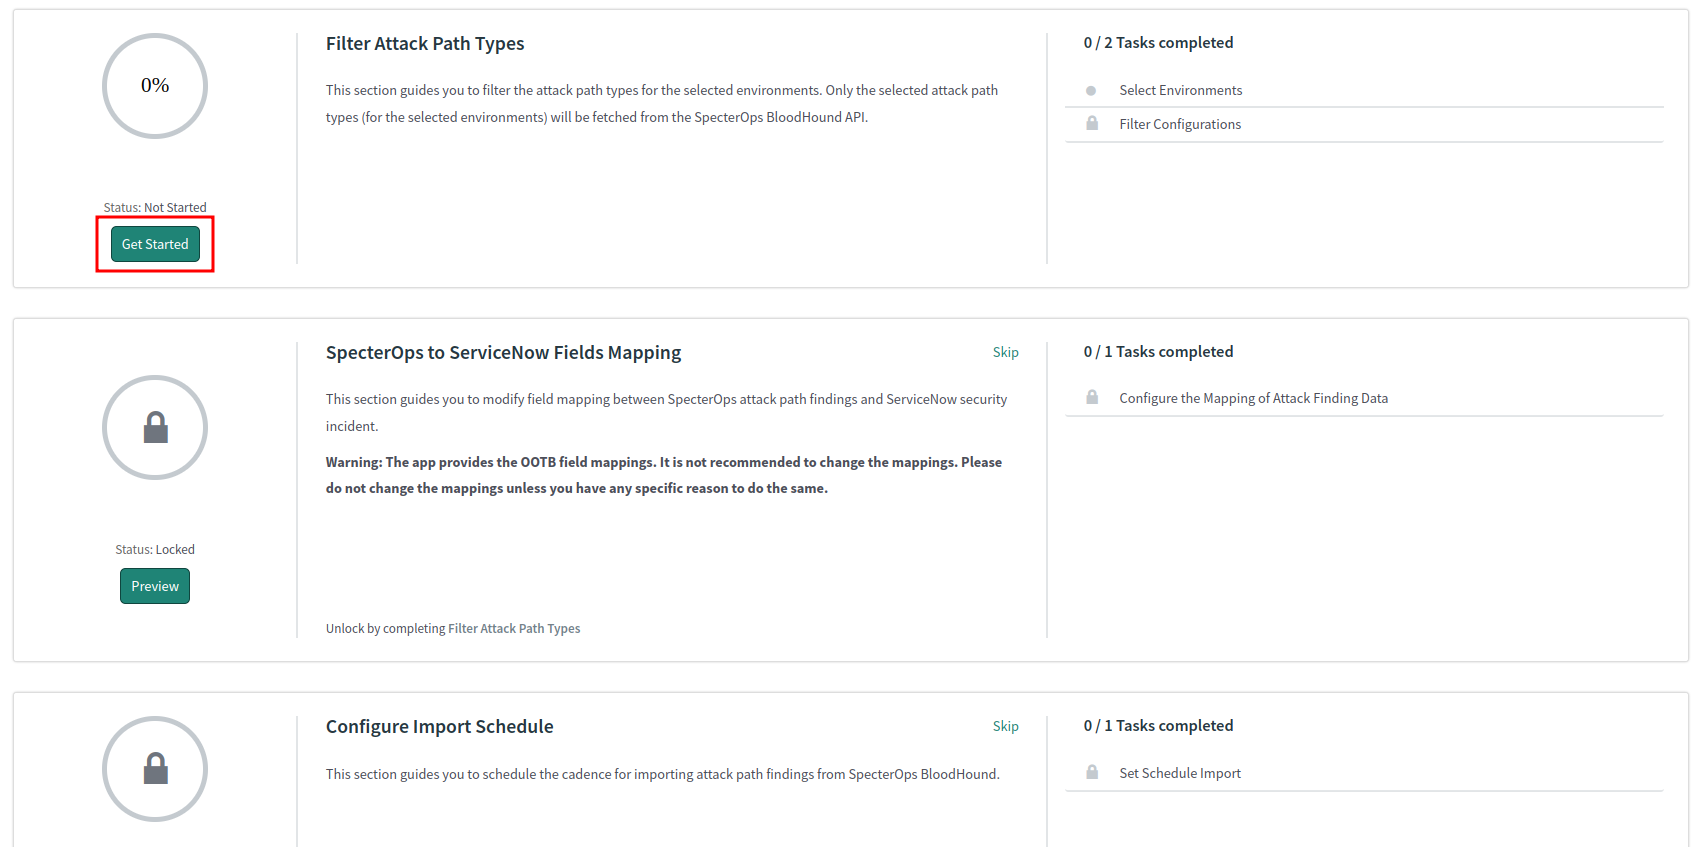
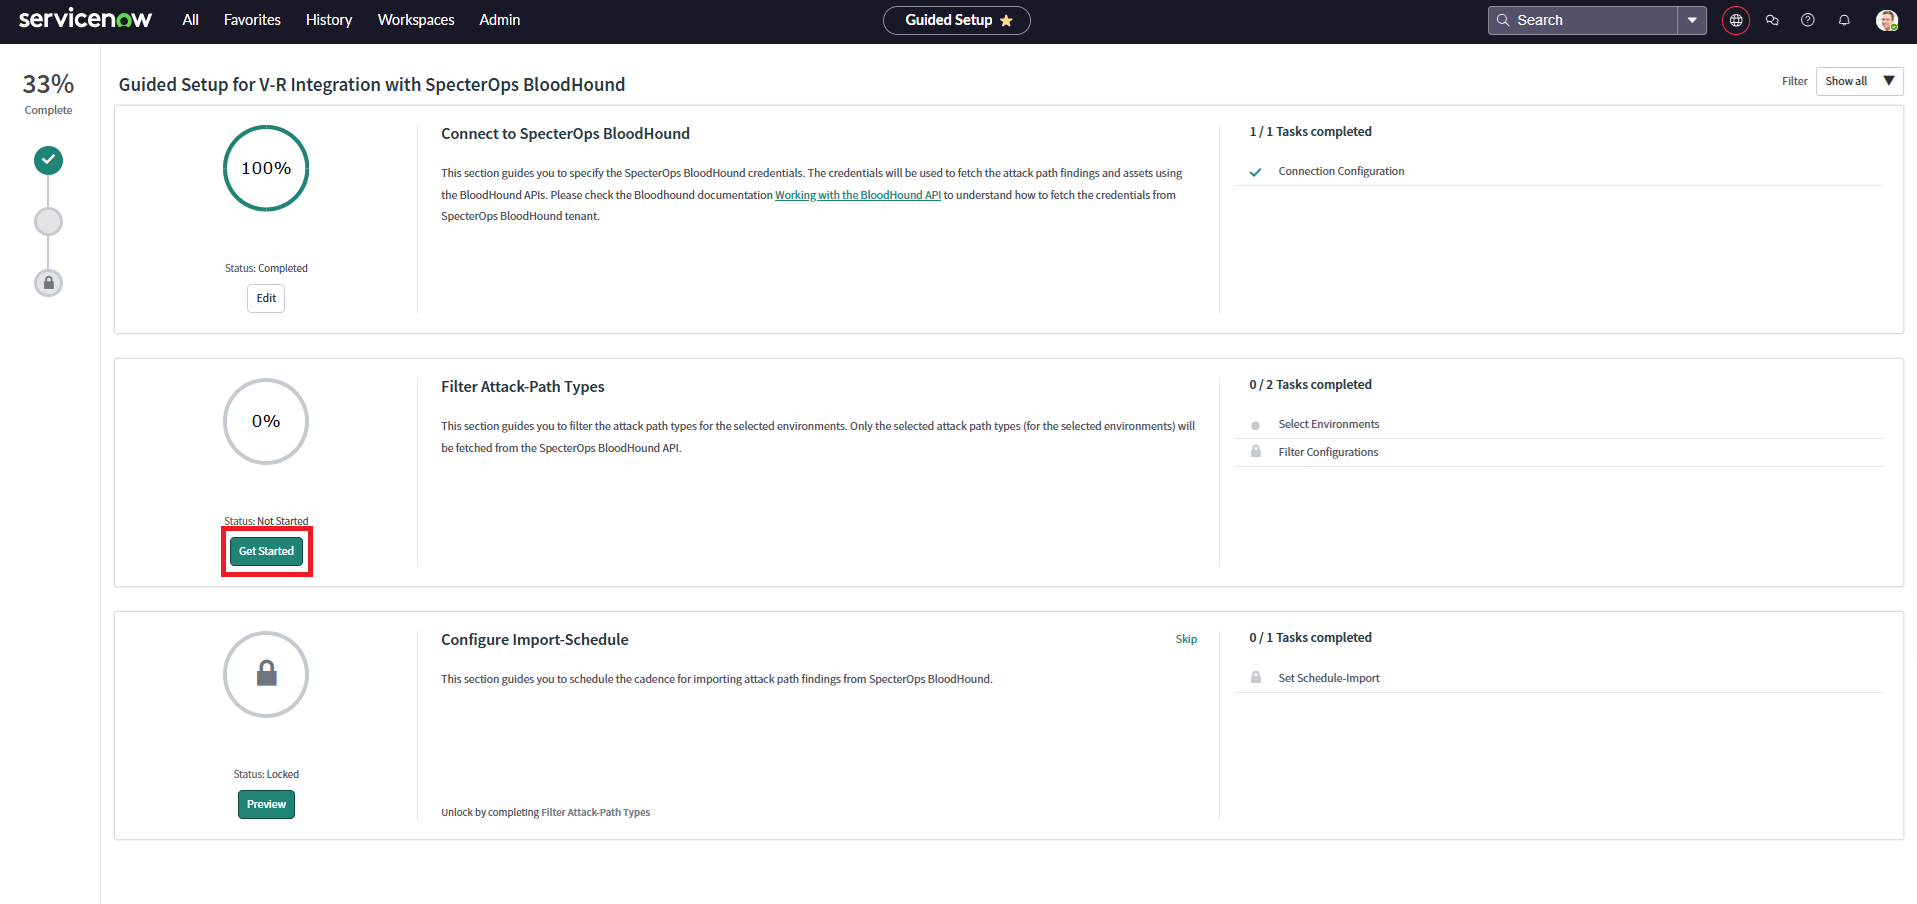
1. Click **Get Started** in the *Filter Attack Path Types* section.
{app_2 === 'Security Incident Response Integration with SpecterOps BloodHound' && (
)}
### Filter attack path types
Next, configure filters to specify which attack path findings should create ServiceNow tickets. You can filter by environment and attack type to control the scope of findings that generate incidents.
1. Click **Get Started** in the *Filter Attack Path Types* section.
{app_2 === 'Security Incident Response Integration with SpecterOps BloodHound' && (
 )}
{app_2 !== 'Security Incident Response Integration with SpecterOps BloodHound' && (
)}
{app_2 !== 'Security Incident Response Integration with SpecterOps BloodHound' && (
 )}
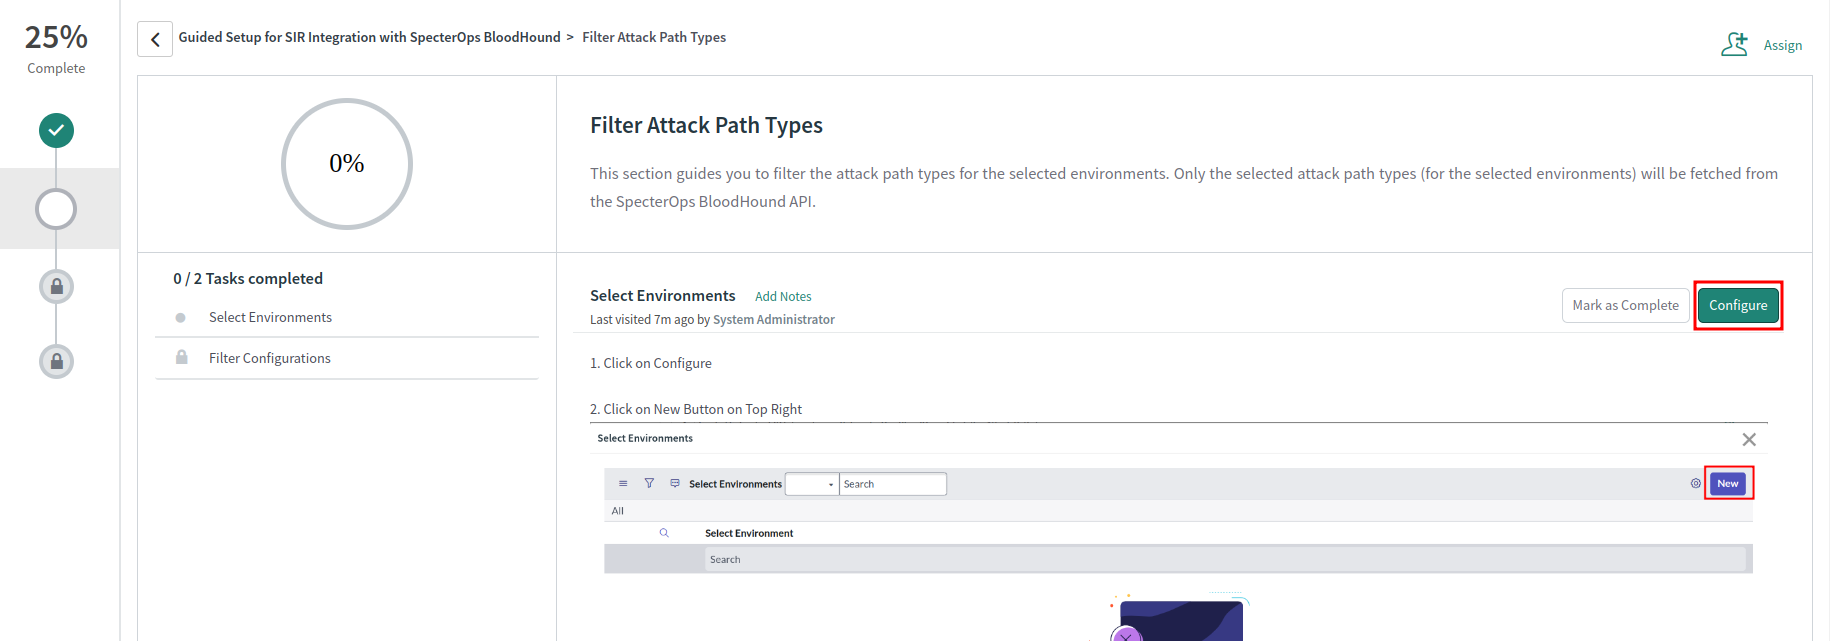
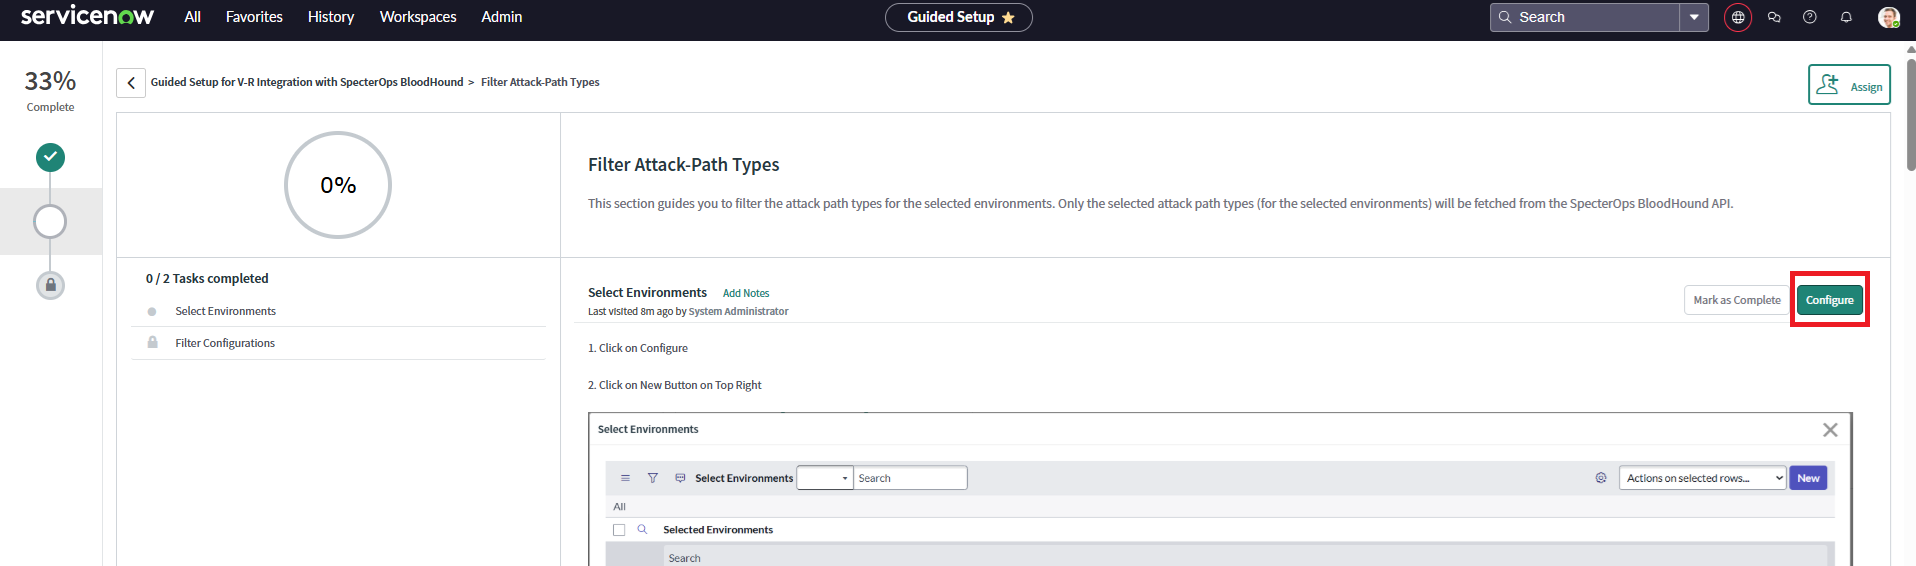
2. Click **Configure** to select environments.
{app_2 === 'Security Incident Response Integration with SpecterOps BloodHound' && (
)}
2. Click **Configure** to select environments.
{app_2 === 'Security Incident Response Integration with SpecterOps BloodHound' && (
 )}
{app_2 !== 'Security Incident Response Integration with SpecterOps BloodHound' && (
)}
{app_2 !== 'Security Incident Response Integration with SpecterOps BloodHound' && (
 )}
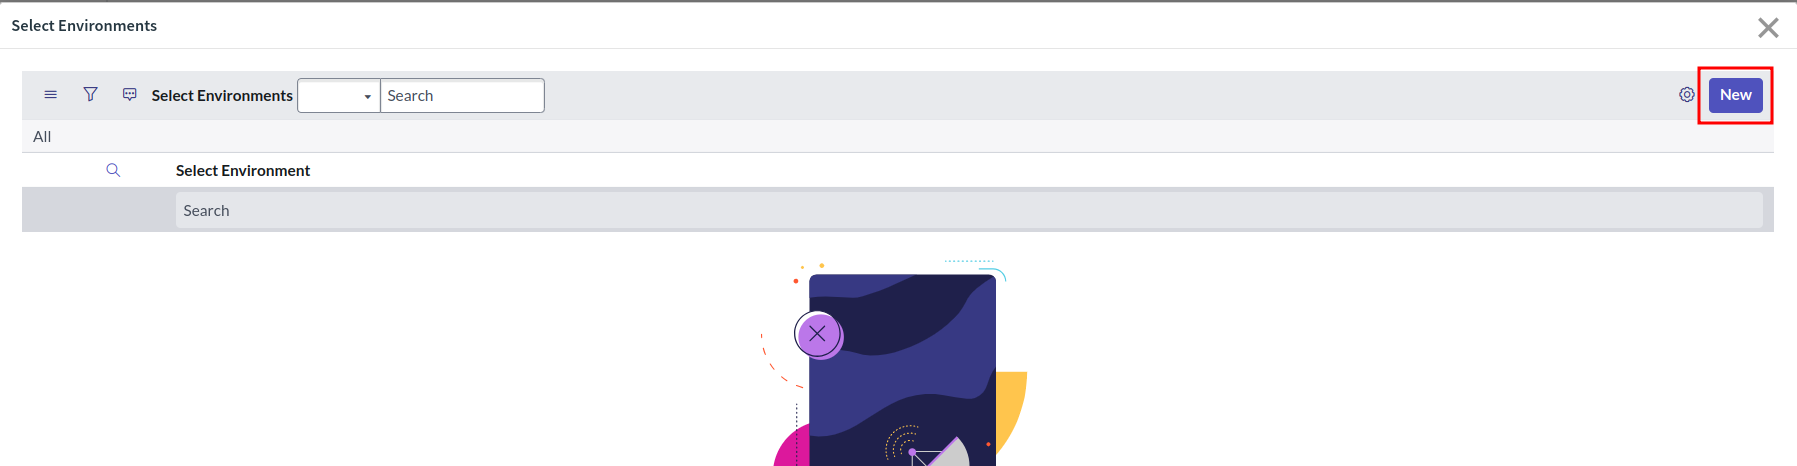
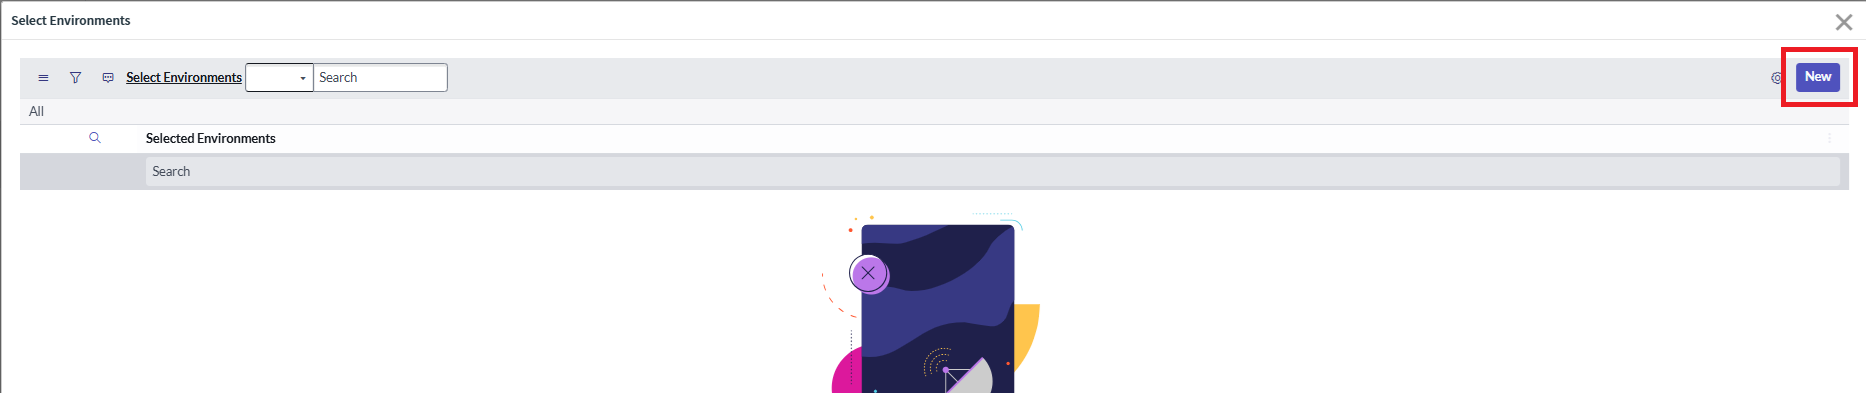
3. Click **New**.
{app_2 === 'Security Incident Response Integration with SpecterOps BloodHound' && (
)}
3. Click **New**.
{app_2 === 'Security Incident Response Integration with SpecterOps BloodHound' && (
 )}
{app_2 !== 'Security Incident Response Integration with SpecterOps BloodHound' && (
)}
{app_2 !== 'Security Incident Response Integration with SpecterOps BloodHound' && (
 )}
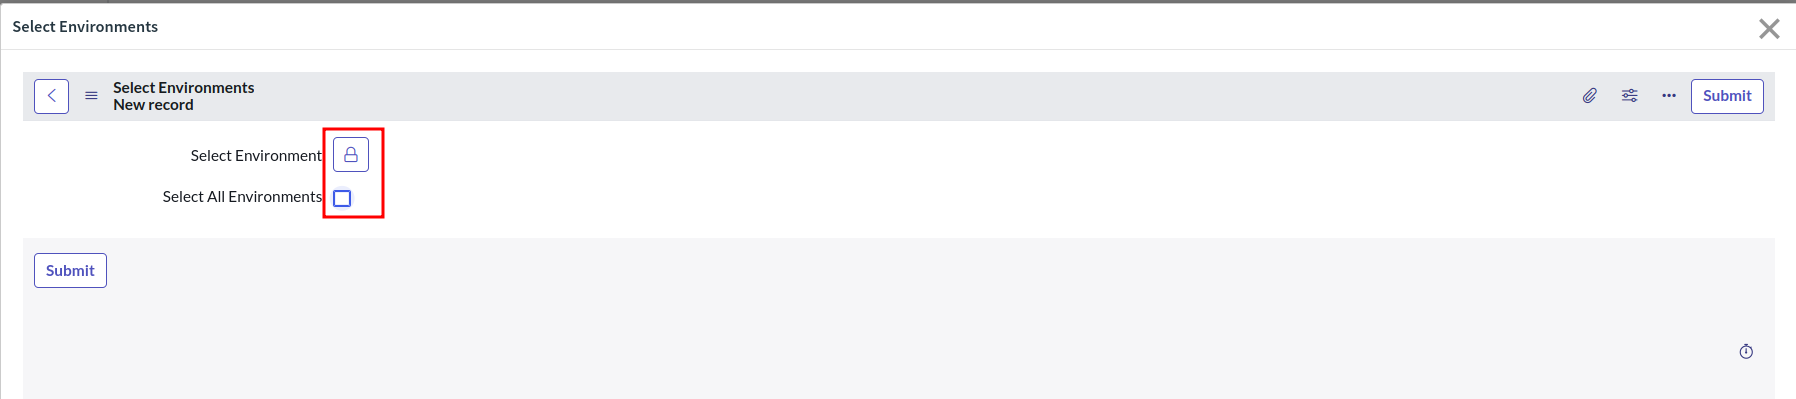
4. Click the (lock) icon to select a single environment.
{app_2 === 'Security Incident Response Integration with SpecterOps BloodHound' && (
)}
4. Click the (lock) icon to select a single environment.
{app_2 === 'Security Incident Response Integration with SpecterOps BloodHound' && (
 )}
{app_2 !== 'Security Incident Response Integration with SpecterOps BloodHound' && (
)}
{app_2 !== 'Security Incident Response Integration with SpecterOps BloodHound' && (
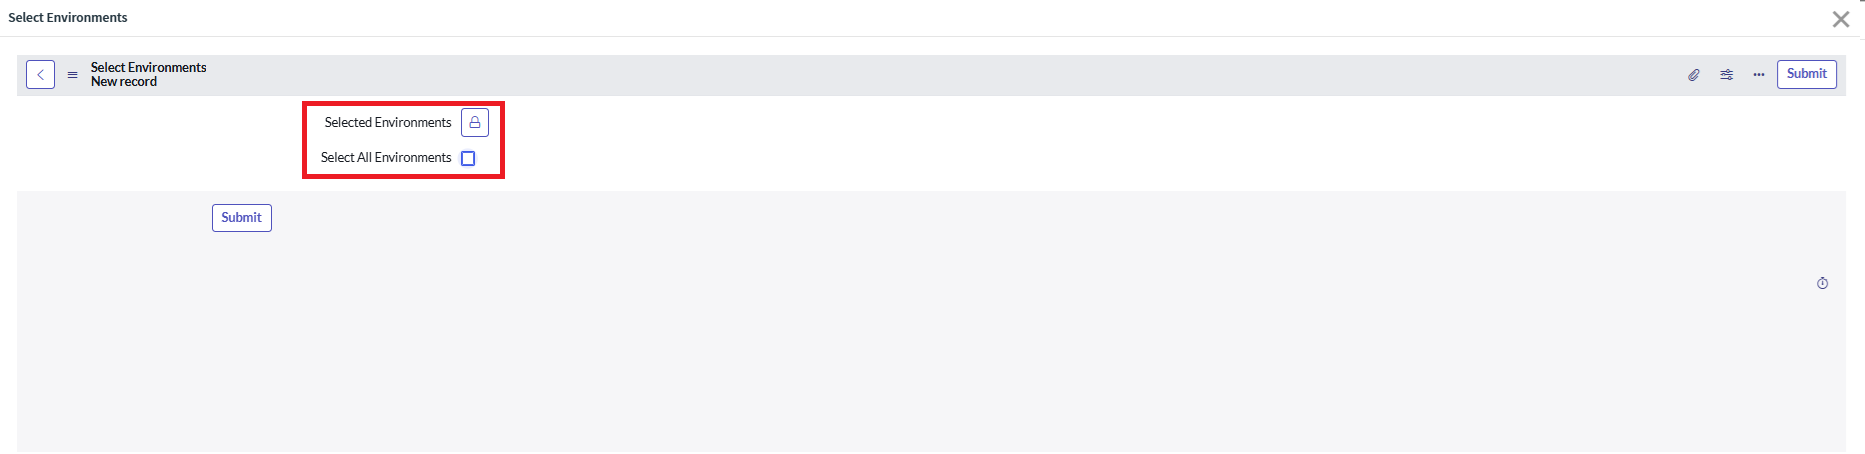 )}
Alternatively, click the **Select All Environments** checkbox to indiscriminately select *all* environments.
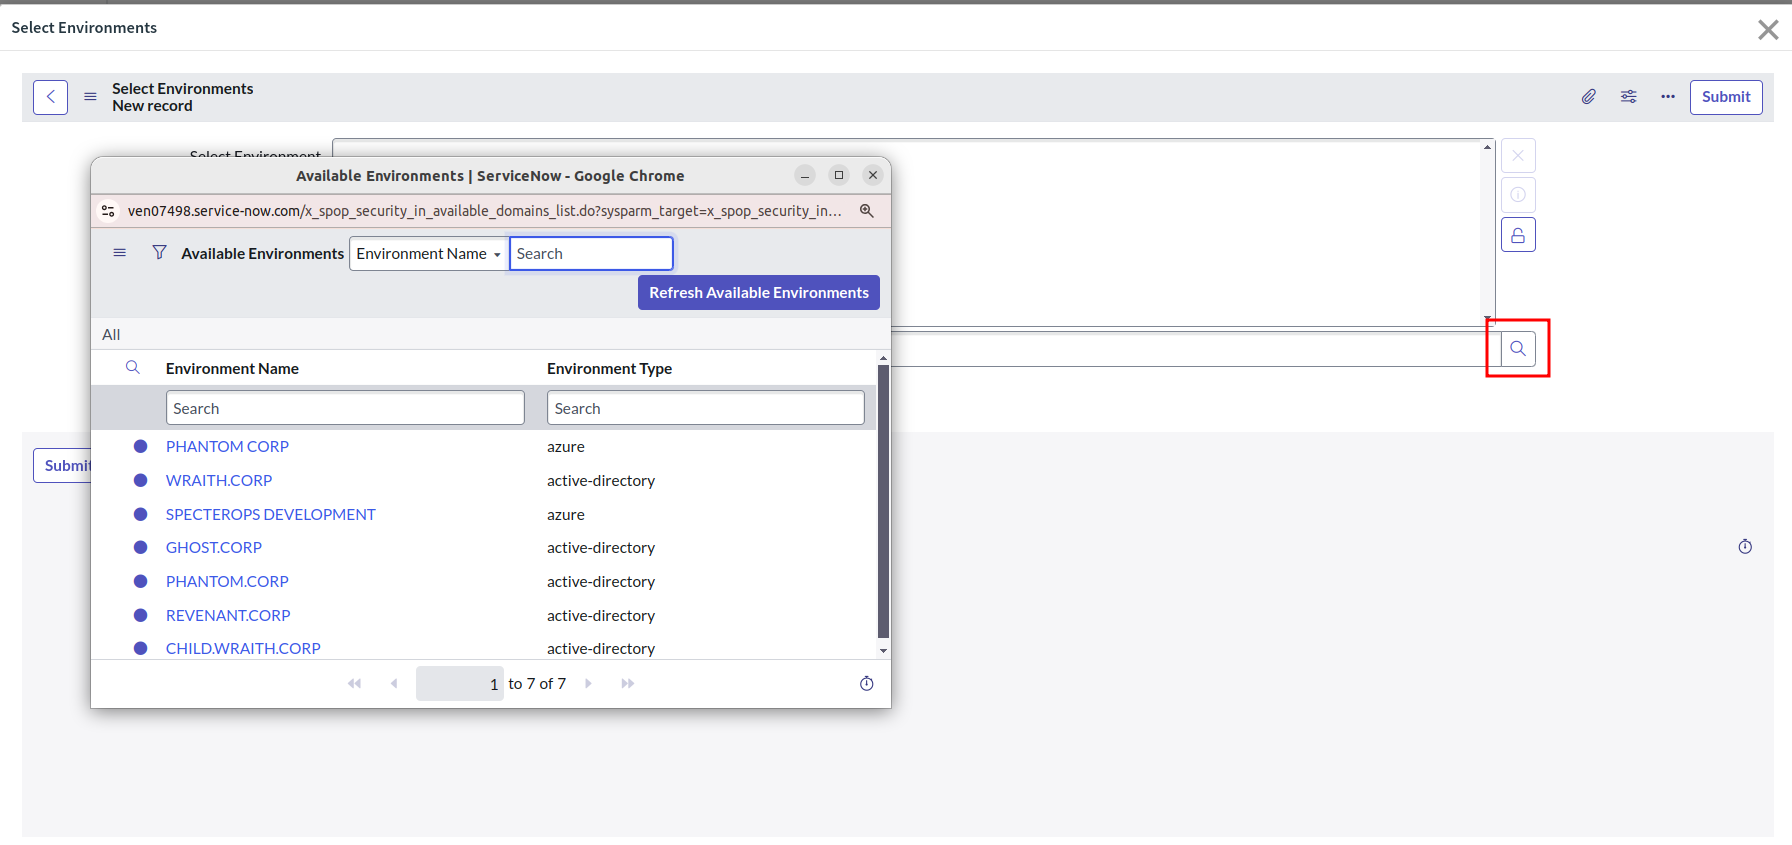
5. After clicking the (lock) icon, click the (search) icon to display a list of available environments.
{app_2 === 'Security Incident Response Integration with SpecterOps BloodHound' && (
)}
Alternatively, click the **Select All Environments** checkbox to indiscriminately select *all* environments.
5. After clicking the (lock) icon, click the (search) icon to display a list of available environments.
{app_2 === 'Security Incident Response Integration with SpecterOps BloodHound' && (
 )}
{app_2 !== 'Security Incident Response Integration with SpecterOps BloodHound' && (
)}
{app_2 !== 'Security Incident Response Integration with SpecterOps BloodHound' && (
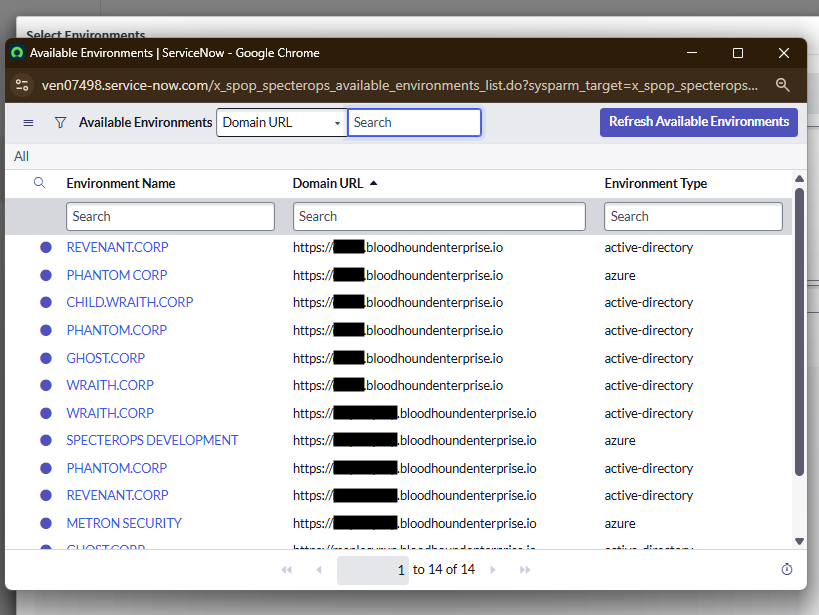 )}
6. Click an environment to select it.
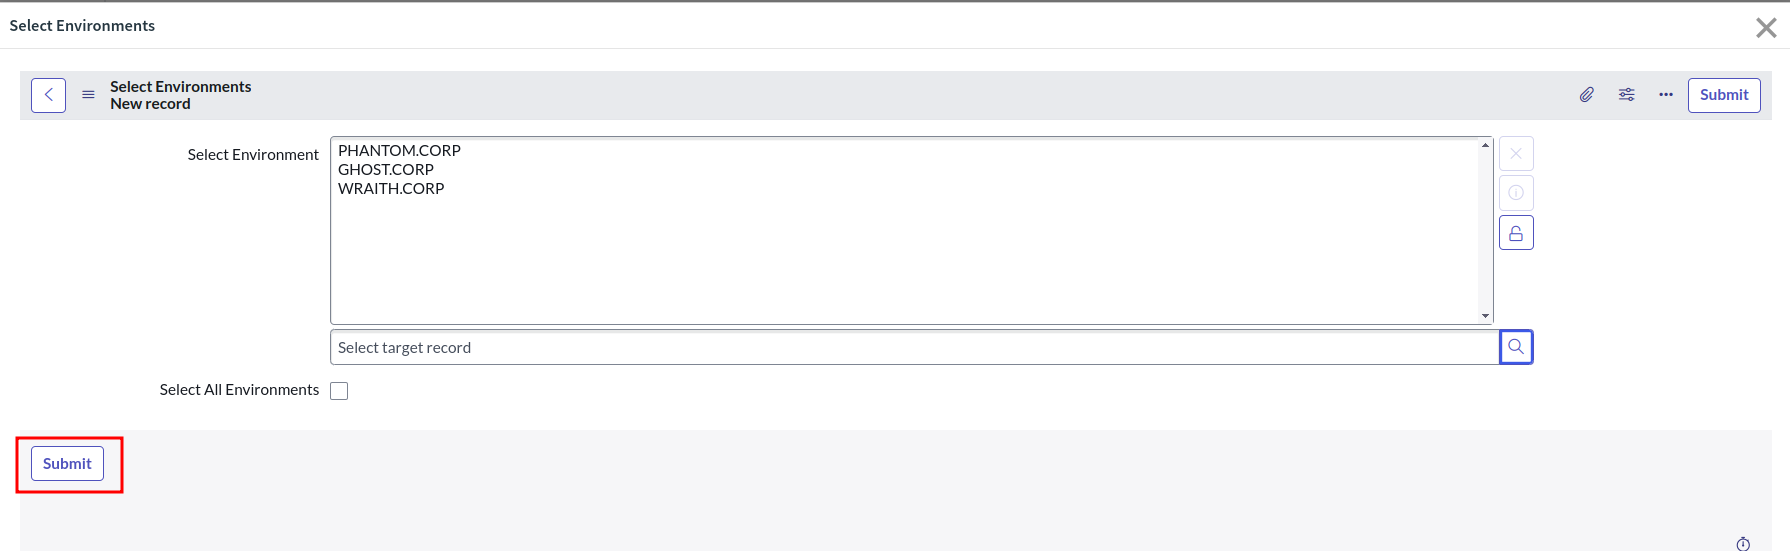
You must repeat steps 4-6 for each environment that you want to include.
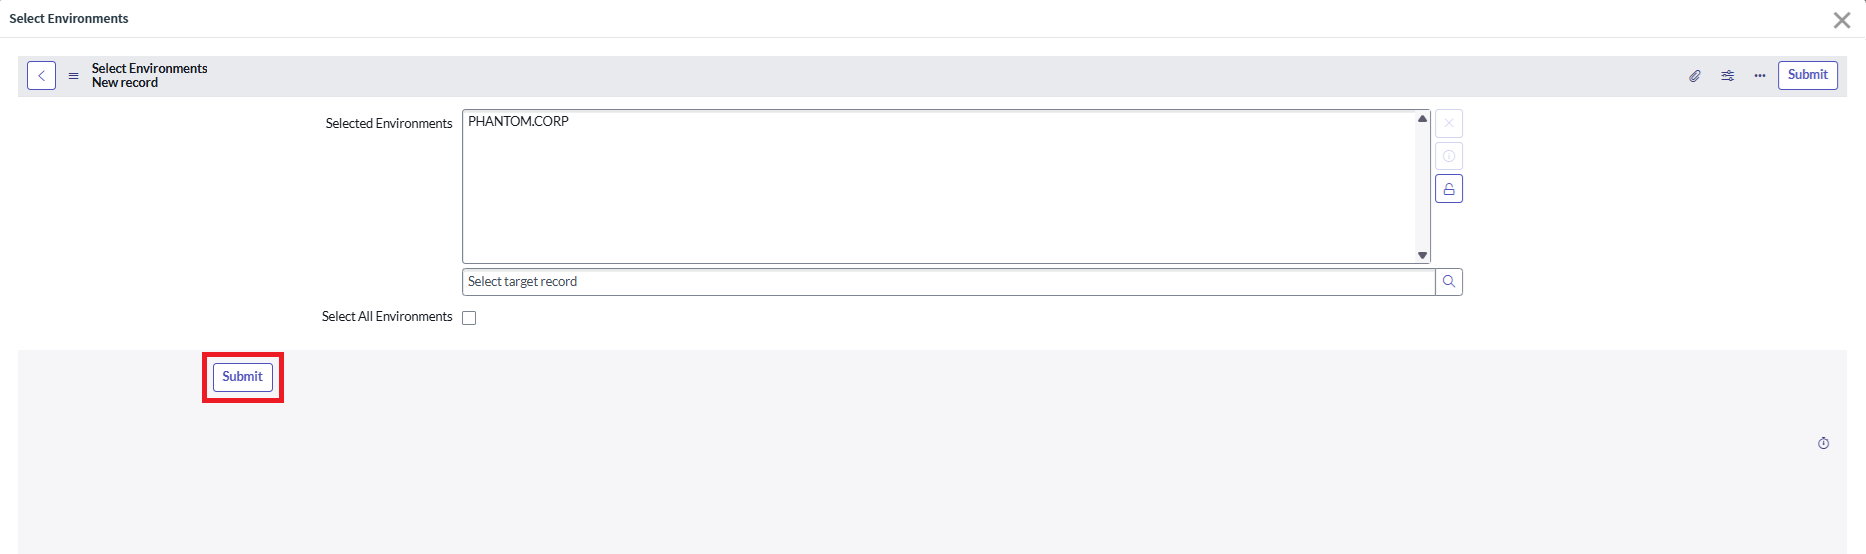
7. After selecting all required environments, click **Submit**.
{app_2 === 'Security Incident Response Integration with SpecterOps BloodHound' && (
)}
6. Click an environment to select it.
You must repeat steps 4-6 for each environment that you want to include.
7. After selecting all required environments, click **Submit**.
{app_2 === 'Security Incident Response Integration with SpecterOps BloodHound' && (
 )}
{app_2 !== 'Security Incident Response Integration with SpecterOps BloodHound' && (
)}
{app_2 !== 'Security Incident Response Integration with SpecterOps BloodHound' && (
 )}
8. Click the (close) icon.
9. Click **Mark as Complete**.
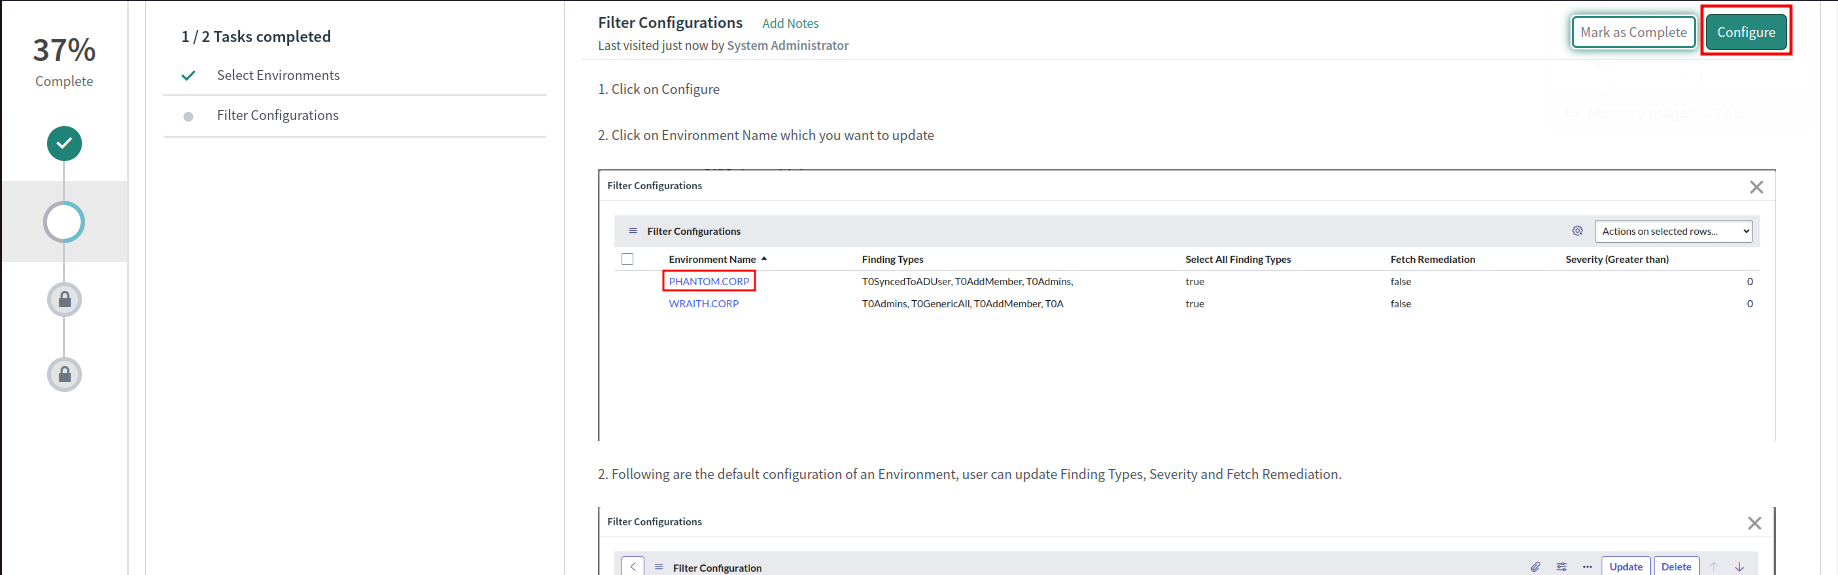
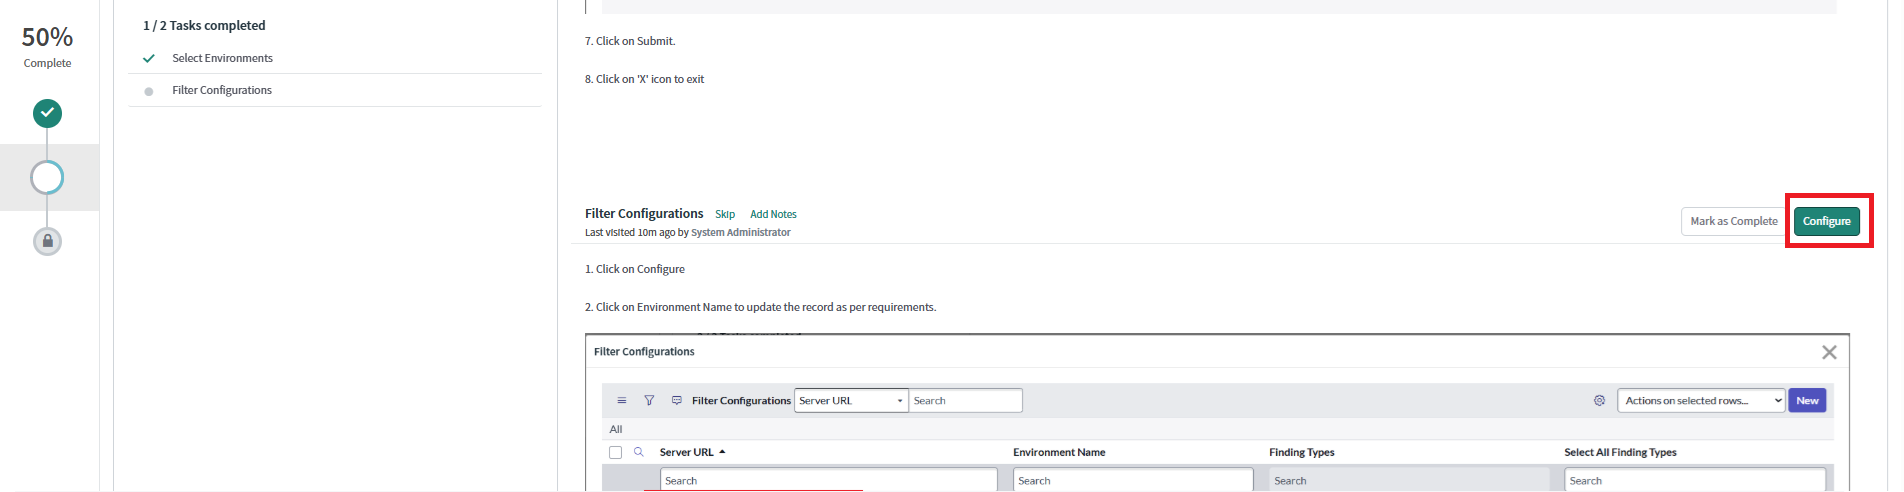
10. Scroll down the page to the *Filter Configuration* section and click **Configure**.
{app_2 === 'Security Incident Response Integration with SpecterOps BloodHound' && (
)}
8. Click the (close) icon.
9. Click **Mark as Complete**.
10. Scroll down the page to the *Filter Configuration* section and click **Configure**.
{app_2 === 'Security Incident Response Integration with SpecterOps BloodHound' && (
 )}
{app_2 !== 'Security Incident Response Integration with SpecterOps BloodHound' && (
)}
{app_2 !== 'Security Incident Response Integration with SpecterOps BloodHound' && (
 )}
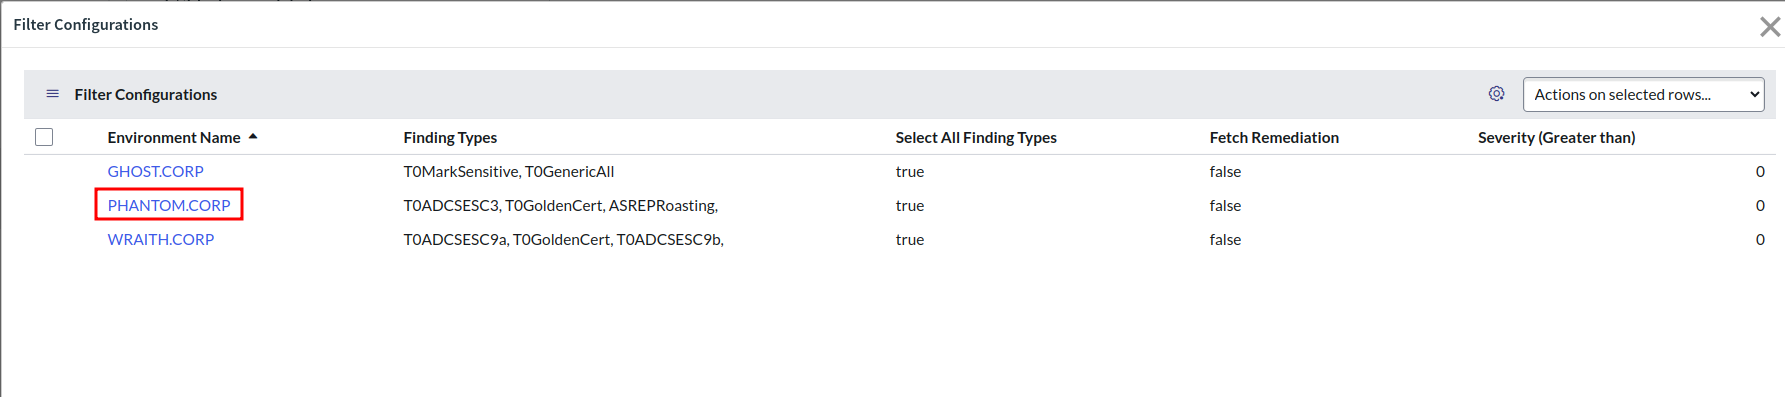
11. Click an environment to update the default configuration.
{app_2 === 'Security Incident Response Integration with SpecterOps BloodHound' && (
)}
11. Click an environment to update the default configuration.
{app_2 === 'Security Incident Response Integration with SpecterOps BloodHound' && (
 )}
{app_2 !== 'Security Incident Response Integration with SpecterOps BloodHound' && (
)}
{app_2 !== 'Security Incident Response Integration with SpecterOps BloodHound' && (
 )}
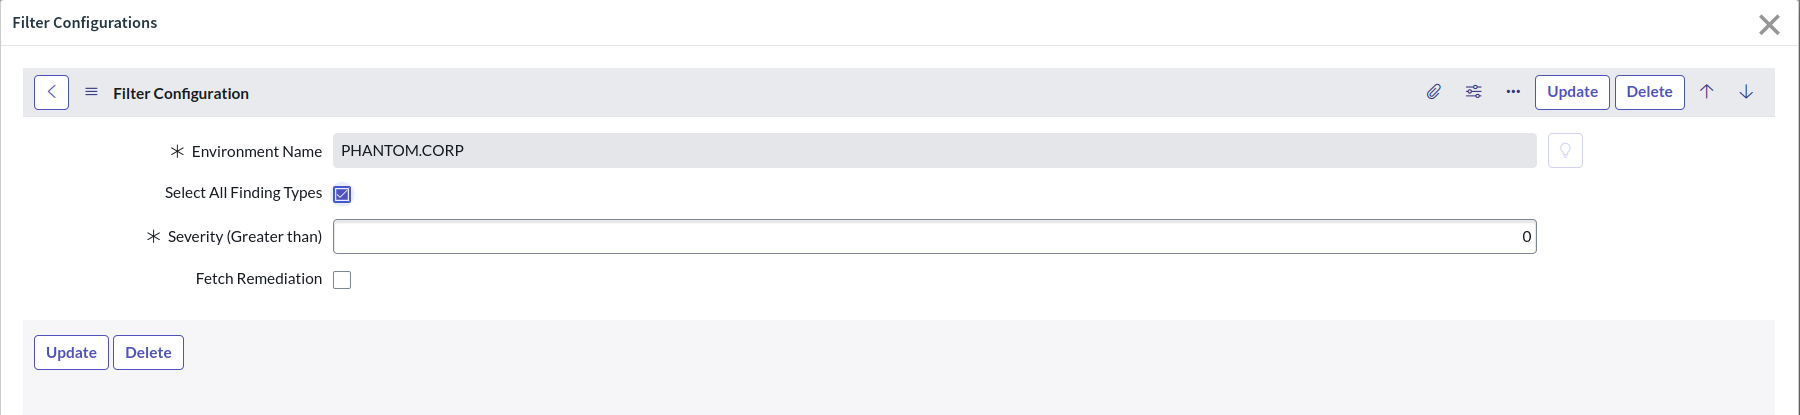
12. Edit the fields as required.
{app_2 === 'Security Incident Response Integration with SpecterOps BloodHound' && (
)}
12. Edit the fields as required.
{app_2 === 'Security Incident Response Integration with SpecterOps BloodHound' && (
 )}
{app_2 !== 'Security Incident Response Integration with SpecterOps BloodHound' && (
)}
{app_2 !== 'Security Incident Response Integration with SpecterOps BloodHound' && (
 )}
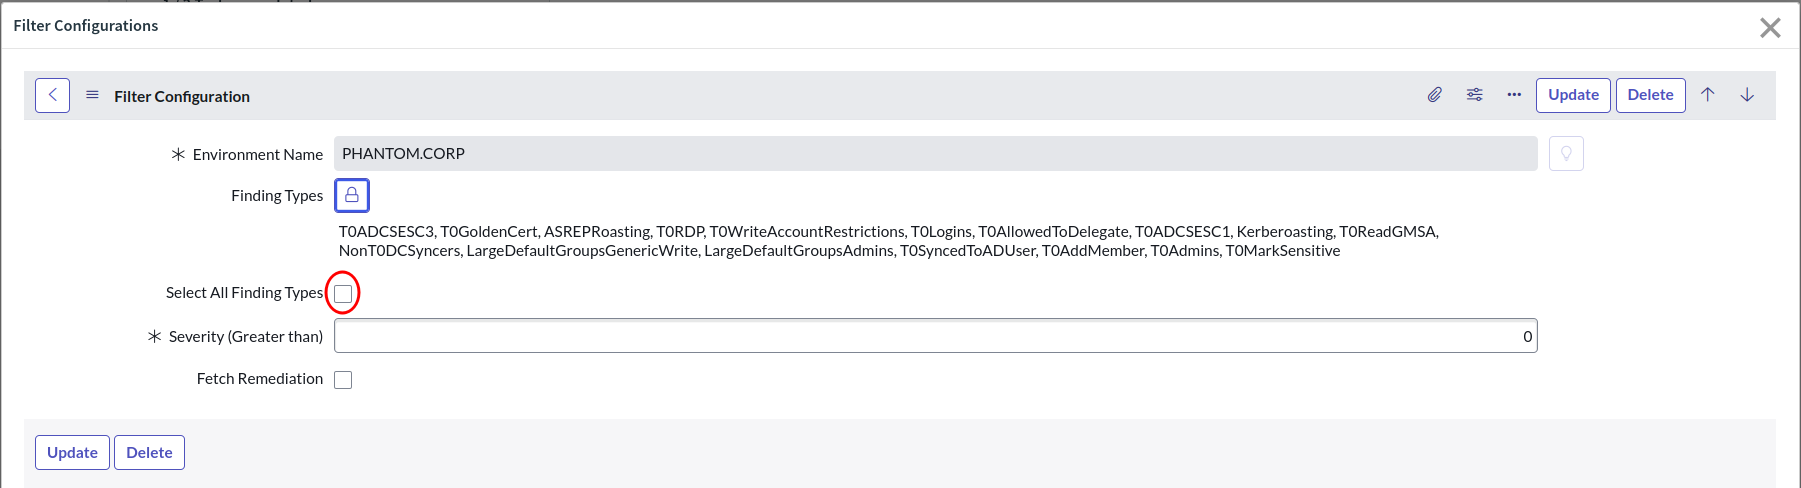
13. Click the **Select All Attack Types** checkbox to update finding types.
{app_2 === 'Security Incident Response Integration with SpecterOps BloodHound' && (
)}
13. Click the **Select All Attack Types** checkbox to update finding types.
{app_2 === 'Security Incident Response Integration with SpecterOps BloodHound' && (
 )}
{app_2 !== 'Security Incident Response Integration with SpecterOps BloodHound' && (
)}
{app_2 !== 'Security Incident Response Integration with SpecterOps BloodHound' && (
 )}
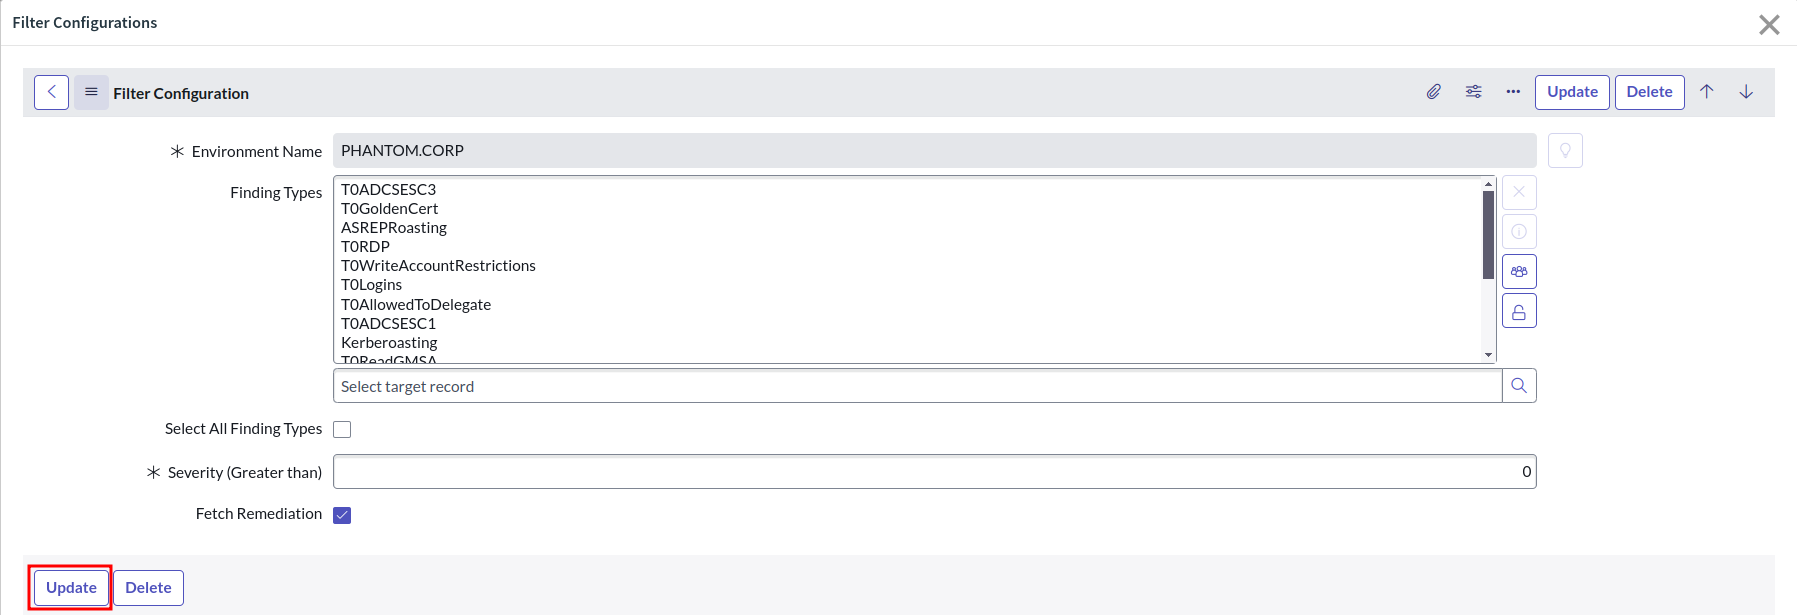
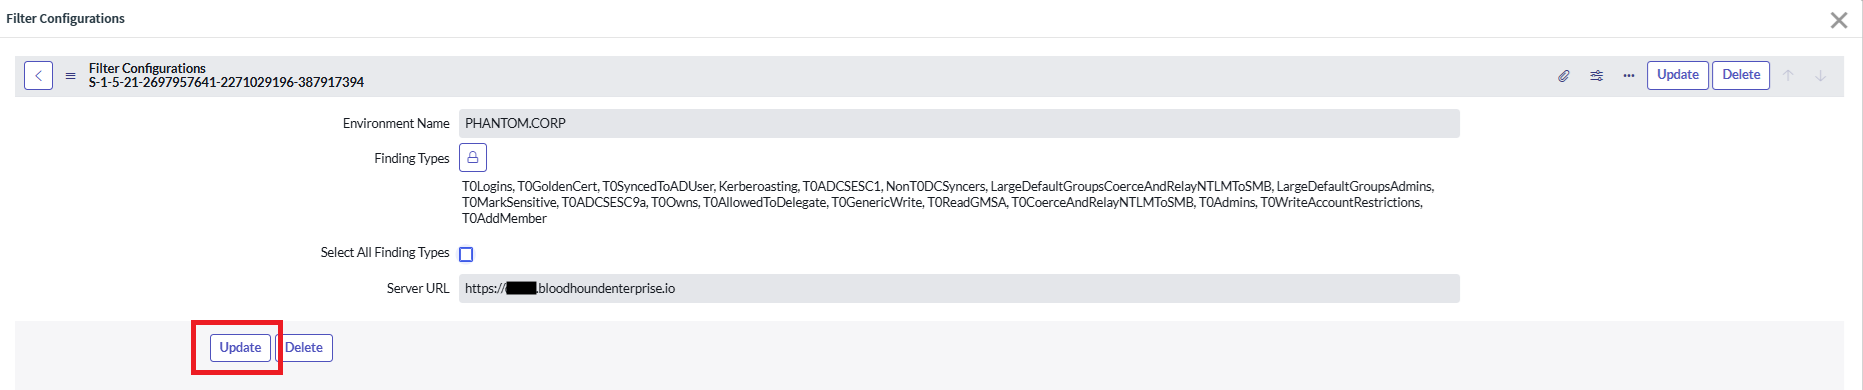
14. Click **Update** to save the configuration.
{app_2 === 'Security Incident Response Integration with SpecterOps BloodHound' && (
)}
14. Click **Update** to save the configuration.
{app_2 === 'Security Incident Response Integration with SpecterOps BloodHound' && (
 )}
{app_2 !== 'Security Incident Response Integration with SpecterOps BloodHound' && (
)}
{app_2 !== 'Security Incident Response Integration with SpecterOps BloodHound' && (
 )}
15. Click the (close) icon.
16. Click **Mark as Complete**.
### Configure field mapping
Field mapping allows you to specify how BloodHound Enterprise attack path finding fields map to ServiceNow SIR ticket fields. You can use the default mapping or customize it as needed.
1. Click **Get Started** in the *SpecterOps to ServiceNow Field Mapping* section.
)}
15. Click the (close) icon.
16. Click **Mark as Complete**.
### Configure field mapping
Field mapping allows you to specify how BloodHound Enterprise attack path finding fields map to ServiceNow SIR ticket fields. You can use the default mapping or customize it as needed.
1. Click **Get Started** in the *SpecterOps to ServiceNow Field Mapping* section.
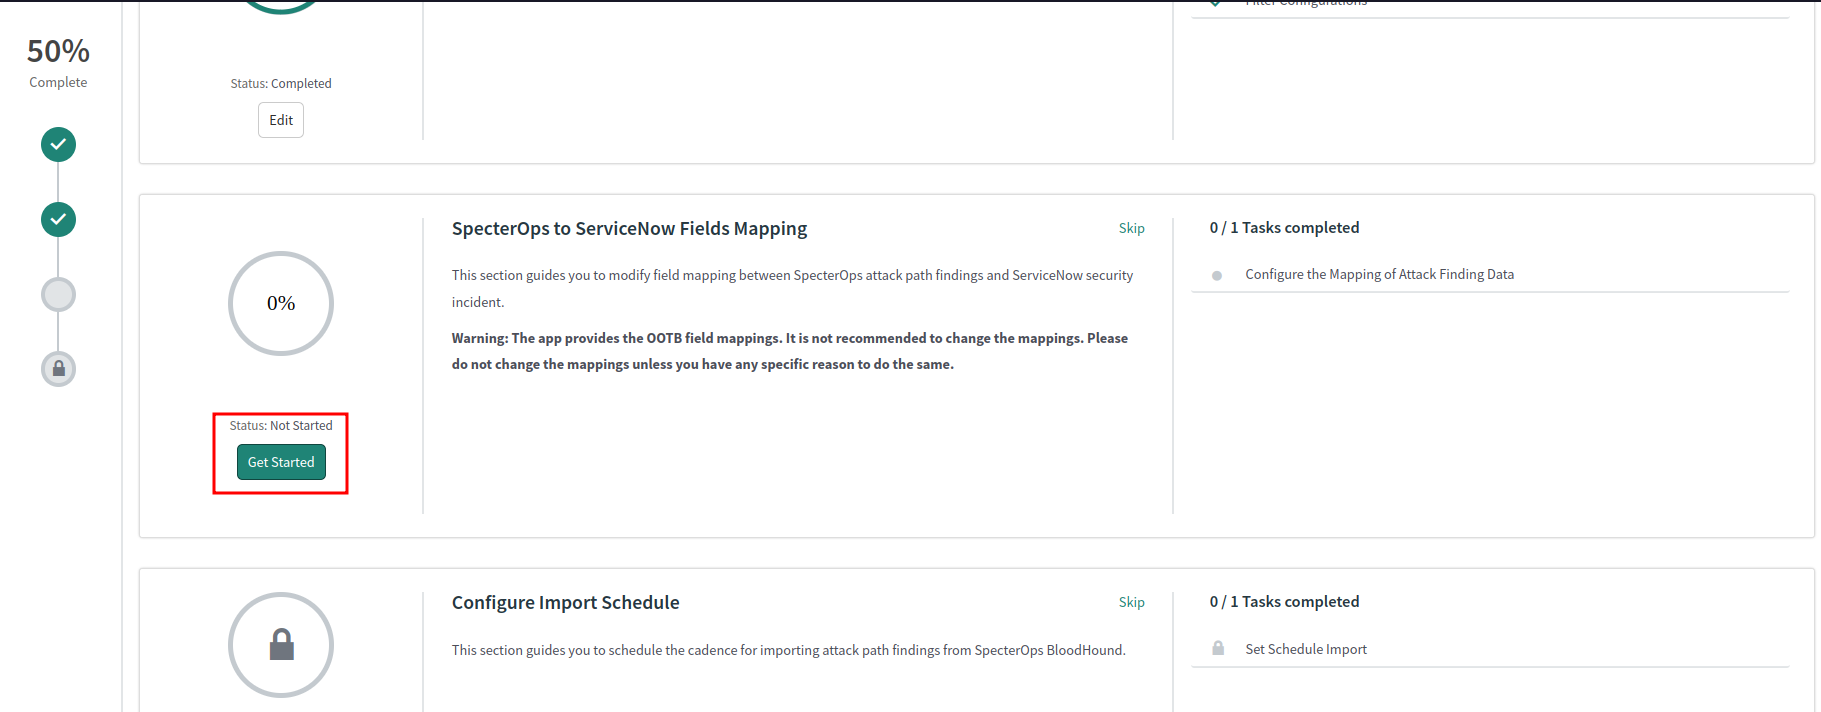 2. Click **Configure** to review the mapping. Update it if necessary, or use the default mapping.
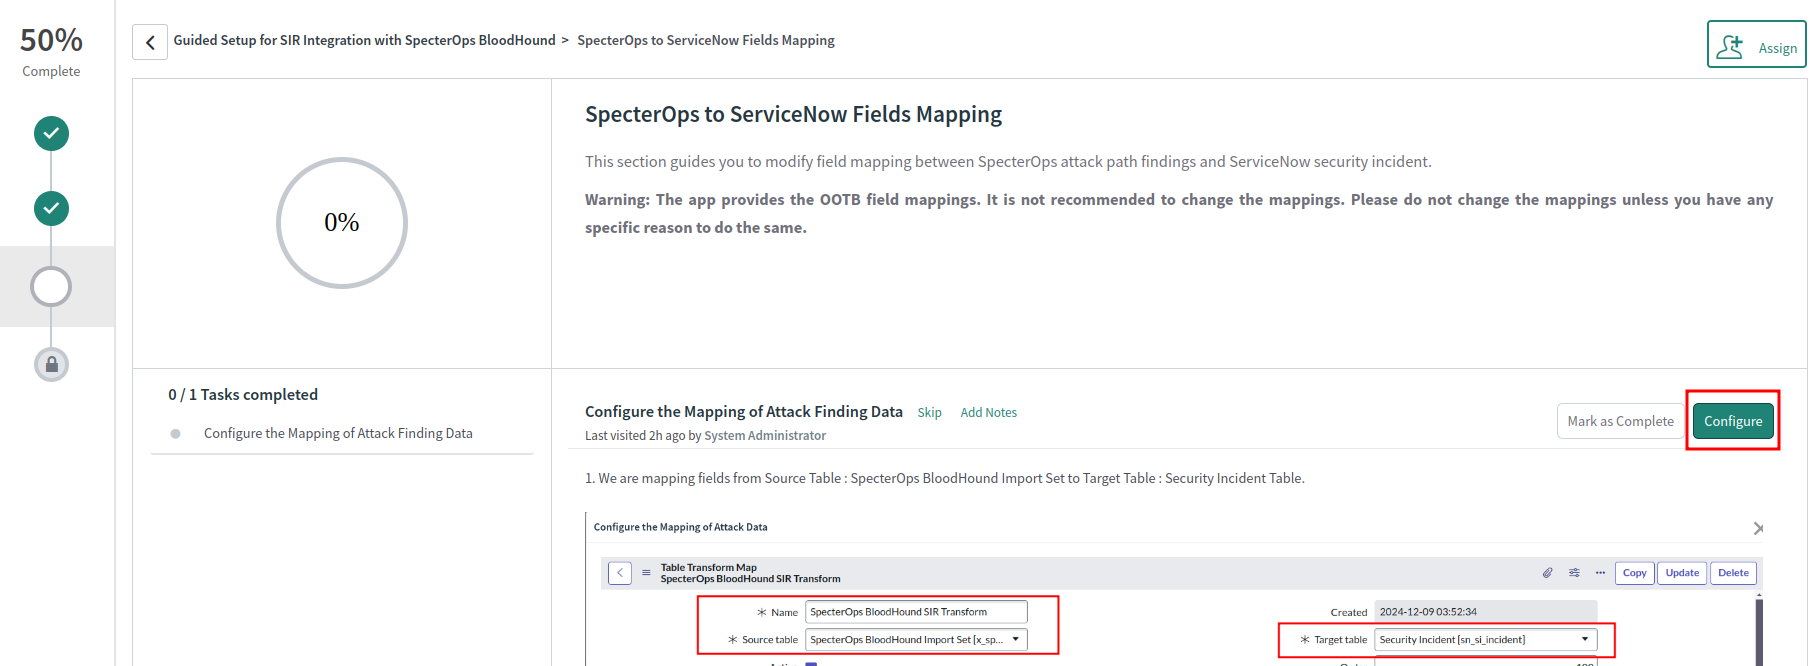 The following table describes the default field mapping:
| **SpecterOps BloodHound Fields** | **ServiceNow SIR Fields** |
| -------------------------------- | ------------------------- |
| id | correlation id |
| composite risk | risk score |
| description + remediation | description |
| domain name + title + id | short description |
| from principal | contact type |
| server url | external url |
3. Click the (close) icon.
4. Click **Mark as Complete**.
### Configure import schedule
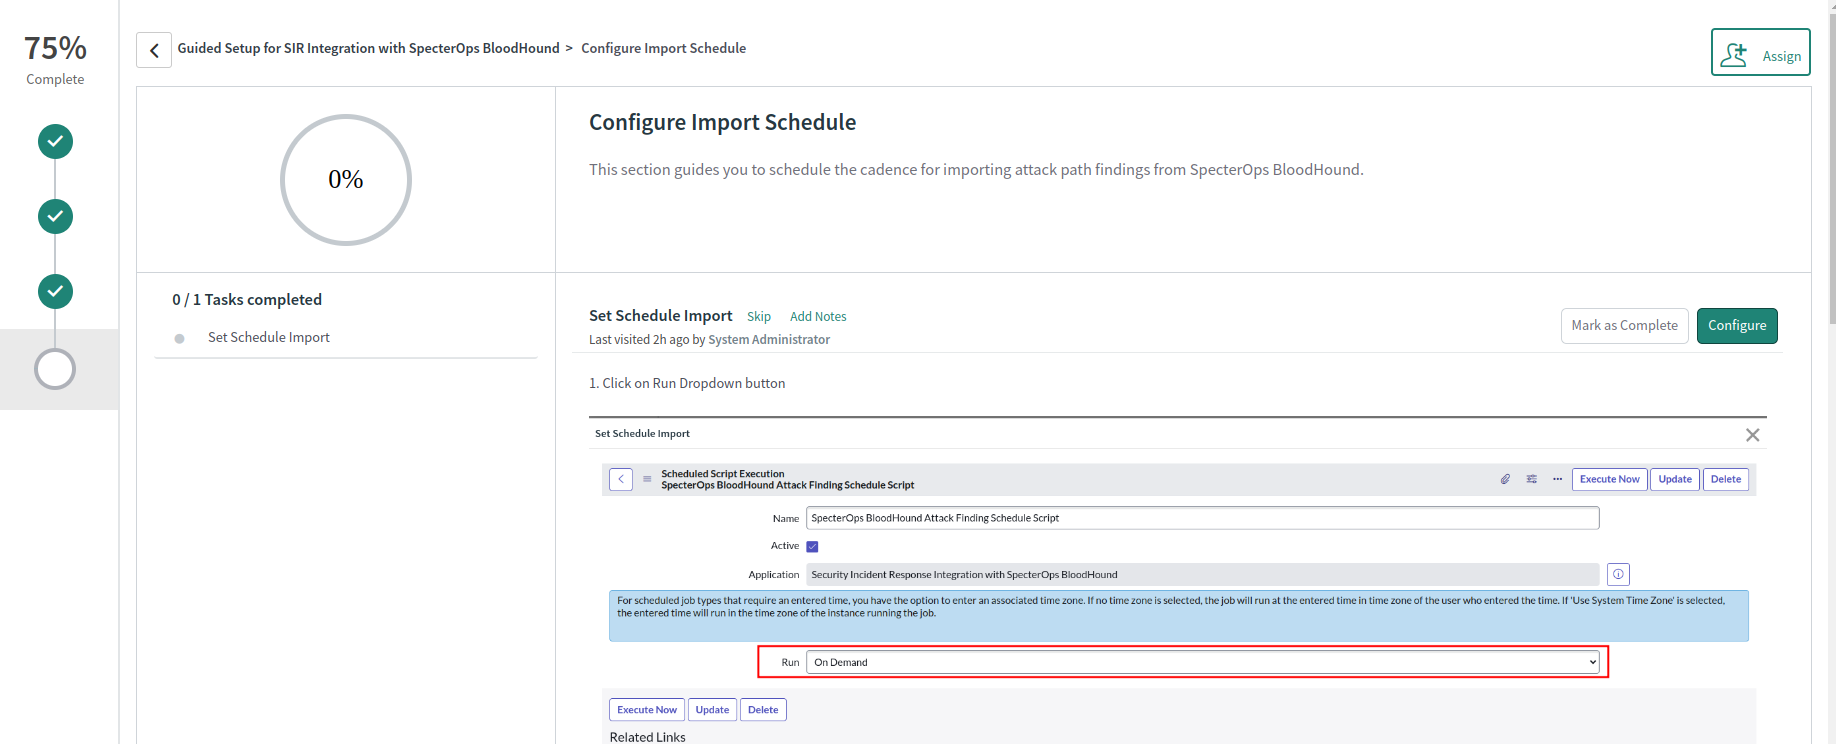
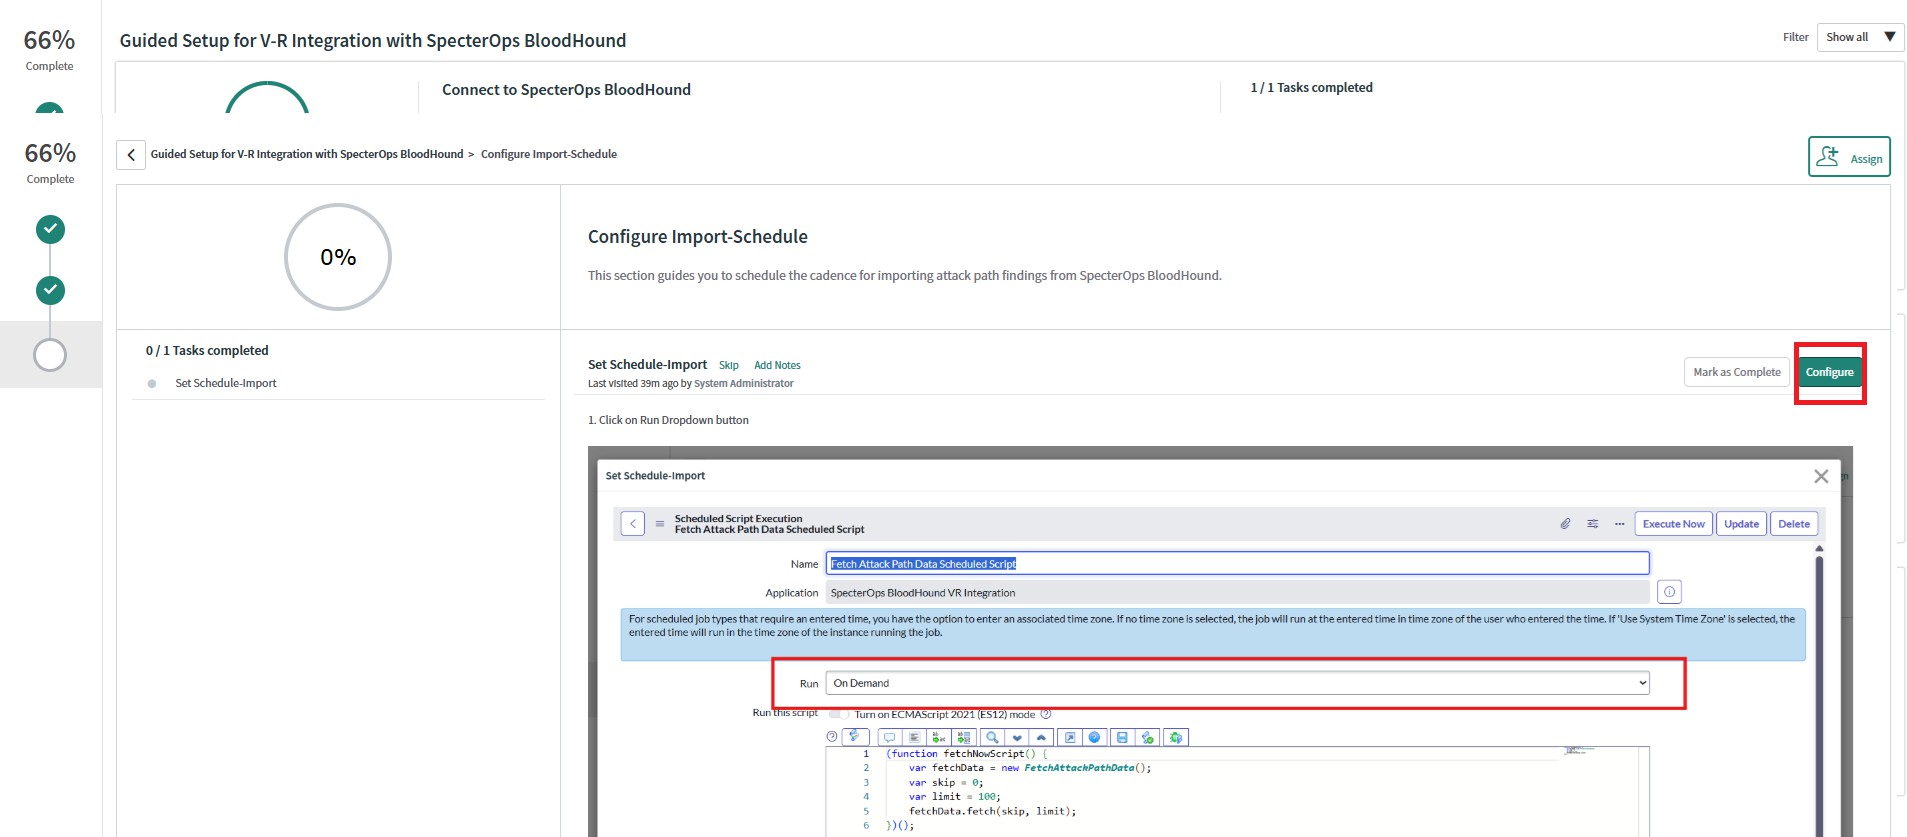
The final step in the guided setup is to configure the import schedule to specify how often the integration should fetch attack path findings from BloodHound Enterprise and create ServiceNow tickets.
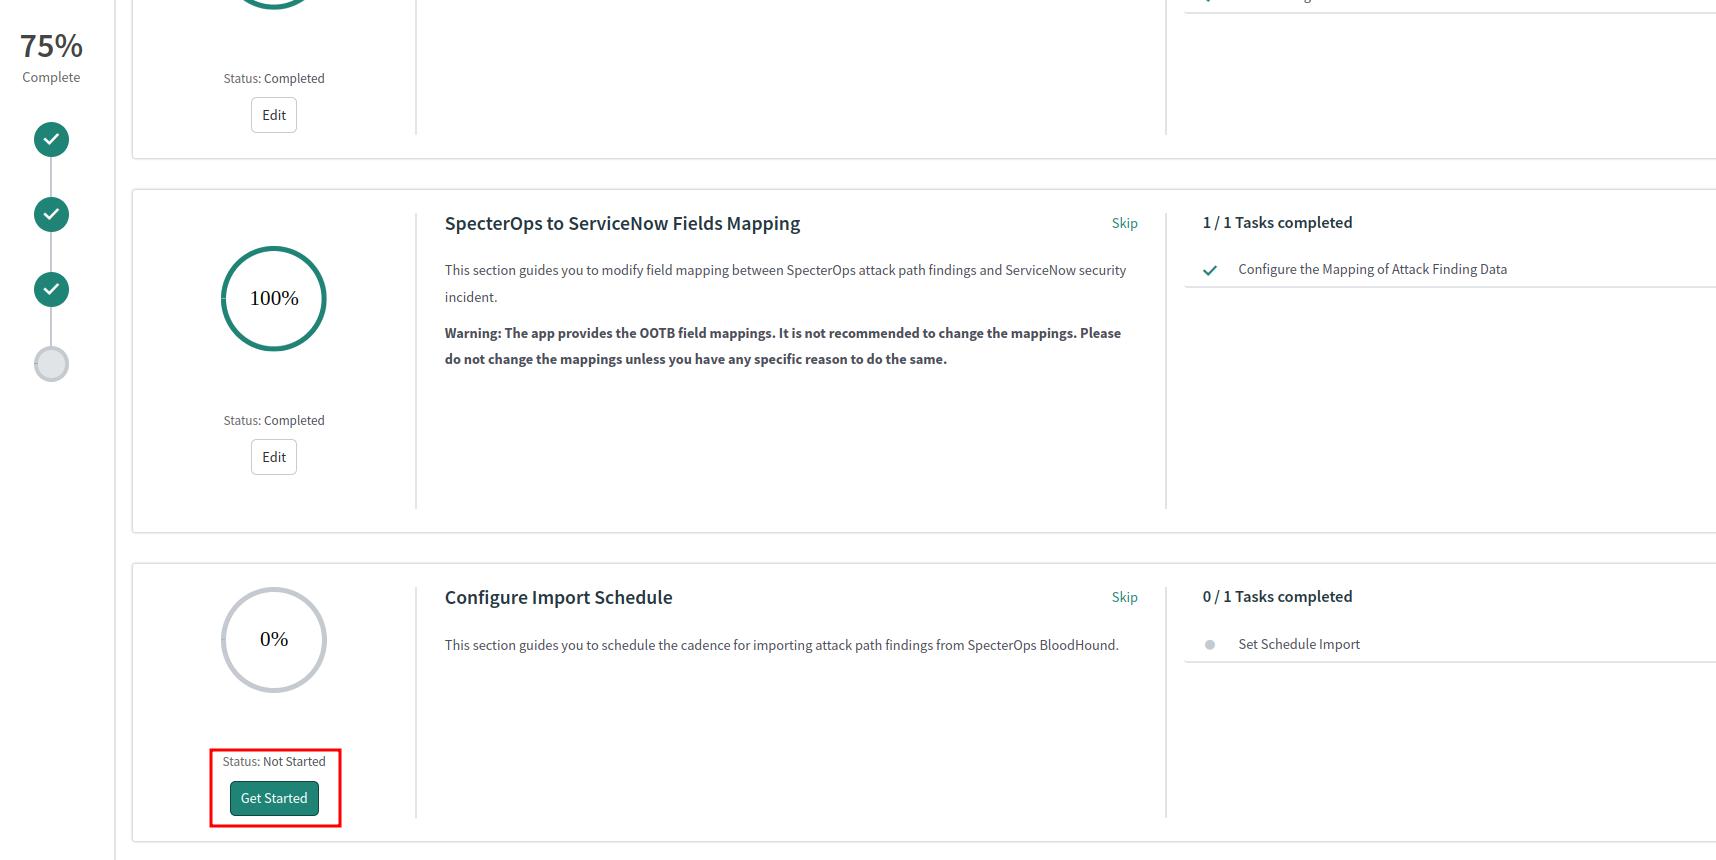
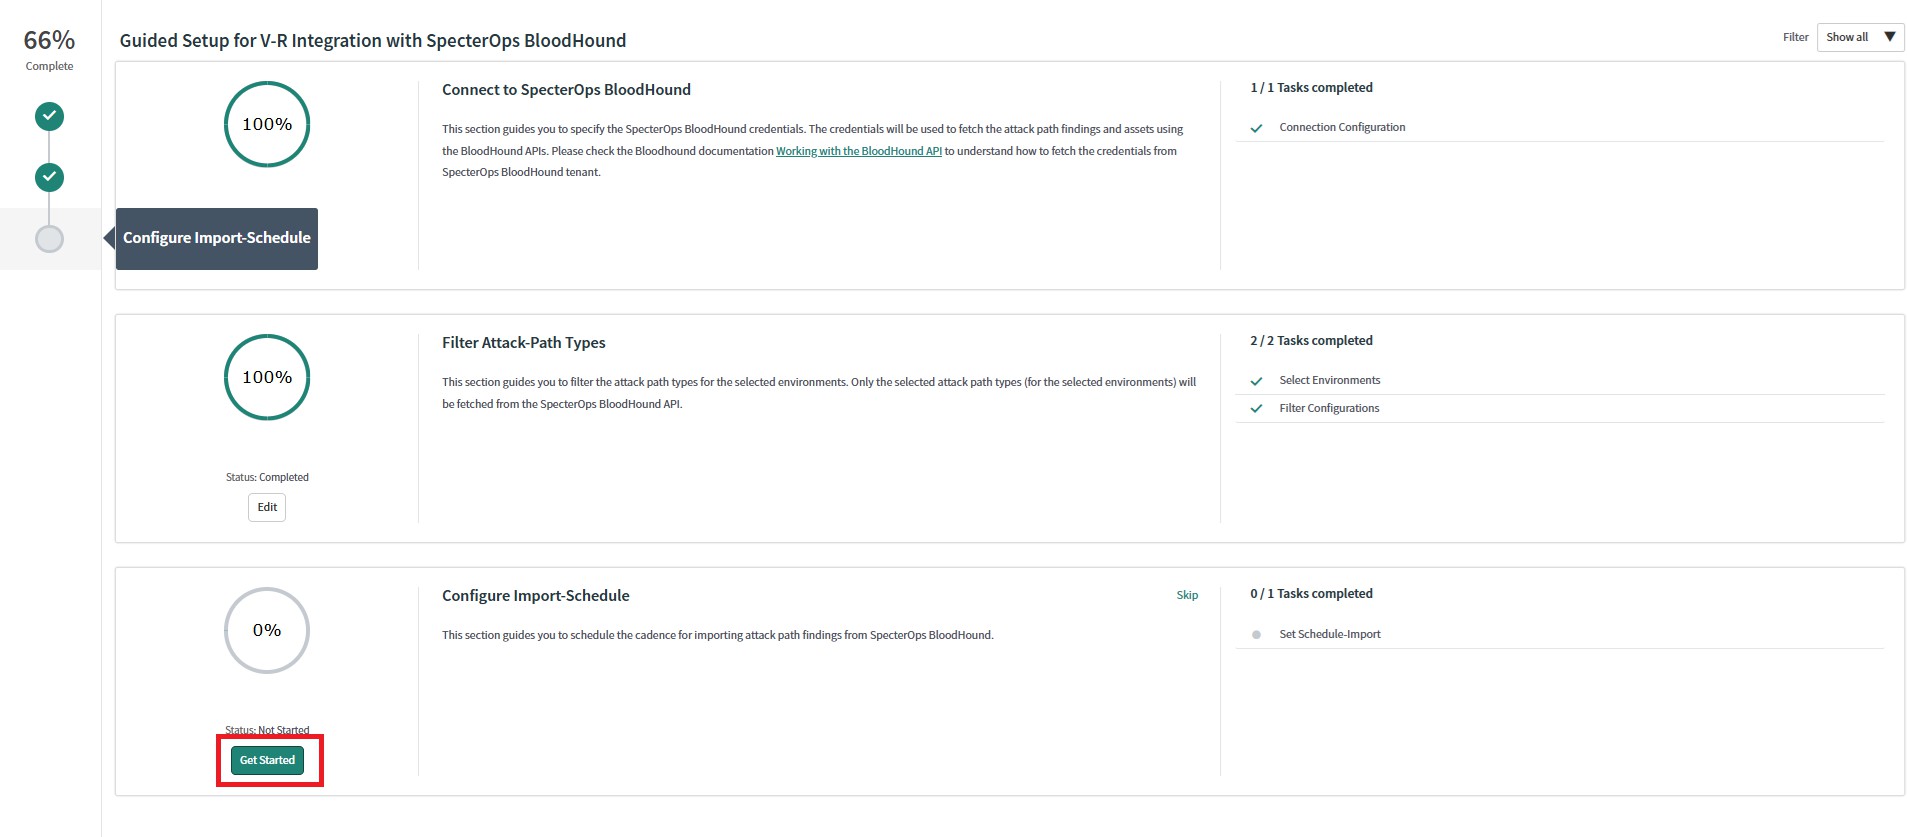
1. Click **Get Started** in the *Configure Import Schedule* section.
{app_3 === 'Security Incident Response Integration with SpecterOps BloodHound' && (
The following table describes the default field mapping:
| **SpecterOps BloodHound Fields** | **ServiceNow SIR Fields** |
| -------------------------------- | ------------------------- |
| id | correlation id |
| composite risk | risk score |
| description + remediation | description |
| domain name + title + id | short description |
| from principal | contact type |
| server url | external url |
3. Click the (close) icon.
4. Click **Mark as Complete**.
### Configure import schedule
The final step in the guided setup is to configure the import schedule to specify how often the integration should fetch attack path findings from BloodHound Enterprise and create ServiceNow tickets.
1. Click **Get Started** in the *Configure Import Schedule* section.
{app_3 === 'Security Incident Response Integration with SpecterOps BloodHound' && (
 )}
{app_3 !== 'Security Incident Response Integration with SpecterOps BloodHound' && (
)}
{app_3 !== 'Security Incident Response Integration with SpecterOps BloodHound' && (
 )}
2. Click **Configure** to schedule an import.
{app_3 === 'Security Incident Response Integration with SpecterOps BloodHound' && (
)}
2. Click **Configure** to schedule an import.
{app_3 === 'Security Incident Response Integration with SpecterOps BloodHound' && (
 )}
{app_3 !== 'Security Incident Response Integration with SpecterOps BloodHound' && (
)}
{app_3 !== 'Security Incident Response Integration with SpecterOps BloodHound' && (
 )}
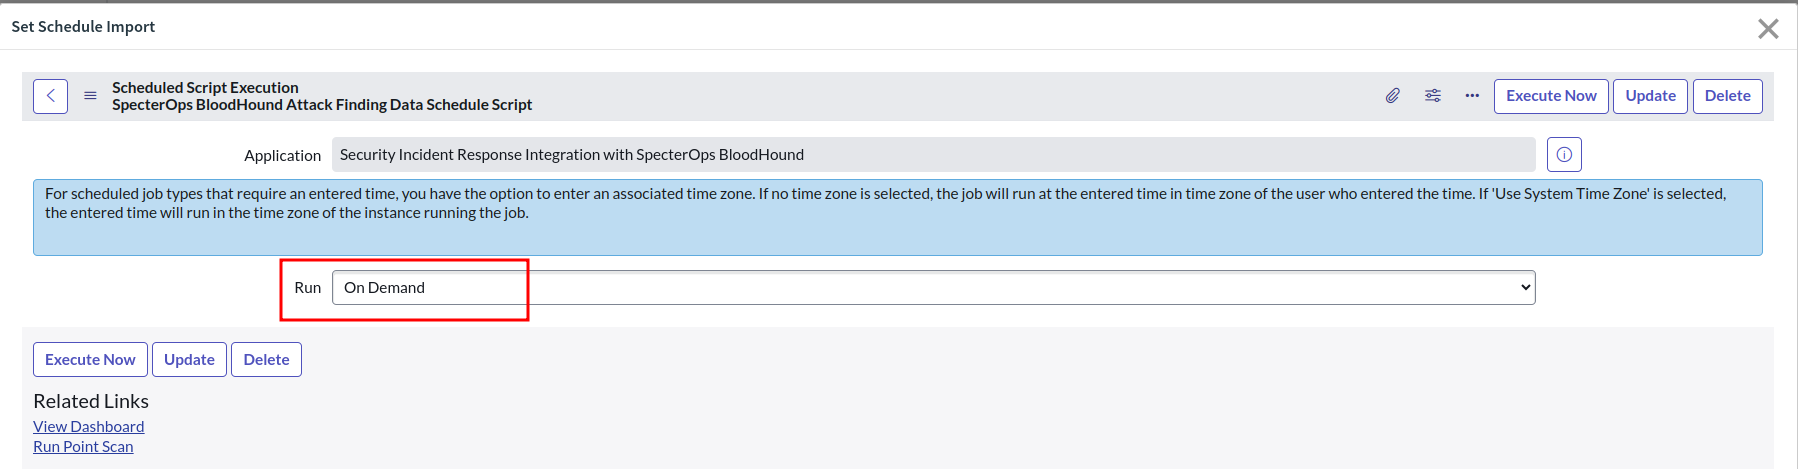
3. Click the **Run** dropdown menu and select one of the available options.
{app_3 === 'Security Incident Response Integration with SpecterOps BloodHound' && (
)}
3. Click the **Run** dropdown menu and select one of the available options.
{app_3 === 'Security Incident Response Integration with SpecterOps BloodHound' && (
 )}
{app_3 !== 'Security Incident Response Integration with SpecterOps BloodHound' && (
)}
{app_3 !== 'Security Incident Response Integration with SpecterOps BloodHound' && (
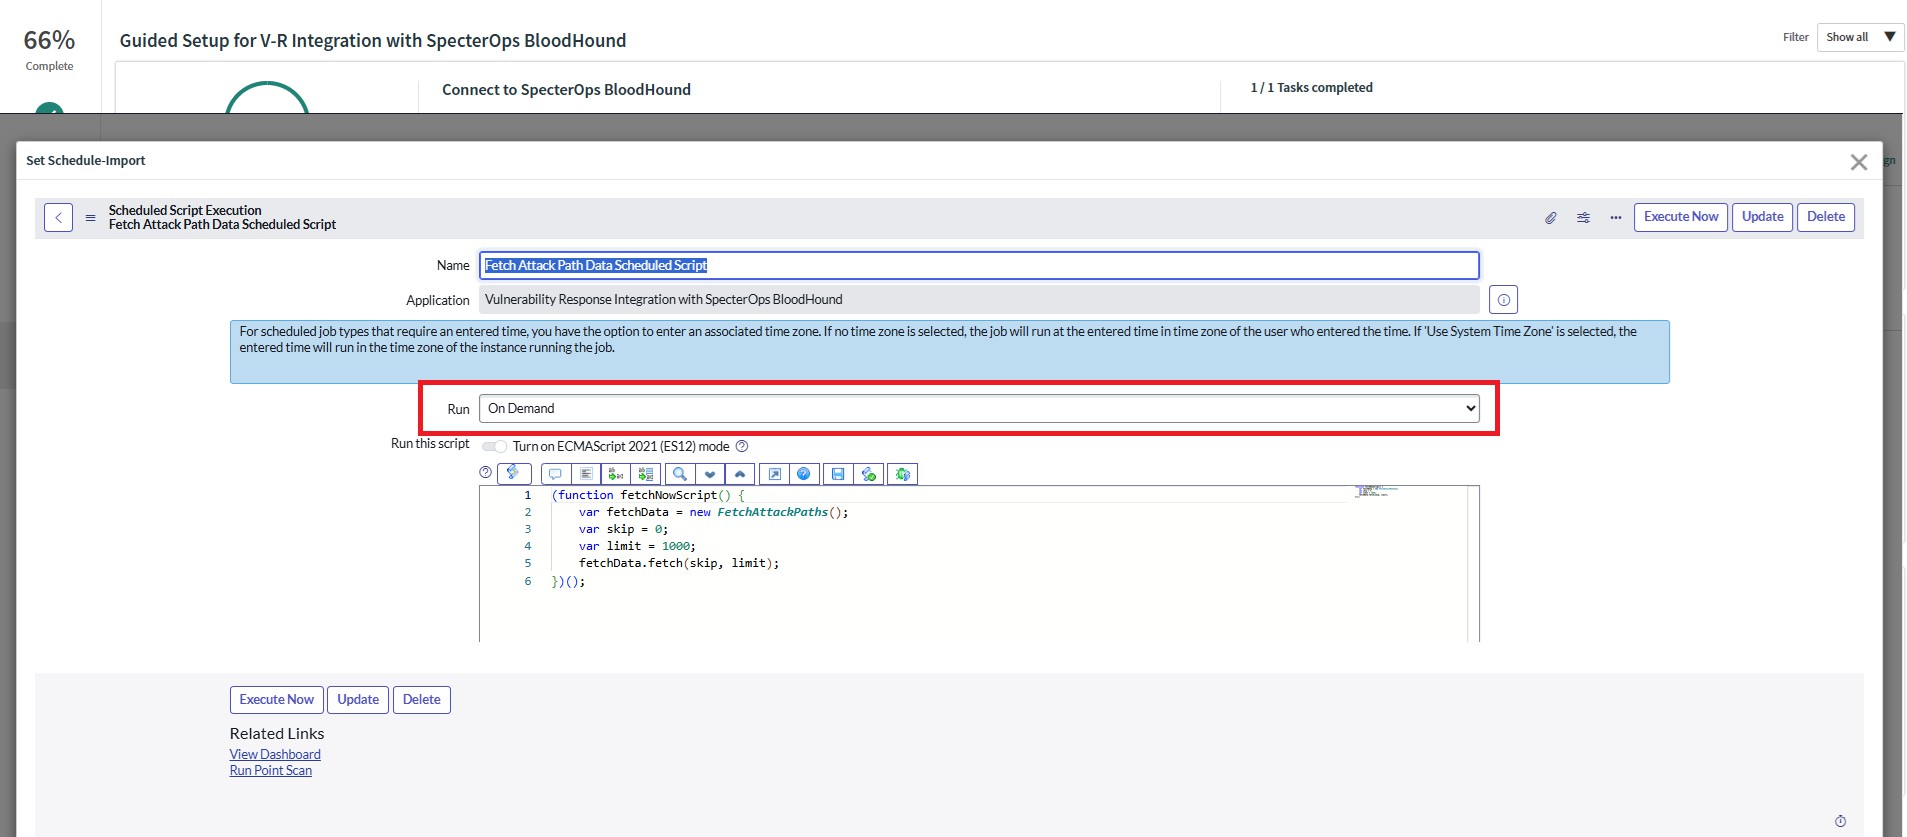 )}
4. Enter frequency details and click **Update**.
You can also click **Execute Now** to run the import immediately.
5. Click the (close) icon.
6. Click **Mark as Complete**.
The configuration is now complete. The integration will start fetching attack path findings from BloodHound Enterprise based on the configured schedule and create ServiceNow tickets accordingly.
## Next steps
[View and manage](/integrations/service-now/security-incident-response/use) SIR tickets created from BloodHound Enterprise attack path findings in ServiceNow.
)}
4. Enter frequency details and click **Update**.
You can also click **Execute Now** to run the import immediately.
5. Click the (close) icon.
6. Click **Mark as Complete**.
The configuration is now complete. The integration will start fetching attack path findings from BloodHound Enterprise based on the configured schedule and create ServiceNow tickets accordingly.
## Next steps
[View and manage](/integrations/service-now/security-incident-response/use) SIR tickets created from BloodHound Enterprise attack path findings in ServiceNow.