> ## Documentation Index
> Fetch the complete documentation index at: https://bloodhound.specterops.io/llms.txt
> Use this file to discover all available pages before exploring further.
# Deploy a Tiered SharpHound Enterprise Collector Strategy
 ## Purpose
This guide provides instructions on how to implement a tiered SharpHound Enterprise collector strategy, which is the recommended approach for collecting local data (i.e. Local Groups or Sessions) using SharpHound Enterprise.
The recommendation seeks to remove the risk of credential caching, delegation, and relaying by following the principle that "[elevated user accounts should not be used to log on to lower Tier assets](https://techcommunity.microsoft.com/t5/core-infrastructure-and-security/protecting-domain-administrative-credentials/ba-p/259210)" as recommended for domains with the [Active Directory Tier Model](https://learn.microsoft.com/en-us/microsoft-identity-manager/pam/tier-model-for-partitioning-administrative-privileges) or [Enterprise access model](https://learn.microsoft.com/en-us/security/privileged-access-workstations/privileged-access-access-model).
Without a tiered strategy, an organization may violate this principle if a Tier Zero SharpHound Enterprise service account authenticates to all hosts/computer objects in the domain. This is essentially the same as a Domain Admin logging onto a workstation.
Be advised that this risk is considered lower because:
* SharpHound Enterprise collects data through [network logons](https://learn.microsoft.com/en-us/windows-server/identity/securing-privileged-access/reference-tools-logon-types), which will not cache credentials on target systems.
* SharpHound Enterprise does not use NTLM authentication by default, it uses Kerberos, which is less likely to be relayed.
* SharpHound Enterprise **can** be hardened to mitigate the risk of Kerberos Delegation and NTLM authentication, see [SharpHound Enterprise Service Hardening](/manage-bloodhound/securing-bloodhound-and-collectors/sharphound-hardening).
Although this article uses the term "*tier*", it is mostly interchangeable with the term "'*plane*" from the Enterprise access model.
## Prerequisites
* Having defined/created one or more Organizational Units (OUs) for computers of each tier.
* Each tier's collector will be configured to only process computers stored in the tier's OU(s).
* Creation of one BloodHound collector server for each tier, see [SharpHound Enterprise System Requirements](/install-data-collector/install-sharphound/system-requirements)
* Tip: In BloodHound, mark the Tier Zero collector server as Tier Zero, see [Privilege Zones](/analyze-data/privilege-zones/overview)
* Creation of one SharpHound Enterprise service account for each tier, see [Create a gMSA for use with SharpHound Enterprise](/install-data-collector/install-sharphound/create-gmsa)
* Each service account must have collection permission on all systems in the service account's tier - local `Administrators` group membership or [Least-Privileged Collection](/collect-data/enterprise-collection/least-privileged-collection) permissions.
* Each service account is recommended to be hardened, see [SharpHound Enterprise Service Hardening](/manage-bloodhound/securing-bloodhound-and-collectors/sharphound-hardening).
* Tip: In BloodHound, mark the Tier Zero service account as Tier Zero, see [Privilege Zones](/analyze-data/privilege-zones/overview)
## Process
### Create a tiered SharpHound Enterprise collector client
This section outlines how to create a collector client that will be dedicated to local collection on computers in a single tier.
One client should be created for each tier, for example:
* Tier Zero
* Tier One
* Tier Two
For organizations without an implemented tier model, we recommend creating a Tier Zero collector, and only a single collector for the other tiers.
In this example, a collector client for Tier Zero will be created.
1. Follow the article [Create a SharpHound Enterprise collector client](/collect-data/enterprise-collection/create-collector)
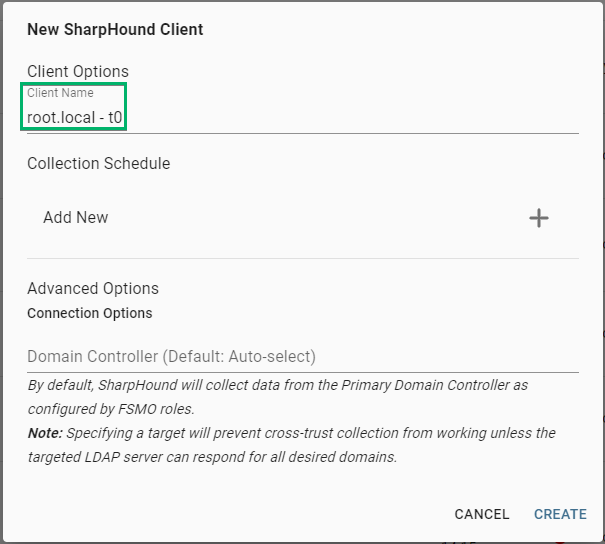
* Tip: Include an indicator for the client's tier in the **Client Name** field, for example, appending it with "t0"
## Purpose
This guide provides instructions on how to implement a tiered SharpHound Enterprise collector strategy, which is the recommended approach for collecting local data (i.e. Local Groups or Sessions) using SharpHound Enterprise.
The recommendation seeks to remove the risk of credential caching, delegation, and relaying by following the principle that "[elevated user accounts should not be used to log on to lower Tier assets](https://techcommunity.microsoft.com/t5/core-infrastructure-and-security/protecting-domain-administrative-credentials/ba-p/259210)" as recommended for domains with the [Active Directory Tier Model](https://learn.microsoft.com/en-us/microsoft-identity-manager/pam/tier-model-for-partitioning-administrative-privileges) or [Enterprise access model](https://learn.microsoft.com/en-us/security/privileged-access-workstations/privileged-access-access-model).
Without a tiered strategy, an organization may violate this principle if a Tier Zero SharpHound Enterprise service account authenticates to all hosts/computer objects in the domain. This is essentially the same as a Domain Admin logging onto a workstation.
Be advised that this risk is considered lower because:
* SharpHound Enterprise collects data through [network logons](https://learn.microsoft.com/en-us/windows-server/identity/securing-privileged-access/reference-tools-logon-types), which will not cache credentials on target systems.
* SharpHound Enterprise does not use NTLM authentication by default, it uses Kerberos, which is less likely to be relayed.
* SharpHound Enterprise **can** be hardened to mitigate the risk of Kerberos Delegation and NTLM authentication, see [SharpHound Enterprise Service Hardening](/manage-bloodhound/securing-bloodhound-and-collectors/sharphound-hardening).
Although this article uses the term "*tier*", it is mostly interchangeable with the term "'*plane*" from the Enterprise access model.
## Prerequisites
* Having defined/created one or more Organizational Units (OUs) for computers of each tier.
* Each tier's collector will be configured to only process computers stored in the tier's OU(s).
* Creation of one BloodHound collector server for each tier, see [SharpHound Enterprise System Requirements](/install-data-collector/install-sharphound/system-requirements)
* Tip: In BloodHound, mark the Tier Zero collector server as Tier Zero, see [Privilege Zones](/analyze-data/privilege-zones/overview)
* Creation of one SharpHound Enterprise service account for each tier, see [Create a gMSA for use with SharpHound Enterprise](/install-data-collector/install-sharphound/create-gmsa)
* Each service account must have collection permission on all systems in the service account's tier - local `Administrators` group membership or [Least-Privileged Collection](/collect-data/enterprise-collection/least-privileged-collection) permissions.
* Each service account is recommended to be hardened, see [SharpHound Enterprise Service Hardening](/manage-bloodhound/securing-bloodhound-and-collectors/sharphound-hardening).
* Tip: In BloodHound, mark the Tier Zero service account as Tier Zero, see [Privilege Zones](/analyze-data/privilege-zones/overview)
## Process
### Create a tiered SharpHound Enterprise collector client
This section outlines how to create a collector client that will be dedicated to local collection on computers in a single tier.
One client should be created for each tier, for example:
* Tier Zero
* Tier One
* Tier Two
For organizations without an implemented tier model, we recommend creating a Tier Zero collector, and only a single collector for the other tiers.
In this example, a collector client for Tier Zero will be created.
1. Follow the article [Create a SharpHound Enterprise collector client](/collect-data/enterprise-collection/create-collector)
* Tip: Include an indicator for the client's tier in the **Client Name** field, for example, appending it with "t0"
 2. Install the collector client on the dedicated Tier Zero BloodHound collector server, using the dedicated Tier Zero SharpHound Enterprise service account. [See Install and Upgrade SharpHound Enterprise](/install-data-collector/install-sharphound/installation-upgrade).
### Create tiered collector clients' schedules
Two types of data collection schedules can be deployed for each of the tiered collector clients.
For three tiers, the recommended schedule configuration is:
* Tier Zero
* Schedule 1
* **Active Directory Structure Data**, frequency: 1 day
* Schedule 2
* **Local Groups** and **Sessions**, frequency: 3-6 hours
* Tier One
* Schedule 1
* **Local Groups** and **Sessions**, frequency: 3-6 hours
* Tier Two
* Schedule 1
* **Local Groups** and **Sessions**, frequency: 3-6 hours
### Active Directory Structure Data schedule
Only one AD Structure Data schedule is needed, even though multiple tiers exist. It is recommended to be collected by the Tier Zero collector, as the clients of other tiers may be denied read access to Active Directory structure data.
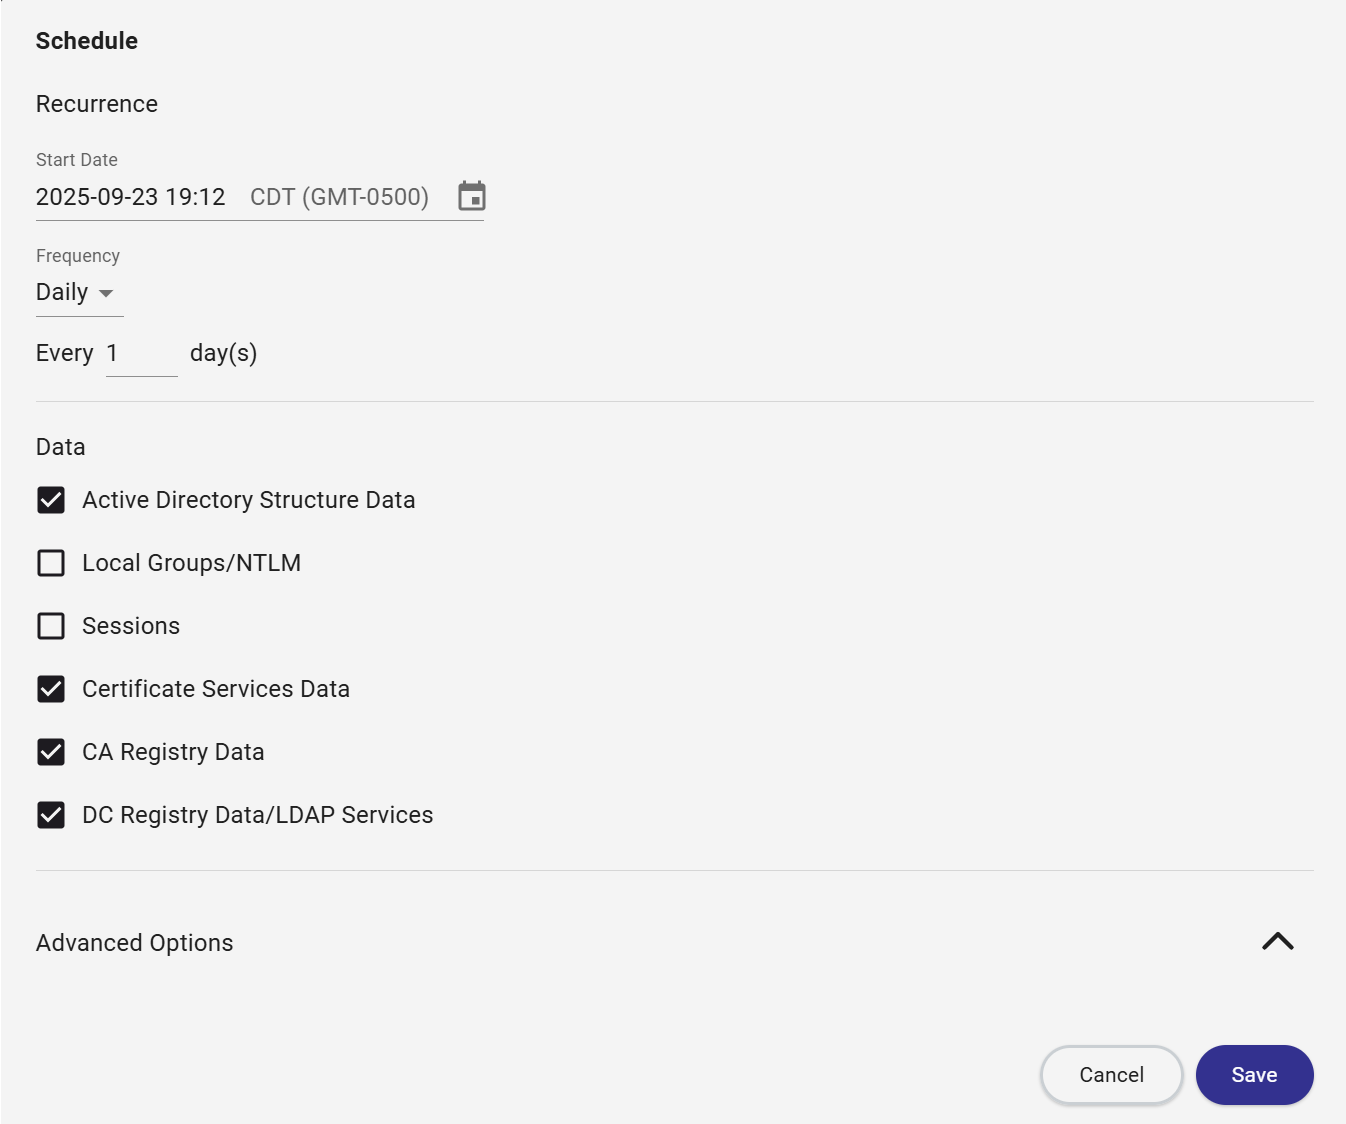
1. On the Tier Zero collector client, create a new collection schedule, see [Create a data collection schedule](/collect-data/enterprise-collection/collection-schedule)
2. Set the frequency to be **Daily** and **Every 1 day(s)**.
3. Set the schedule to only collect **Active Directory Structure Data**
4. The completed schedule should look like so:\*\*
2. Install the collector client on the dedicated Tier Zero BloodHound collector server, using the dedicated Tier Zero SharpHound Enterprise service account. [See Install and Upgrade SharpHound Enterprise](/install-data-collector/install-sharphound/installation-upgrade).
### Create tiered collector clients' schedules
Two types of data collection schedules can be deployed for each of the tiered collector clients.
For three tiers, the recommended schedule configuration is:
* Tier Zero
* Schedule 1
* **Active Directory Structure Data**, frequency: 1 day
* Schedule 2
* **Local Groups** and **Sessions**, frequency: 3-6 hours
* Tier One
* Schedule 1
* **Local Groups** and **Sessions**, frequency: 3-6 hours
* Tier Two
* Schedule 1
* **Local Groups** and **Sessions**, frequency: 3-6 hours
### Active Directory Structure Data schedule
Only one AD Structure Data schedule is needed, even though multiple tiers exist. It is recommended to be collected by the Tier Zero collector, as the clients of other tiers may be denied read access to Active Directory structure data.
1. On the Tier Zero collector client, create a new collection schedule, see [Create a data collection schedule](/collect-data/enterprise-collection/collection-schedule)
2. Set the frequency to be **Daily** and **Every 1 day(s)**.
3. Set the schedule to only collect **Active Directory Structure Data**
4. The completed schedule should look like so:\*\*
 ### Local Groups and Sessions schedule
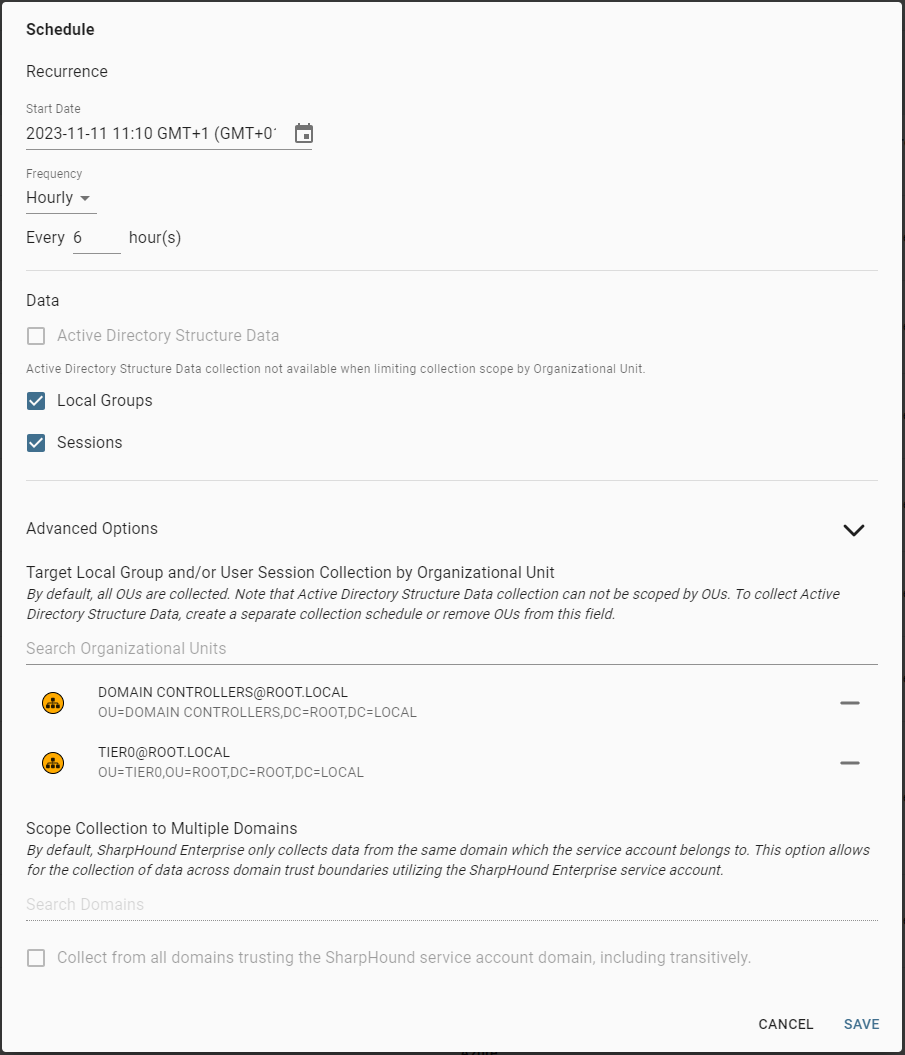
In this example, a schedule is configured on a Tier Zero collector client. Other tiers must follow the same procedure with different OUs selected.
1. On the Tier Zero collector client, create a new collection schedule, see [Create a data collection schedule](/collect-data/enterprise-collection/collection-schedule)
2. Set the frequency to be **Hourly** and **Every 3-6 hours**.
3. Set the schedule to collect **Local Groups** and **Sessions**
4. In **Advanced Options** in the setting **Target Local Group and/or User Session Collection by Organizational Unit**, search for the Tier Zero OU(s) containing the domain's Tier Zero computer objects.
* Tip: Remember to add your Domain Controllers OU to the Tier Zero schedule.
### Local Groups and Sessions schedule
In this example, a schedule is configured on a Tier Zero collector client. Other tiers must follow the same procedure with different OUs selected.
1. On the Tier Zero collector client, create a new collection schedule, see [Create a data collection schedule](/collect-data/enterprise-collection/collection-schedule)
2. Set the frequency to be **Hourly** and **Every 3-6 hours**.
3. Set the schedule to collect **Local Groups** and **Sessions**
4. In **Advanced Options** in the setting **Target Local Group and/or User Session Collection by Organizational Unit**, search for the Tier Zero OU(s) containing the domain's Tier Zero computer objects.
* Tip: Remember to add your Domain Controllers OU to the Tier Zero schedule.
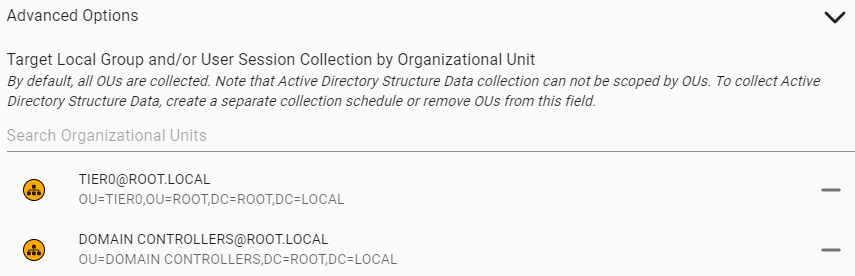 5. The completed schedule should look like so: