> ## Documentation Index
> Fetch the complete documentation index at: https://bloodhound.specterops.io/llms.txt
> Use this file to discover all available pages before exploring further.
# Configure ADFS for Integrated Windows Authentication
> Learn how to enable Integrated Windows Authentication for SharpHound Enterprise on your Active Directory Federation Services (ADFS) server.
 When using Integrated Windows Authentication (IWA) to authenticate SharpHound Enterprise with your BloodHound Enterprise tenant, you must configure your Active Directory Federation Services (ADFS) server to support this authentication method.
## Purpose
This guide explains the BloodHound-specific ADFS configuration steps. For general ADFS setup and administration, refer to [Microsoft's ADFS documentation](https://learn.microsoft.com/en-us/windows-server/identity/active-directory-federation-services).
## Prerequisites
* An ADFS server deployed and operational in your network
* Administrative access to your ADFS server
* The **Client ID** generated after [creating a SharpHound Enterprise collector client](/collect-data/enterprise-collection/create-collector#integrated-windows-authentication)
## Process
The ADFS configuration process involves creating a server application for SharpHound Enterprise, configuring authentication, and ensuring that the necessary claims are included in the issued tokens for proper validation by BloodHound Enterprise. Follow the steps below to complete the configuration.
In ADFS Management, create a server application using the Web API template.
1. Open **ADFS Management** on your ADFS server.
2. Right-click **Application Groups**.
3. Select **Add Application Group...** to launch the *Add Application Group Wizard*.
4. Enter a name for the application group (e.g., "sharphound-bloodhound").
5. Under **Template** > **Client Server applications**, select **Server application accessing a Web API**.
When using Integrated Windows Authentication (IWA) to authenticate SharpHound Enterprise with your BloodHound Enterprise tenant, you must configure your Active Directory Federation Services (ADFS) server to support this authentication method.
## Purpose
This guide explains the BloodHound-specific ADFS configuration steps. For general ADFS setup and administration, refer to [Microsoft's ADFS documentation](https://learn.microsoft.com/en-us/windows-server/identity/active-directory-federation-services).
## Prerequisites
* An ADFS server deployed and operational in your network
* Administrative access to your ADFS server
* The **Client ID** generated after [creating a SharpHound Enterprise collector client](/collect-data/enterprise-collection/create-collector#integrated-windows-authentication)
## Process
The ADFS configuration process involves creating a server application for SharpHound Enterprise, configuring authentication, and ensuring that the necessary claims are included in the issued tokens for proper validation by BloodHound Enterprise. Follow the steps below to complete the configuration.
In ADFS Management, create a server application using the Web API template.
1. Open **ADFS Management** on your ADFS server.
2. Right-click **Application Groups**.
3. Select **Add Application Group...** to launch the *Add Application Group Wizard*.
4. Enter a name for the application group (e.g., "sharphound-bloodhound").
5. Under **Template** > **Client Server applications**, select **Server application accessing a Web API**.
 6. Click **Next**.
1. On the **Server Application** page enter the **Client ID** provided after [creating](/collect-data/enterprise-collection/create-collector#integrated-windows-authentication-2) the SharpHound Enterprise collector client.
A **Redirect URI** is not necessary for SharpHound's authentication flow, but is required for application creation. You can enter any valid URI (e.g., `http://localhost`) and it will not impact SharpHound's ability to authenticate.
6. Click **Next**.
1. On the **Server Application** page enter the **Client ID** provided after [creating](/collect-data/enterprise-collection/create-collector#integrated-windows-authentication-2) the SharpHound Enterprise collector client.
A **Redirect URI** is not necessary for SharpHound's authentication flow, but is required for application creation. You can enter any valid URI (e.g., `http://localhost`) and it will not impact SharpHound's ability to authenticate.
 2. Click **Next**.
1. On the **Configure Application Credentials** page, click the **Integrated Windows Authentication** checkbox.
2. Click **Select...** and enter the service account user that SharpHound Enterprise will use to authenticate with ADFS.
2. Click **Next**.
1. On the **Configure Application Credentials** page, click the **Integrated Windows Authentication** checkbox.
2. Click **Select...** and enter the service account user that SharpHound Enterprise will use to authenticate with ADFS.
 3. Click **OK**.
4. Click **Next**.
1. On the **Configure Web API** page, enter a descriptive name for the Web API (e.g., `bloodhound-api`).
2. In the **Identifier** field, enter your BloodHound Enterprise tenant URL (e.g., `https://your-tenant/bloodhoundenterprise.io`).
3. Click **Add**.
4. Click **OK** to add the Web API.
3. Click **OK**.
4. Click **Next**.
1. On the **Configure Web API** page, enter a descriptive name for the Web API (e.g., `bloodhound-api`).
2. In the **Identifier** field, enter your BloodHound Enterprise tenant URL (e.g., `https://your-tenant/bloodhoundenterprise.io`).
3. Click **Add**.
4. Click **OK** to add the Web API.
 5. Click **Next**.
On the **Apply Access Control Policy** page, select the appropriate access control policy for your environment and click **Next**.
The default **Permit everyone** policy allows any authenticated user to obtain a token for SharpHound Enterprise, but you may choose a more restrictive policy if necessary.
1. On the **Configure Application Permissions** page, review the permitted scopes assigned to the application.
At minimum, you must select **openid** to ensure that the necessary claims are included in the token for BloodHound authentication. No additional permissions are required for SharpHound Enterprise.
5. Click **Next**.
On the **Apply Access Control Policy** page, select the appropriate access control policy for your environment and click **Next**.
The default **Permit everyone** policy allows any authenticated user to obtain a token for SharpHound Enterprise, but you may choose a more restrictive policy if necessary.
1. On the **Configure Application Permissions** page, review the permitted scopes assigned to the application.
At minimum, you must select **openid** to ensure that the necessary claims are included in the token for BloodHound authentication. No additional permissions are required for SharpHound Enterprise.
 2. Click **Next**.
Review the application group configuration and click **Next** to create the application group and associated server application.
The issuance transform rule is critical for token validation in BloodHound Enterprise. This rule ensures that the **Client ID** is properly included as the "sub" (subject) claim in the token.
1. On the **Application Groups** page, open the application group you created for SharpHound Enterprise (e.g., `sharphound-bloodhound`).
2. Open the **Web API** you created for BloodHound Enterprise (e.g., `bloodhound`).
3. Click the **Issuance Transform Rules** tab and click **Add Rule...**.
4. On the **Choose Rule Type** page, select the **Send Claims Using a Custom Rule** template from the dropdown menu and click **Next**.
2. Click **Next**.
Review the application group configuration and click **Next** to create the application group and associated server application.
The issuance transform rule is critical for token validation in BloodHound Enterprise. This rule ensures that the **Client ID** is properly included as the "sub" (subject) claim in the token.
1. On the **Application Groups** page, open the application group you created for SharpHound Enterprise (e.g., `sharphound-bloodhound`).
2. Open the **Web API** you created for BloodHound Enterprise (e.g., `bloodhound`).
3. Click the **Issuance Transform Rules** tab and click **Add Rule...**.
4. On the **Choose Rule Type** page, select the **Send Claims Using a Custom Rule** template from the dropdown menu and click **Next**.
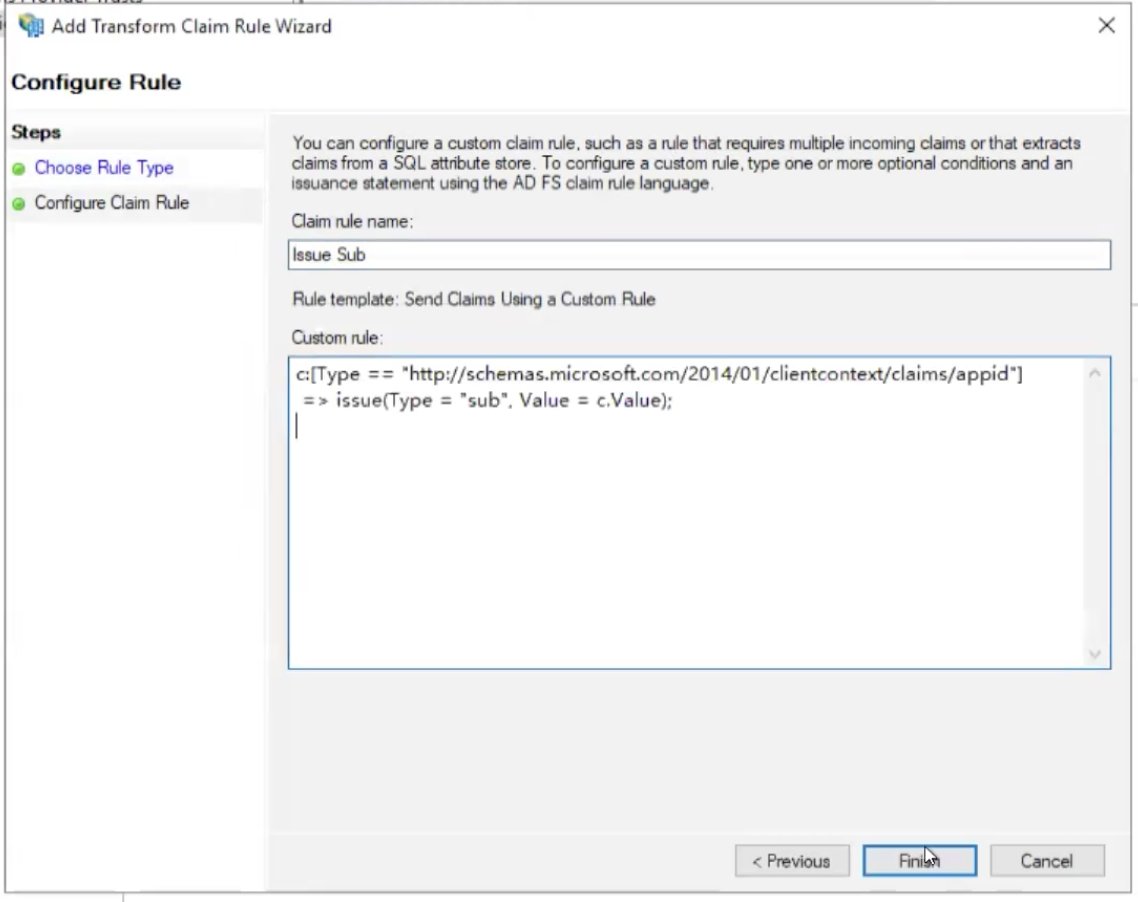
 5. On the **Configure Claim Rule** page, enter a name for the rule (e.g., `Issue Sub`).
6. Add the following custom rule to ensure the Client ID is included as the "sub" claim in the token:
```text theme={null}
c:[type == "http://schemas.microsoft.com/2014/01/clientcontext/claims/appid"]
=> issue(Type = "sub", Value = c.Value);
```
5. On the **Configure Claim Rule** page, enter a name for the rule (e.g., `Issue Sub`).
6. Add the following custom rule to ensure the Client ID is included as the "sub" claim in the token:
```text theme={null}
c:[type == "http://schemas.microsoft.com/2014/01/clientcontext/claims/appid"]
=> issue(Type = "sub", Value = c.Value);
```
 The exact claim transformation rules required may vary based on your ADFS version and configuration. The critical requirement is that the token issued by ADFS must include the **Client ID** as the "sub" claim so that BloodHound Enterprise can validate that the token is intended for SharpHound Enterprise.
7. Click **Finish**.
8. Click **Apply**.
## Next Steps
After ADFS is configured:
1. [Configure](/install-data-collector/install-sharphound/local-configuration#integrated-windows-authentication-iwa) the SharpHound Enterprise collector application with the required IWA properties in the `settings.json` file.
2. [Run an on-demand scan](/collect-data/enterprise-collection/on-demand-scan) to test the configuration.
## Troubleshooting
If SharpHound does not authenticate successfully with ADFS, use the following accordion to troubleshoot common issues:
Review the ADFS event log for authentication failures or token issuance errors. The event log often contains detailed information about why authentication or token issuance failed, including specific error codes and messages.
Ensure that the SharpHound service account can reach the ADFS server. From the server running SharpHound, verify connectivity to the ADFS server over HTTPS on port 443. You can test this using tools like `Test-NetConnection` (PowerShell) or `curl` to confirm the well-known endpoint is accessible.
Verify that the service account running SharpHound has Windows authentication rights on the ADFS-protected Web API. Check the ADFS application configuration and ensure Windows authentication is enabled for the Web API.
Review the SharpHound logs for detailed error messages during authentication attempts. Logs are typically located in `%APPDATA%\BloodHoundEnterprise`. Look for errors related to token acquisition, ADFS connectivity, or authentication failures.
The exact claim transformation rules required may vary based on your ADFS version and configuration. The critical requirement is that the token issued by ADFS must include the **Client ID** as the "sub" claim so that BloodHound Enterprise can validate that the token is intended for SharpHound Enterprise.
7. Click **Finish**.
8. Click **Apply**.
## Next Steps
After ADFS is configured:
1. [Configure](/install-data-collector/install-sharphound/local-configuration#integrated-windows-authentication-iwa) the SharpHound Enterprise collector application with the required IWA properties in the `settings.json` file.
2. [Run an on-demand scan](/collect-data/enterprise-collection/on-demand-scan) to test the configuration.
## Troubleshooting
If SharpHound does not authenticate successfully with ADFS, use the following accordion to troubleshoot common issues:
Review the ADFS event log for authentication failures or token issuance errors. The event log often contains detailed information about why authentication or token issuance failed, including specific error codes and messages.
Ensure that the SharpHound service account can reach the ADFS server. From the server running SharpHound, verify connectivity to the ADFS server over HTTPS on port 443. You can test this using tools like `Test-NetConnection` (PowerShell) or `curl` to confirm the well-known endpoint is accessible.
Verify that the service account running SharpHound has Windows authentication rights on the ADFS-protected Web API. Check the ADFS application configuration and ensure Windows authentication is enabled for the Web API.
Review the SharpHound logs for detailed error messages during authentication attempts. Logs are typically located in `%APPDATA%\BloodHoundEnterprise`. Look for errors related to token acquisition, ADFS connectivity, or authentication failures.