> ## Documentation Index
> Fetch the complete documentation index at: https://bloodhound.specterops.io/llms.txt
> Use this file to discover all available pages before exploring further.
# BloodHound Enterprise Quickstart
 Get started with your BloodHound Enterprise instance and start identifying and remediating security risks.
# Prerequisites
To complete this quickstart, you must have a BloodHound Enterprise instance. To connect with the SpecterOps team and receive an instance, [request a demo of BloodHound Enterprise](https://specterops.io/get-a-demo/).
# Get data into BloodHound
BloodHound Enterprise supports multiple data collection paths. Use the path that matches the directories and platforms you want to analyze:
* Active Directory, collected by SharpHound Enterprise
* Entra ID (formerly Azure AD) and Azure IaaS, collected by AzureHound Enterprise
* Github, Jamf, and Okta, collected by OpenHound for BloodHound Enterprise
You can run SharpHound Enterprise and AzureHound Enterprise from the same Windows system. AzureHound Enterprise also supports Docker and Kubernetes deployments.
Use [OpenHound](/openhound/overview) for built-in collectors and workflows for platforms like GitHub, Jamf, and Okta. For additional community-built collectors, explore the [OpenGraph Library](/opengraph/library).
## Ingest with SharpHound Enterprise (Active Directory)
SharpHound Enterprise collects [multiple data types](/collect-data/enterprise-collection/data-retention) from Active Directory and its domain-joined systems. We recommend collecting all types for full risk identification and accurate risk assessment calculation.
Get started with your BloodHound Enterprise instance and start identifying and remediating security risks.
# Prerequisites
To complete this quickstart, you must have a BloodHound Enterprise instance. To connect with the SpecterOps team and receive an instance, [request a demo of BloodHound Enterprise](https://specterops.io/get-a-demo/).
# Get data into BloodHound
BloodHound Enterprise supports multiple data collection paths. Use the path that matches the directories and platforms you want to analyze:
* Active Directory, collected by SharpHound Enterprise
* Entra ID (formerly Azure AD) and Azure IaaS, collected by AzureHound Enterprise
* Github, Jamf, and Okta, collected by OpenHound for BloodHound Enterprise
You can run SharpHound Enterprise and AzureHound Enterprise from the same Windows system. AzureHound Enterprise also supports Docker and Kubernetes deployments.
Use [OpenHound](/openhound/overview) for built-in collectors and workflows for platforms like GitHub, Jamf, and Okta. For additional community-built collectors, explore the [OpenGraph Library](/opengraph/library).
## Ingest with SharpHound Enterprise (Active Directory)
SharpHound Enterprise collects [multiple data types](/collect-data/enterprise-collection/data-retention) from Active Directory and its domain-joined systems. We recommend collecting all types for full risk identification and accurate risk assessment calculation.
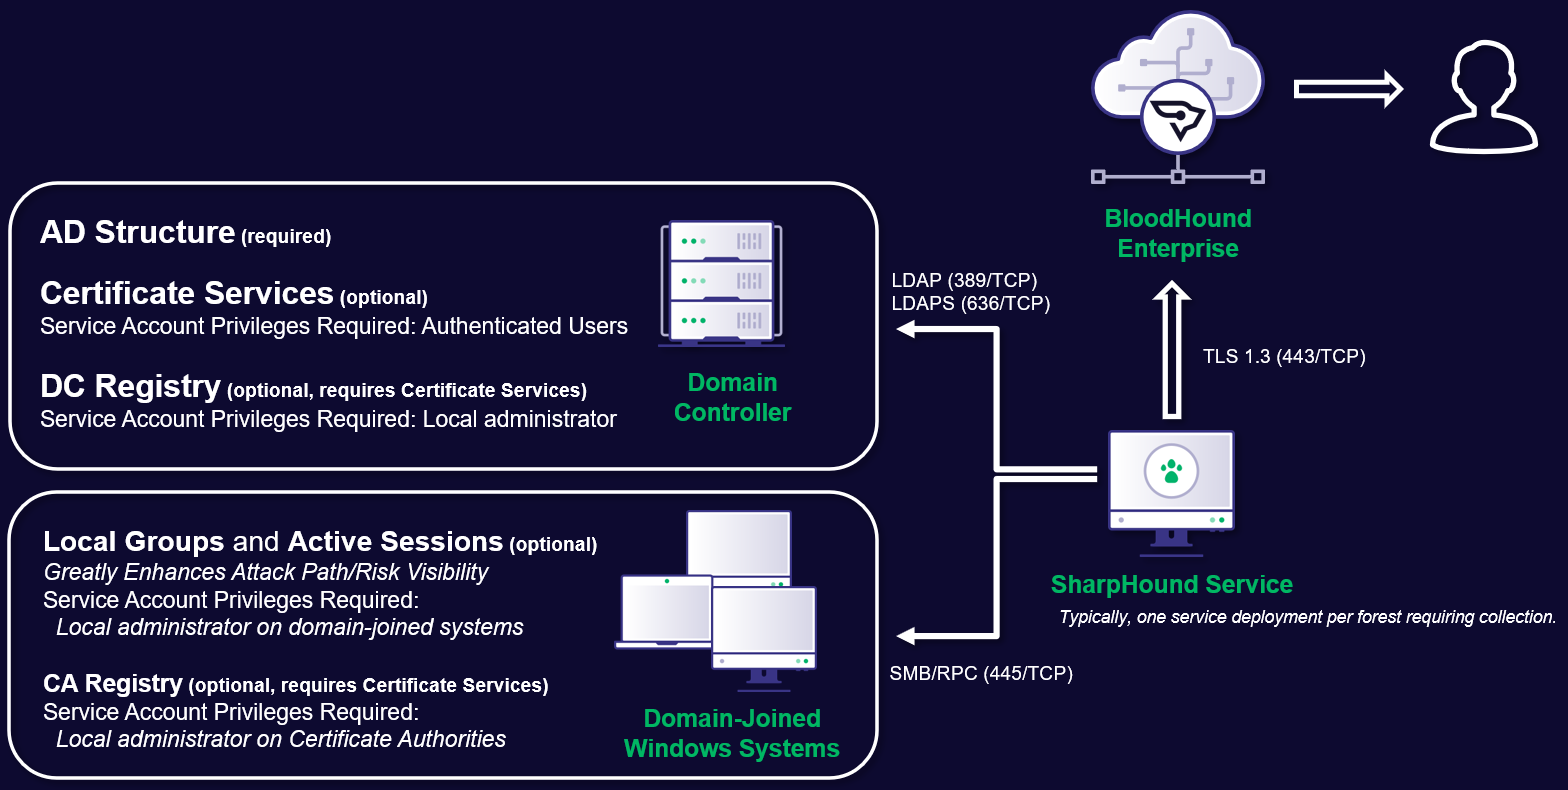 Install the SharpHound Enterprise collector service on a domain-joined Windows system and run it as an Active Directory account.
1. Review the [SharpHound Enterprise System Requirements](/install-data-collector/install-sharphound/system-requirements) and [SharpHound Service Hardening Guidelines](/manage-bloodhound/securing-bloodhound-and-collectors/sharphound-hardening).
2. [Install and Upgrade SharpHound Enterprise](/install-data-collector/install-sharphound/installation-upgrade).
3. To fully secure a domain, collect data from all other domains with a trust relationship to it (in- and outgoing trust). Configure SharpHound Enterprise for [Cross-Trust Collection](/collect-data/enterprise-collection/cross-trust).
## Ingest with AzureHound Enterprise (Entra ID and Azure)
Install and run AzureHound Enterprise on Windows, Docker, or Kubernetes. When you deploy AzureHound Enterprise on Windows, it runs as a Windows service.
1. Review the [AzureHound Enterprise System Requirements and Deployment Process](/install-data-collector/install-azurehound/system-requirements).
2. [Configure Azure](/install-data-collector/install-azurehound/azure-configuration).
3. [Create your AzureHound configuration](/install-data-collector/install-azurehound/create-configuration).
4. [Deploy and maintain AzureHound](/install-data-collector/install-azurehound/installation-options).
## Ingest with OpenHound (Github, Jamf, and Okta)
OpenHound for BloodHound Enterprise runs as a containerized service and is complementary to SharpHound Enterprise and AzureHound Enterprise.
This is a SpecterOps-managed feature. If it is not enabled in your environment, contact your account team for assistance.
1. Review the OpenHound for BloodHound Enterprise [configuration requirements](/openhound/enterprise).
2. Create an OpenHound [collector client](/collect-data/enterprise-collection/create-collector) to get API credentials.
3. Configure the OpenHound collector you want to run:
* [Github](/openhound/collectors/github/collect-data#configure-openhound)
* [Jamf](/openhound/collectors/jamf/collect-data#configure-openhound)
* [Okta](/openhound/collectors/okta/collect-data#configure-openhound)
4. Deploy OpenHound in your environment and run an on-demand scan or scheduled collection.
# Verify data quality
After collecting data, to verify data quality:
1. Go to settings (⚙️) → **Administration** and select **Data Quality**.
2. Verify that each collector has collected the expected amount of data and that principal types match your expected coverage for each directory and platform.
3. If using privileged collection, verify that the charts **Local Group Completeness Over Time** and **Session Completeness Over Time** report higher than 0%.
Obtaining 100% completeness is not possible in most environments due to things like workstations being offline during collection.
4. If you see lower-than-expected data quality examine the data collection logs and contact your SpecterOps representative if you need assistance.
# Scope Tier Zero objects
BloodHound Enterprise identifies and prioritizes attack paths. To get the most accurate assessment scope your Tier Zero objects.
1. [Scope Tier Zero for your environment](/get-started/security-boundaries/tier-zero-members).
2. [Mark your environment's Tier Zero objects in BloodHound](/analyze-data/privilege-zones/overview).
# Grant users access
Your BloodHound Enterprise instance has a few administrative users by default. To bring your team into your instance, grant your team access with dedicated users and roles.
To grant users access to your instance, [create users and set access control roles](/manage-bloodhound/auth/users-and-roles).
BloodHound Enterprise supports two authentication methods for users:
* Built-in authentication via username and password, supporting TOTP-based multi-factor authentication
* [SAML 2.0-based Single-Sign-On](/manage-bloodhound/auth/saml)
Your default users are configured with built-in authentication. For your team, you can also configure SAML authentication.
Enable multi-factor authentication for all users, no matter the authentication method and user role. If using SAML authentication, your connected identity provider will handle multi-factor authentication.
# Explore and remediate attack paths
Go to the **Attack Paths**, **Explore**, and **Posture** pages to see identified attack paths, prioritization, and recommended mitigations.
# Next steps
* Learn how to work with the [BloodHound Enterprise API](/integrations/bloodhound-api/working-with-api)
* [Configure BloodHound integrations](/integrations/overview)
Install the SharpHound Enterprise collector service on a domain-joined Windows system and run it as an Active Directory account.
1. Review the [SharpHound Enterprise System Requirements](/install-data-collector/install-sharphound/system-requirements) and [SharpHound Service Hardening Guidelines](/manage-bloodhound/securing-bloodhound-and-collectors/sharphound-hardening).
2. [Install and Upgrade SharpHound Enterprise](/install-data-collector/install-sharphound/installation-upgrade).
3. To fully secure a domain, collect data from all other domains with a trust relationship to it (in- and outgoing trust). Configure SharpHound Enterprise for [Cross-Trust Collection](/collect-data/enterprise-collection/cross-trust).
## Ingest with AzureHound Enterprise (Entra ID and Azure)
Install and run AzureHound Enterprise on Windows, Docker, or Kubernetes. When you deploy AzureHound Enterprise on Windows, it runs as a Windows service.
1. Review the [AzureHound Enterprise System Requirements and Deployment Process](/install-data-collector/install-azurehound/system-requirements).
2. [Configure Azure](/install-data-collector/install-azurehound/azure-configuration).
3. [Create your AzureHound configuration](/install-data-collector/install-azurehound/create-configuration).
4. [Deploy and maintain AzureHound](/install-data-collector/install-azurehound/installation-options).
## Ingest with OpenHound (Github, Jamf, and Okta)
OpenHound for BloodHound Enterprise runs as a containerized service and is complementary to SharpHound Enterprise and AzureHound Enterprise.
This is a SpecterOps-managed feature. If it is not enabled in your environment, contact your account team for assistance.
1. Review the OpenHound for BloodHound Enterprise [configuration requirements](/openhound/enterprise).
2. Create an OpenHound [collector client](/collect-data/enterprise-collection/create-collector) to get API credentials.
3. Configure the OpenHound collector you want to run:
* [Github](/openhound/collectors/github/collect-data#configure-openhound)
* [Jamf](/openhound/collectors/jamf/collect-data#configure-openhound)
* [Okta](/openhound/collectors/okta/collect-data#configure-openhound)
4. Deploy OpenHound in your environment and run an on-demand scan or scheduled collection.
# Verify data quality
After collecting data, to verify data quality:
1. Go to settings (⚙️) → **Administration** and select **Data Quality**.
2. Verify that each collector has collected the expected amount of data and that principal types match your expected coverage for each directory and platform.
3. If using privileged collection, verify that the charts **Local Group Completeness Over Time** and **Session Completeness Over Time** report higher than 0%.
Obtaining 100% completeness is not possible in most environments due to things like workstations being offline during collection.
4. If you see lower-than-expected data quality examine the data collection logs and contact your SpecterOps representative if you need assistance.
# Scope Tier Zero objects
BloodHound Enterprise identifies and prioritizes attack paths. To get the most accurate assessment scope your Tier Zero objects.
1. [Scope Tier Zero for your environment](/get-started/security-boundaries/tier-zero-members).
2. [Mark your environment's Tier Zero objects in BloodHound](/analyze-data/privilege-zones/overview).
# Grant users access
Your BloodHound Enterprise instance has a few administrative users by default. To bring your team into your instance, grant your team access with dedicated users and roles.
To grant users access to your instance, [create users and set access control roles](/manage-bloodhound/auth/users-and-roles).
BloodHound Enterprise supports two authentication methods for users:
* Built-in authentication via username and password, supporting TOTP-based multi-factor authentication
* [SAML 2.0-based Single-Sign-On](/manage-bloodhound/auth/saml)
Your default users are configured with built-in authentication. For your team, you can also configure SAML authentication.
Enable multi-factor authentication for all users, no matter the authentication method and user role. If using SAML authentication, your connected identity provider will handle multi-factor authentication.
# Explore and remediate attack paths
Go to the **Attack Paths**, **Explore**, and **Posture** pages to see identified attack paths, prioritization, and recommended mitigations.
# Next steps
* Learn how to work with the [BloodHound Enterprise API](/integrations/bloodhound-api/working-with-api)
* [Configure BloodHound integrations](/integrations/overview)