> ## Documentation Index
> Fetch the complete documentation index at: https://bloodhound.specterops.io/llms.txt
> Use this file to discover all available pages before exploring further.
# Ad-hoc BHE Data Collection with SharpHound CE
> Learn how to do ad-hoc data collection for BloodHound Enterprise using SharpHound Community Edition.
 ## Purpose
This article explains how to perform ad-hoc data collection for BloodHound Enterprise (BHE) using the SharpHound Community Edition (CE) collector.
Use SharpHound CE when you cannot deploy [SharpHound Enterprise](/install-data-collector/install-sharphound/system-requirements). Examples include:
* Environments with no internet access (such as SCADA or OT environments)
* Merger and acquisition scenarios to assess risk before integration or consolidation of IT infrastructure
* Quick deployment scenarios to do an initial assessment before a full SharpHound Enterprise deployment
SharpHound CE may require allow-listing in endpoint protection solutions, as it is unsigned and will likely be flagged as malicious.
SharpHound CE uses the same collection library as SharpHound Enterprise and therefore collects the same data. However, CE does not integrate with the SaaS portal, so it cannot provide portal status monitoring or configurable scheduled automatic collection and upload.
## Prerequisites
The following prerequisites are required to perform ad-hoc data collection with SharpHound CE:
* Logged in as a user with the **Administrator**, **Power User**, or **Upload-only** [role](/manage-bloodhound/auth/users-and-roles)
* Access to an account and computer in the in-scope domain or a domain trusted by the in-scope domain
## Process
The ad-hoc data collection process consists of two main steps: performing the data collection with SharpHound CE and uploading the collected data to BloodHound Enterprise.
### Perform SharpHound CE data collection
This section outlines how to use SharpHound CE to collect data from the target environment.
Get the latest version of SharpHound CE using one of the following methods:
* Download from your [BloodHound Enterprise](/get-started/quickstart/community-edition-quickstart#download-collectors) tenant
* Download from [GitHub](https://github.com/SpecterOps/SharpHound/releases/latest)
You can also compile SharpHound CE from the [source code](https://github.com/SpecterOps/SharpHound).
Extract the contents of the downloaded ZIP archive to a working directory on the system where you plan to collect data.
1. Choose a [collection](/collect-data/ce-collection/sharphound-flags#collectionmethods-or-'c') method that meets your requirements.
DCOnly is the recommended starting method and is equivalent to BHE's Active Directory + Certificate Services.
2. Open a PowerShell or Command Prompt window.
3. Navigate to the directory where you extracted SharpHound CE.
4. Start collection with the chosen method.
For example, to perform a **DCOnly** collection:
```ps theme={null}
C:\> SharpHound.exe --CollectionMethods DCOnly
```
After the collection completes, locate the output .zip file in the same directory where you ran SharpHound CE. The file name is in the format `SharpHound-.zip`.
### Upload data to BloodHound Enterprise
This section outlines how to upload the collected data to BloodHound Enterprise for analysis.
In the left menu, click **Administration** > **File Ingest**.
1. Click **Upload File(s)**.
## Purpose
This article explains how to perform ad-hoc data collection for BloodHound Enterprise (BHE) using the SharpHound Community Edition (CE) collector.
Use SharpHound CE when you cannot deploy [SharpHound Enterprise](/install-data-collector/install-sharphound/system-requirements). Examples include:
* Environments with no internet access (such as SCADA or OT environments)
* Merger and acquisition scenarios to assess risk before integration or consolidation of IT infrastructure
* Quick deployment scenarios to do an initial assessment before a full SharpHound Enterprise deployment
SharpHound CE may require allow-listing in endpoint protection solutions, as it is unsigned and will likely be flagged as malicious.
SharpHound CE uses the same collection library as SharpHound Enterprise and therefore collects the same data. However, CE does not integrate with the SaaS portal, so it cannot provide portal status monitoring or configurable scheduled automatic collection and upload.
## Prerequisites
The following prerequisites are required to perform ad-hoc data collection with SharpHound CE:
* Logged in as a user with the **Administrator**, **Power User**, or **Upload-only** [role](/manage-bloodhound/auth/users-and-roles)
* Access to an account and computer in the in-scope domain or a domain trusted by the in-scope domain
## Process
The ad-hoc data collection process consists of two main steps: performing the data collection with SharpHound CE and uploading the collected data to BloodHound Enterprise.
### Perform SharpHound CE data collection
This section outlines how to use SharpHound CE to collect data from the target environment.
Get the latest version of SharpHound CE using one of the following methods:
* Download from your [BloodHound Enterprise](/get-started/quickstart/community-edition-quickstart#download-collectors) tenant
* Download from [GitHub](https://github.com/SpecterOps/SharpHound/releases/latest)
You can also compile SharpHound CE from the [source code](https://github.com/SpecterOps/SharpHound).
Extract the contents of the downloaded ZIP archive to a working directory on the system where you plan to collect data.
1. Choose a [collection](/collect-data/ce-collection/sharphound-flags#collectionmethods-or-'c') method that meets your requirements.
DCOnly is the recommended starting method and is equivalent to BHE's Active Directory + Certificate Services.
2. Open a PowerShell or Command Prompt window.
3. Navigate to the directory where you extracted SharpHound CE.
4. Start collection with the chosen method.
For example, to perform a **DCOnly** collection:
```ps theme={null}
C:\> SharpHound.exe --CollectionMethods DCOnly
```
After the collection completes, locate the output .zip file in the same directory where you ran SharpHound CE. The file name is in the format `SharpHound-.zip`.
### Upload data to BloodHound Enterprise
This section outlines how to upload the collected data to BloodHound Enterprise for analysis.
In the left menu, click **Administration** > **File Ingest**.
1. Click **Upload File(s)**.
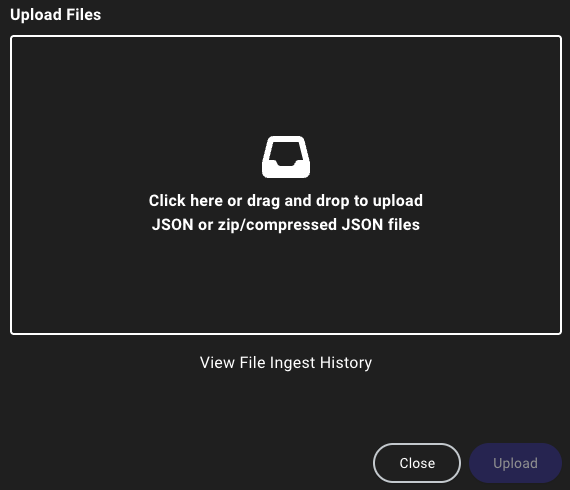
 2. Click the modal or drag and drop the output .zip file onto it and click **Upload**.
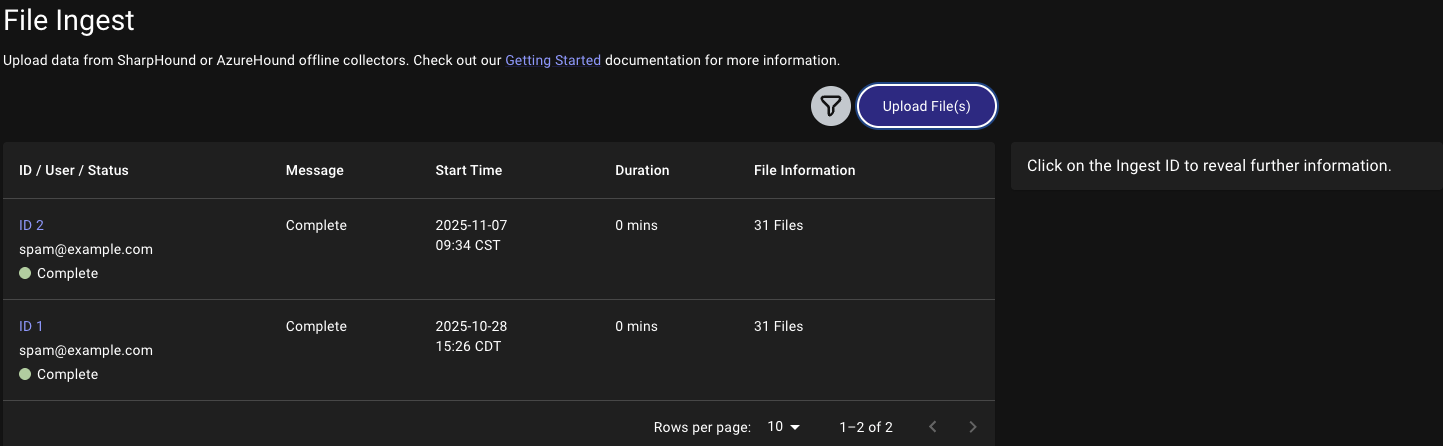
 After the upload completes, you can verify the status on the [**File Ingest**](/collect-data/enterprise-collection/monitor#file-ingest-logs) page.
### Analyze Data and Use BloodHound Enterprise Features
* **Dashboard and Visualization:** Review key insights and summaries.
* **Running Queries:** Explore specific security aspects and visualize attack paths.
* **Posture Reporting:** Visualize and track exposure within your Enterprise
### Best Practices for Secure Environments
* **Minimize Data Collection Scope:** Focus on necessary data to limit exposure.
* **Secure Data Handling:** Ensure secure storage and handling of collected data.
* **Regular Updates and Maintenance:** Keep SharpHound CE updated.
## Outcome
After ingest and analysis is complete, BloodHound Enterprise presents a comprehensive report with actionable recommendations on the **Attack Paths** page.
After the upload completes, you can verify the status on the [**File Ingest**](/collect-data/enterprise-collection/monitor#file-ingest-logs) page.
### Analyze Data and Use BloodHound Enterprise Features
* **Dashboard and Visualization:** Review key insights and summaries.
* **Running Queries:** Explore specific security aspects and visualize attack paths.
* **Posture Reporting:** Visualize and track exposure within your Enterprise
### Best Practices for Secure Environments
* **Minimize Data Collection Scope:** Focus on necessary data to limit exposure.
* **Secure Data Handling:** Ensure secure storage and handling of collected data.
* **Regular Updates and Maintenance:** Keep SharpHound CE updated.
## Outcome
After ingest and analysis is complete, BloodHound Enterprise presents a comprehensive report with actionable recommendations on the **Attack Paths** page.