> ## Documentation Index
> Fetch the complete documentation index at: https://bloodhound.specterops.io/llms.txt
> Use this file to discover all available pages before exploring further.
# Create a gMSA for Use With SharpHound Community Edition
export const word_0 = "Community Edition"
 This page describes how to configure and run the SharpHound Community Edition collection tool using an Active Directory gMSA.
## Overview of gMSAs
Group Managed Service Accounts (gMSA) are managed domain accounts that provide automatic password management, simplified service principal name (SPN) management, and the ability to delegate the management to other objects.
Detailed software requirements from Microsoft are available [here](https://docs.microsoft.com/en-us/previous-versions/windows/it-pro/windows-server-2012-r2-and-2012/hh831782\(v=ws.11\)#software-requirements).
Microsoft gMSA documentation is available [here](https://docs.microsoft.com/en-us/previous-versions/windows/it-pro/windows-server-2012-r2-and-2012/hh831782\(v=ws.11\)).
## Create a gMSA account
To create a gMSA account, start by preparing the domain.
1. Log into a domain controller within the domain you want to create a gMSA.
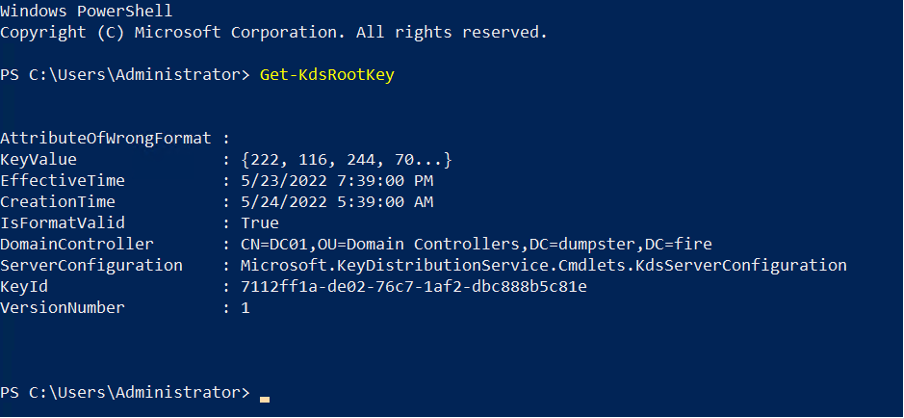
2. To validate whether the domain has a KDS Root Key configured, run:
```
Get-KdsRootKey
```
If there's no result returned, the KDS Root Key has not been configured in the domain. Continue on to step 3.
If there is a result returned, the KDS Root Key has already been configured in the domain. Skip step 3 and move on to [Create the gMSA and password read group](#create-the-gmsa-and-password-read-group).
This page describes how to configure and run the SharpHound Community Edition collection tool using an Active Directory gMSA.
## Overview of gMSAs
Group Managed Service Accounts (gMSA) are managed domain accounts that provide automatic password management, simplified service principal name (SPN) management, and the ability to delegate the management to other objects.
Detailed software requirements from Microsoft are available [here](https://docs.microsoft.com/en-us/previous-versions/windows/it-pro/windows-server-2012-r2-and-2012/hh831782\(v=ws.11\)#software-requirements).
Microsoft gMSA documentation is available [here](https://docs.microsoft.com/en-us/previous-versions/windows/it-pro/windows-server-2012-r2-and-2012/hh831782\(v=ws.11\)).
## Create a gMSA account
To create a gMSA account, start by preparing the domain.
1. Log into a domain controller within the domain you want to create a gMSA.
2. To validate whether the domain has a KDS Root Key configured, run:
```
Get-KdsRootKey
```
If there's no result returned, the KDS Root Key has not been configured in the domain. Continue on to step 3.
If there is a result returned, the KDS Root Key has already been configured in the domain. Skip step 3 and move on to [Create the gMSA and password read group](#create-the-gmsa-and-password-read-group).
 3. Create the KDS Root Key.
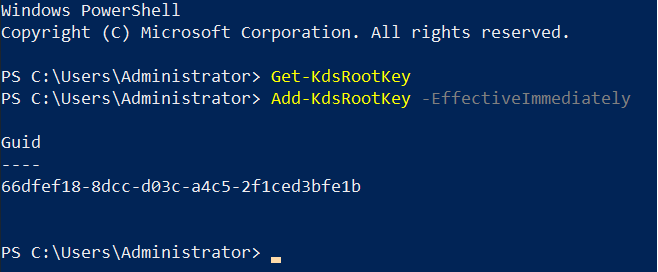
For a production environment, run:
```
Add-KdsRootKey -EffectiveImmediately
```
3. Create the KDS Root Key.
For a production environment, run:
```
Add-KdsRootKey -EffectiveImmediately
```
 For a test environment, make the key available for immediate use by running:
```
Add-KdsRootKey -EffectiveTime ((Get-Date).AddHours(-10))
```
## Create the gMSA and password read group
Perform these steps from/against a writeable Domain Controller.
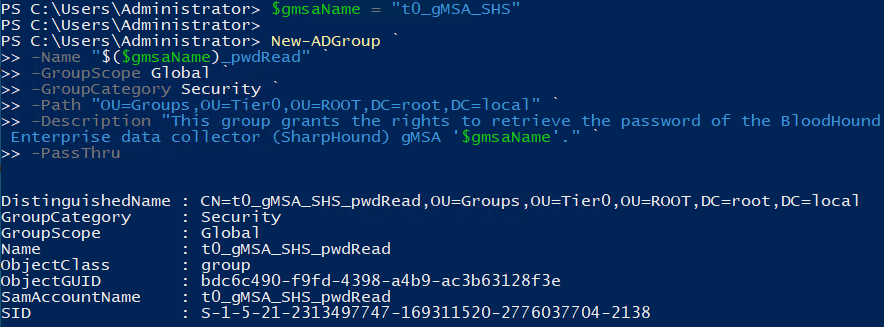
1. Create a gMSA password read group for computers that should have access to the gMSA password.
Browse to the desired location in Users and Computers and create the group.
Alternatively, use this template to create the group using PowerShell:
```json theme={null}
$gmsaName = "t0_gMSA_SHS" # Name of the gMSA
$pwdReadOUDN = "<DISGINGUISHED_NAME>" # Distinguished Name of OU to create the password read group in
New-ADGroup `
-Name "$($gmsaName)_pwdRead" `
-GroupScope Global `
-GroupCategory Security `
-Path $pwdReadOUDN `
-Description "This group grants the rights to retrieve the password of the BloodHound data collector (SharpHound) gMSA '$gmsaName'." `
-PassThru
```
For a test environment, make the key available for immediate use by running:
```
Add-KdsRootKey -EffectiveTime ((Get-Date).AddHours(-10))
```
## Create the gMSA and password read group
Perform these steps from/against a writeable Domain Controller.
1. Create a gMSA password read group for computers that should have access to the gMSA password.
Browse to the desired location in Users and Computers and create the group.
Alternatively, use this template to create the group using PowerShell:
```json theme={null}
$gmsaName = "t0_gMSA_SHS" # Name of the gMSA
$pwdReadOUDN = "<DISGINGUISHED_NAME>" # Distinguished Name of OU to create the password read group in
New-ADGroup `
-Name "$($gmsaName)_pwdRead" `
-GroupScope Global `
-GroupCategory Security `
-Path $pwdReadOUDN `
-Description "This group grants the rights to retrieve the password of the BloodHound data collector (SharpHound) gMSA '$gmsaName'." `
-PassThru
```
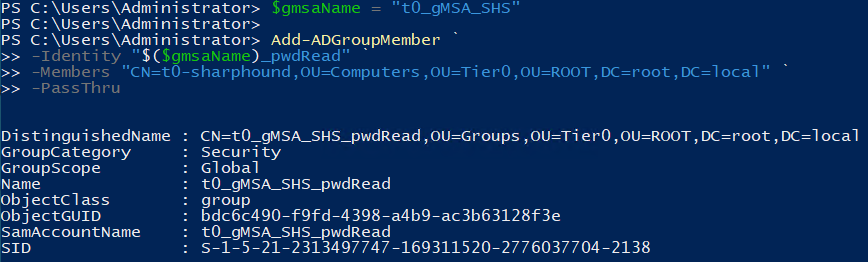
 2. Add the SharpHound {word_0} server that performs the Sharphound collections as a member of the gMSA password read group. This allows it to access the password of the gMSA and run the service.
Add the computer to the group in Users and Computers.
Alternatively, use this template to add group membership using PowerShell:
```json theme={null}
$gmsaName = "t0_gMSA_SHS" # Name of the gMSA
$shServerDN = "<DISGINGUISHED_NAME>" # Distinguished Name of the SharpHound Enterprise server
Add-ADGroupMember `
-Identity "$($gmsaName)_pwdRead" `
-Members $shServerDN `
-PassThru
```
2. Add the SharpHound {word_0} server that performs the Sharphound collections as a member of the gMSA password read group. This allows it to access the password of the gMSA and run the service.
Add the computer to the group in Users and Computers.
Alternatively, use this template to add group membership using PowerShell:
```json theme={null}
$gmsaName = "t0_gMSA_SHS" # Name of the gMSA
$shServerDN = "<DISGINGUISHED_NAME>" # Distinguished Name of the SharpHound Enterprise server
Add-ADGroupMember `
-Identity "$($gmsaName)_pwdRead" `
-Members $shServerDN `
-PassThru
```
 When viewing the changes on a Windows server with the GUI enabled, you can see the OUs and the t0\_gMSA\_SHS\_pwdRead group you created.
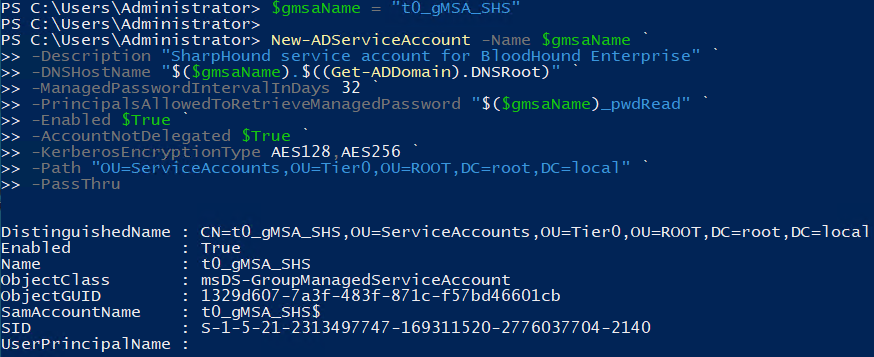
3. Create the gMSA and allow the password read group to retrieve its password.
On a Domain Controller, use this template to create the gMSA and set the retrieve right using PowerShell:
```json theme={null}
$gmsaName = "t0_gMSA_SHS" # Name of the gMSA
$gmsaOUDN = "<DISGINGUISHED_NAME>" # Distinguished Name of OU to create the gMSA in
New-ADServiceAccount -Name $gmsaName `
-Description "SharpHound service account for BloodHound" `
-DNSHostName "$($gmsaName).$((Get-ADDomain).DNSRoot)" `
-ManagedPasswordIntervalInDays 32 `
-PrincipalsAllowedToRetrieveManagedPassword "$($gmsaName)_pwdRead" `
-Enabled $True `
-AccountNotDelegated $True `
-KerberosEncryptionType AES128,AES256 `
-Path $gmsaOUDN `
-PassThru
```
If you receive the error `"_New-ADServiceAccount : Key does not exist_"`, try again in 10 hours. This allows all Domain Controllers to converge AD replication of the KDS root key.
When viewing the changes on a Windows server with the GUI enabled, you can see the OUs and the t0\_gMSA\_SHS\_pwdRead group you created.
3. Create the gMSA and allow the password read group to retrieve its password.
On a Domain Controller, use this template to create the gMSA and set the retrieve right using PowerShell:
```json theme={null}
$gmsaName = "t0_gMSA_SHS" # Name of the gMSA
$gmsaOUDN = "<DISGINGUISHED_NAME>" # Distinguished Name of OU to create the gMSA in
New-ADServiceAccount -Name $gmsaName `
-Description "SharpHound service account for BloodHound" `
-DNSHostName "$($gmsaName).$((Get-ADDomain).DNSRoot)" `
-ManagedPasswordIntervalInDays 32 `
-PrincipalsAllowedToRetrieveManagedPassword "$($gmsaName)_pwdRead" `
-Enabled $True `
-AccountNotDelegated $True `
-KerberosEncryptionType AES128,AES256 `
-Path $gmsaOUDN `
-PassThru
```
If you receive the error `"_New-ADServiceAccount : Key does not exist_"`, try again in 10 hours. This allows all Domain Controllers to converge AD replication of the KDS root key.
 ## Prepare the SharpHound {word_0} server
1. Restart the SharpHound Enterprise server so that the server's membership of the \`pwdRead\` group takes effect.
2. Grant the gMSA the "Log on as a service" User Rights Assignment on the SharpHound {word_0} server. This can be done through \`secpol.msc\` or policy deployment methods like a GPO.
3. (Optional) Test that the SharpHound {word_0} server can retrieve the gMSA password. See [Test the gMSA](#test-the-gmsa).
## Test the gMSA
Optionally test the gMSA server to make sure that the gMSA is working.
1. Check the status of the RSAT PowerShell module. On the SharpHound Enterprise server, open a PowerShell as an Administrator and run:
```json theme={null}
Get-WindowsCapability -Name RSAT*
```
## Prepare the SharpHound {word_0} server
1. Restart the SharpHound Enterprise server so that the server's membership of the \`pwdRead\` group takes effect.
2. Grant the gMSA the "Log on as a service" User Rights Assignment on the SharpHound {word_0} server. This can be done through \`secpol.msc\` or policy deployment methods like a GPO.
3. (Optional) Test that the SharpHound {word_0} server can retrieve the gMSA password. See [Test the gMSA](#test-the-gmsa).
## Test the gMSA
Optionally test the gMSA server to make sure that the gMSA is working.
1. Check the status of the RSAT PowerShell module. On the SharpHound Enterprise server, open a PowerShell as an Administrator and run:
```json theme={null}
Get-WindowsCapability -Name RSAT*
```
 If the Install State shows "Installed", skip to step 2, otherwise run:
```
Get-WindowsCapability -Name RSAT* -Online | Add-WindowsCapability -Online
```
If the Install State shows "Installed", skip to step 2, otherwise run:
```
Get-WindowsCapability -Name RSAT* -Online | Add-WindowsCapability -Online
```
 2. In the elevated PowerShell, test that the SharpHound server can retrieve the gMSA password by running:
```json theme={null}
$gmsaName = "t0_gMSA_SHS" # Name of the gMSA
Test-ADServiceAccount -Identity $gmsaName
```
2. In the elevated PowerShell, test that the SharpHound server can retrieve the gMSA password by running:
```json theme={null}
$gmsaName = "t0_gMSA_SHS" # Name of the gMSA
Test-ADServiceAccount -Identity $gmsaName
```
 The test is successful if the command responds with `True`.
## Configure User Rights
As SharpHound is launched with a PowerShell script instead of running as a service, you need to grant the gMSA account the **Log on as a batch job** User Right instead of the **Log on as Service** User Right. Do this with the Local Security Policy or Group Policy.
### Configure user permissions
The Active Directory details collected by SharpHound depend on the permissions that the user running SharpHound has within the Domain.
A regular, non-privileged user can run SharpHound and collect a significant amount of information from Active Directory, but some local system data requires additional permissions on the in-scope computers. See [SharpHound Data and Permissions](/collect-data/sharphound-data-permissions) for an overview.
Grant collection permissions directly to the SharpHound gMSA account. There are two recommended paths:
* **Method 1**: Explicitly make the SharpHound gMSA account a member of the local `Administrators` group on in-scope computers.
* **Method 2**: Grant the SharpHound gMSA account the least-privilege permission set described in [Least-Privileged Collection](/collect-data/enterprise-collection/least-privileged-collection).
The SharpHound collection service account does not require `Domain Admin` membership. `Domain Admins` receives local administrator access on domain-joined computers by default, but that is implicit access and the `Domain Admins` membership gives many other unnecessary permissions. Use explicit local administrator assignment or least-privilege delegation instead.
#### Implement gMSA account protections
After granting collection permissions, consider additional protections for the gMSA account. We highly recommend membership in the `Protected Users` group.
See [SharpHound Enterprise Service Hardening](/manage-bloodhound/securing-bloodhound-and-collectors/sharphound-hardening) to learn about protections you can implement to prevent the SharpHound gMSA account from being compromised and leveraged by an attacker.
## Create a SharpHound PowerShell script to run as a scheduled task
Create a PowerShell script to run SharpHound with a scheduled task.
### Create a script
To create the script on the server where the scheduled task should run:
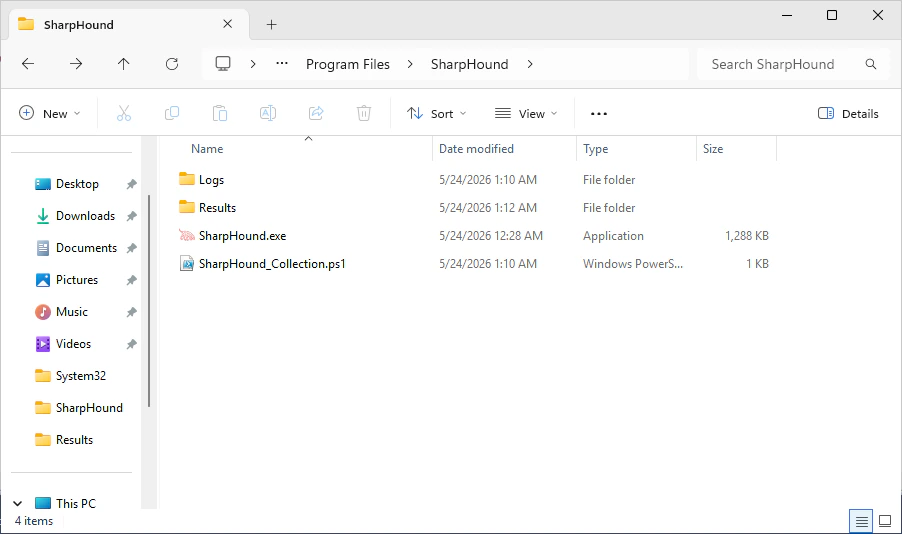
1. Create these three directories:
* `C:\Program Files\SharpHound`
* `C:\Program Files\SharpHound\Results`, and grant the gMSA service account Modify permissions on files within.
* `C:\Program Files\SharpHound\Logs`, and grant the gMSA service account Modify permissions on files within.
Run the code block below, or create the directories and ACLs manually. The code block creates `C:\Program Files\SharpHound` implicitly as a parent of the children.
```powershell theme={null}
$account = "$($env:USERDOMAIN)\t0_gMSA_SHS$"
$paths = @(
"C:\Program Files\SharpHound\Results",
"C:\Program Files\SharpHound\Logs"
)
foreach ($path in $paths) {
New-Item $path -ItemType Directory -Force
$acl = Get-Acl -Path $path
$rule = New-Object System.Security.AccessControl.FileSystemAccessRule(
$account,
[System.Security.AccessControl.FileSystemRights]::Modify,
[System.Security.AccessControl.InheritanceFlags]"ContainerInherit,ObjectInherit",
[System.Security.AccessControl.PropagationFlags]::None,
[System.Security.AccessControl.AccessControlType]::Allow
)
$acl.AddAccessRule($rule)
Set-Acl -Path $path -AclObject $acl
}
```
2. Copy the SharpHound CE executable to the `C:\Program Files\SharpHound` directory.
The SharpHound CE executable may need to be allowlisted or transferred as a password-protected zip file so that Microsoft Defender doesn't block it during the file transfer.
3. Create the PowerShell script `C:\Program Files\SharpHound\SharpHound_Collection.ps1` with the contents from the code block below.
The PowerShell script contains:
* The relative path to the SharpHound executable
* The command line arguments that you want to pass to SharpHound
* Redirection of the console output to a log file
* Deletion of results that are older than 2 months
```powershell theme={null}
$Results = ".\Results"
$Logs = ".\Logs"
$FileDateStamp = Get-Date -Format FileDateTime
& ".\SharpHound.exe" --collectionmethods all --outputdirectory $Results *> "$Logs\$FileDateStamp.log"
#Delete results older than 2 months
Get-ChildItem $Results -Recurse -Force -ea 0 |
? {!$_.PsIsContainer -and $_.LastWriteTime -lt (Get-Date).AddDays(-60)} |
ForEach-Object {
$_ | Remove-Item -Force
$_.FullName | Out-File "$Logs\$FileDateStamp-deletedlog.txt"
}
```
The resulting directory structure should resemble:
The test is successful if the command responds with `True`.
## Configure User Rights
As SharpHound is launched with a PowerShell script instead of running as a service, you need to grant the gMSA account the **Log on as a batch job** User Right instead of the **Log on as Service** User Right. Do this with the Local Security Policy or Group Policy.
### Configure user permissions
The Active Directory details collected by SharpHound depend on the permissions that the user running SharpHound has within the Domain.
A regular, non-privileged user can run SharpHound and collect a significant amount of information from Active Directory, but some local system data requires additional permissions on the in-scope computers. See [SharpHound Data and Permissions](/collect-data/sharphound-data-permissions) for an overview.
Grant collection permissions directly to the SharpHound gMSA account. There are two recommended paths:
* **Method 1**: Explicitly make the SharpHound gMSA account a member of the local `Administrators` group on in-scope computers.
* **Method 2**: Grant the SharpHound gMSA account the least-privilege permission set described in [Least-Privileged Collection](/collect-data/enterprise-collection/least-privileged-collection).
The SharpHound collection service account does not require `Domain Admin` membership. `Domain Admins` receives local administrator access on domain-joined computers by default, but that is implicit access and the `Domain Admins` membership gives many other unnecessary permissions. Use explicit local administrator assignment or least-privilege delegation instead.
#### Implement gMSA account protections
After granting collection permissions, consider additional protections for the gMSA account. We highly recommend membership in the `Protected Users` group.
See [SharpHound Enterprise Service Hardening](/manage-bloodhound/securing-bloodhound-and-collectors/sharphound-hardening) to learn about protections you can implement to prevent the SharpHound gMSA account from being compromised and leveraged by an attacker.
## Create a SharpHound PowerShell script to run as a scheduled task
Create a PowerShell script to run SharpHound with a scheduled task.
### Create a script
To create the script on the server where the scheduled task should run:
1. Create these three directories:
* `C:\Program Files\SharpHound`
* `C:\Program Files\SharpHound\Results`, and grant the gMSA service account Modify permissions on files within.
* `C:\Program Files\SharpHound\Logs`, and grant the gMSA service account Modify permissions on files within.
Run the code block below, or create the directories and ACLs manually. The code block creates `C:\Program Files\SharpHound` implicitly as a parent of the children.
```powershell theme={null}
$account = "$($env:USERDOMAIN)\t0_gMSA_SHS$"
$paths = @(
"C:\Program Files\SharpHound\Results",
"C:\Program Files\SharpHound\Logs"
)
foreach ($path in $paths) {
New-Item $path -ItemType Directory -Force
$acl = Get-Acl -Path $path
$rule = New-Object System.Security.AccessControl.FileSystemAccessRule(
$account,
[System.Security.AccessControl.FileSystemRights]::Modify,
[System.Security.AccessControl.InheritanceFlags]"ContainerInherit,ObjectInherit",
[System.Security.AccessControl.PropagationFlags]::None,
[System.Security.AccessControl.AccessControlType]::Allow
)
$acl.AddAccessRule($rule)
Set-Acl -Path $path -AclObject $acl
}
```
2. Copy the SharpHound CE executable to the `C:\Program Files\SharpHound` directory.
The SharpHound CE executable may need to be allowlisted or transferred as a password-protected zip file so that Microsoft Defender doesn't block it during the file transfer.
3. Create the PowerShell script `C:\Program Files\SharpHound\SharpHound_Collection.ps1` with the contents from the code block below.
The PowerShell script contains:
* The relative path to the SharpHound executable
* The command line arguments that you want to pass to SharpHound
* Redirection of the console output to a log file
* Deletion of results that are older than 2 months
```powershell theme={null}
$Results = ".\Results"
$Logs = ".\Logs"
$FileDateStamp = Get-Date -Format FileDateTime
& ".\SharpHound.exe" --collectionmethods all --outputdirectory $Results *> "$Logs\$FileDateStamp.log"
#Delete results older than 2 months
Get-ChildItem $Results -Recurse -Force -ea 0 |
? {!$_.PsIsContainer -and $_.LastWriteTime -lt (Get-Date).AddDays(-60)} |
ForEach-Object {
$_ | Remove-Item -Force
$_.FullName | Out-File "$Logs\$FileDateStamp-deletedlog.txt"
}
```
The resulting directory structure should resemble:
 ### Create a scheduled task
To create the scheduled task, choose the PowerShell method or the GUI method. The PowerShell method is the easiest way to create the scheduled task.
To create the scheduled task with PowerShell:
1. Run these PowerShell commands, modifying files names and domain names as necessary:
```powershell theme={null}
$arg = '-ExecutionPolicy ByPass -NoProfile -File ".\SharpHound_Collection.ps1"'
$ta = New-ScheduledTaskAction -Execute C:\Windows\System32\WindowsPowerShell\v1.0\powershell.exe -Argument $arg -WorkingDirectory "C:\Program Files\SharpHound"
$tt = New-ScheduledTaskTrigger -At 9:00 -Weekly -DaysOfWeek Monday
$ap = New-ScheduledTaskPrincipal -UserID "$($env:USERDOMAIN)\t0_gMSA_SHS$" -LogonType Password -RunLevel Highest
Register-ScheduledTask SharpHoundCollection -Action $ta -Trigger $tt -Principal $ap
```
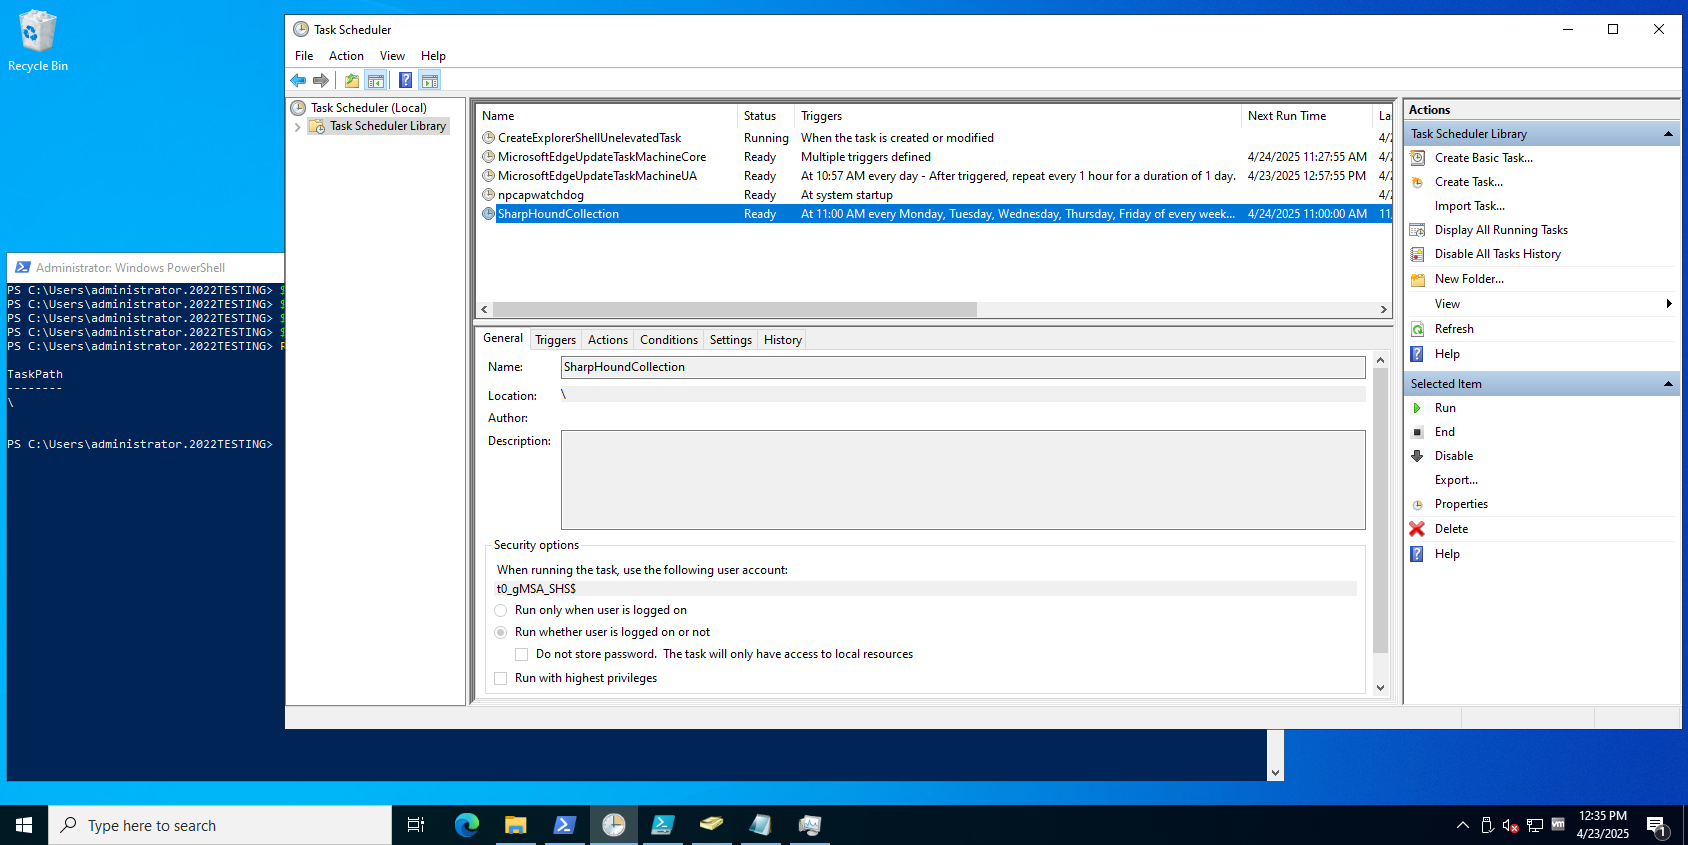
2. After refreshing the Scheduled Tasks MMC, you should see the newly created scheduled task that runs as the gMSA account.
### Create a scheduled task
To create the scheduled task, choose the PowerShell method or the GUI method. The PowerShell method is the easiest way to create the scheduled task.
To create the scheduled task with PowerShell:
1. Run these PowerShell commands, modifying files names and domain names as necessary:
```powershell theme={null}
$arg = '-ExecutionPolicy ByPass -NoProfile -File ".\SharpHound_Collection.ps1"'
$ta = New-ScheduledTaskAction -Execute C:\Windows\System32\WindowsPowerShell\v1.0\powershell.exe -Argument $arg -WorkingDirectory "C:\Program Files\SharpHound"
$tt = New-ScheduledTaskTrigger -At 9:00 -Weekly -DaysOfWeek Monday
$ap = New-ScheduledTaskPrincipal -UserID "$($env:USERDOMAIN)\t0_gMSA_SHS$" -LogonType Password -RunLevel Highest
Register-ScheduledTask SharpHoundCollection -Action $ta -Trigger $tt -Principal $ap
```
2. After refreshing the Scheduled Tasks MMC, you should see the newly created scheduled task that runs as the gMSA account.
 To create the scheduled task with the GUI:
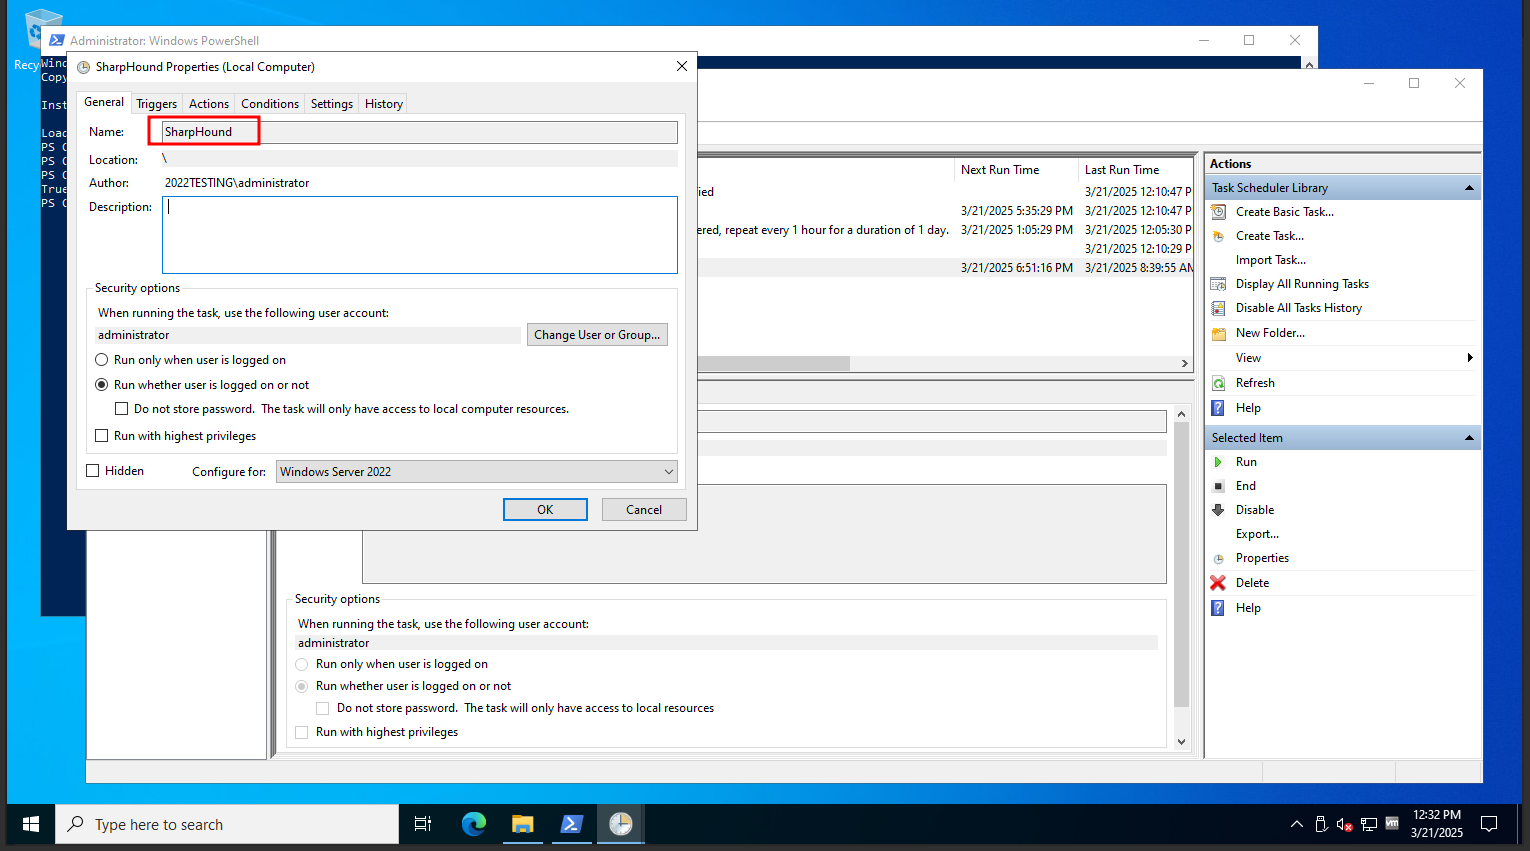
1. Open the Scheduled Tasks MSC on the SharpHound server and create a scheduled task. In the example shown below, the scheduled task name is SharpHound.
To create the scheduled task with the GUI:
1. Open the Scheduled Tasks MSC on the SharpHound server and create a scheduled task. In the example shown below, the scheduled task name is SharpHound.
 2. Configure the scheduled task to run on the desired schedule.
3. Configure the scheduled task with this **Action**:
* **Program / script**: `C:\Windows\System32\WindowsPowerShell\v1.0\powershell.exe`
* **Arguments**: `-ExecutionPolicy ByPass -NoProfile -File ".\SharpHound_Collection.ps1"`
* **Start in**: `C:\Program Files\SharpHound`
4. Click **OK** on the **Edit Action**.
5. Leave the default run-account selection for now — you'll change it to the gMSA in a later step.
6. Click **OK** on the scheduled task to complete the creation.
7. Provide the password for the standard user account when prompted and click **OK**. At this point you should see the scheduled task setup to run using the user account you previously configured.
2. Configure the scheduled task to run on the desired schedule.
3. Configure the scheduled task with this **Action**:
* **Program / script**: `C:\Windows\System32\WindowsPowerShell\v1.0\powershell.exe`
* **Arguments**: `-ExecutionPolicy ByPass -NoProfile -File ".\SharpHound_Collection.ps1"`
* **Start in**: `C:\Program Files\SharpHound`
4. Click **OK** on the **Edit Action**.
5. Leave the default run-account selection for now — you'll change it to the gMSA in a later step.
6. Click **OK** on the scheduled task to complete the creation.
7. Provide the password for the standard user account when prompted and click **OK**. At this point you should see the scheduled task setup to run using the user account you previously configured.
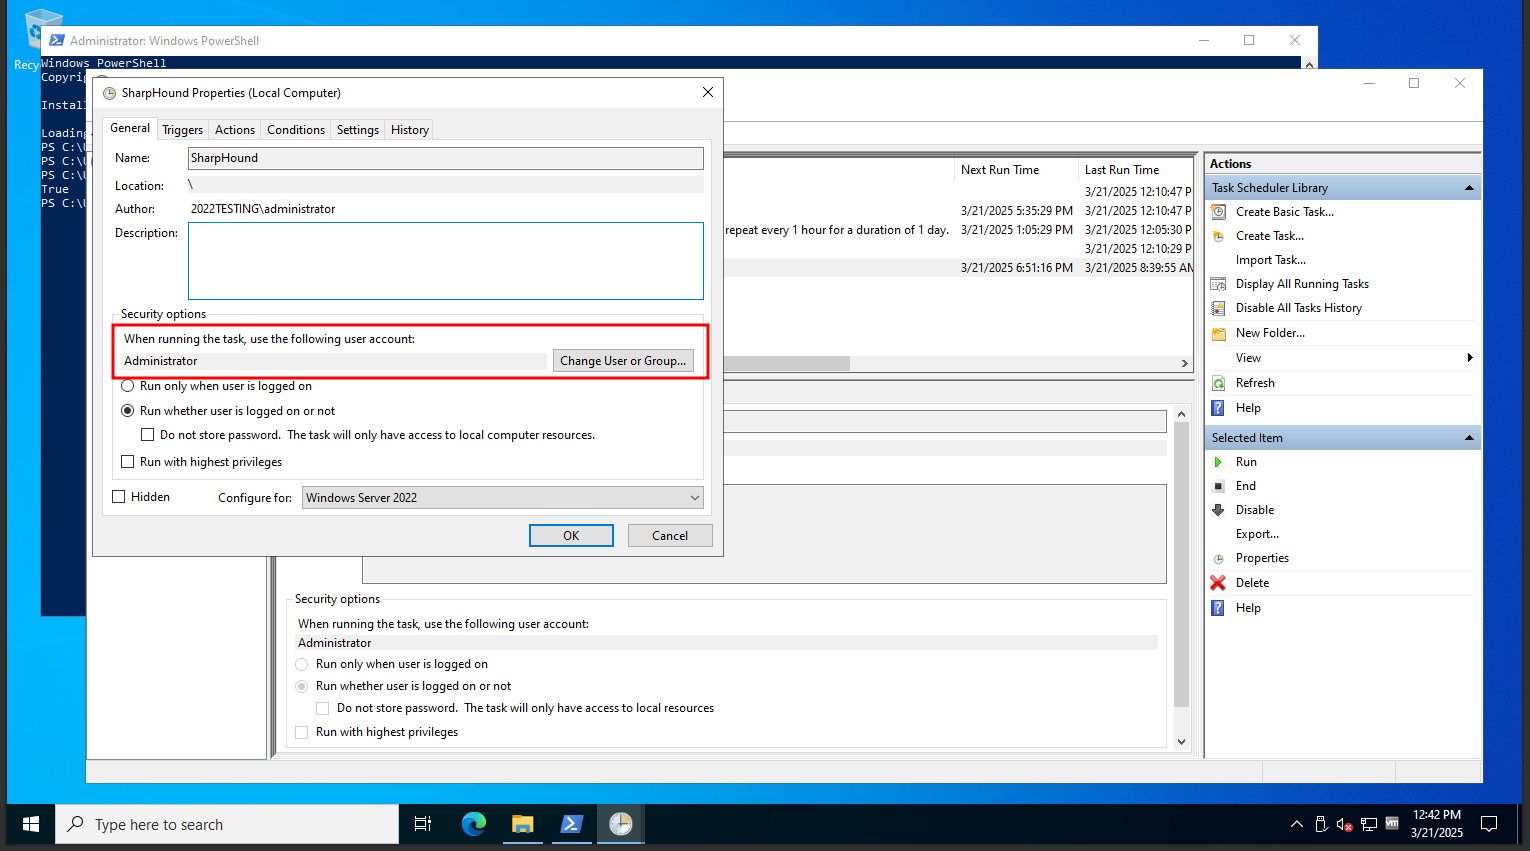 8. Modify the scheduled task to run as the gMSA account with PowerShell:
* Option A: `schtasks`
```powershell theme={null}
schtasks /change /TN \SharpHound /RU "$($env:USERDOMAIN)\t0_gMSA_SHS$" /RP
```
* Option B: `New-ScheduledTaskPrincipal`
```powershell theme={null}
$principal = New-ScheduledTaskPrincipal -UserID "$($env:USERDOMAIN)\t0_gMSA_SHS$" -LogonType Password -RunLevel Highest
Set-ScheduledTask -TaskName SharpHound -Principal $principal
```
9. You should see a message stating that command was successful. If you open the scheduled task you should see that the account it will run as is the gMSA account.
### Test the SharpHound scheduled task
To test the scheduled task running as the gMSA account, right click on the scheduled task and click **Run**.
When completed, a zip file should appear in `C:\Program Files\SharpHound\Results\`, and a log file in `C:\Program Files\SharpHound\Logs\`.
***
Thank you to [@robertstrom](https://github.com/robertstrom) for your contribution and permission in modifying your [original docs](https://github.com/robertstrom/SharphoundgMSA/tree/main) for inclusion in BloodHound's documentation for other users!
8. Modify the scheduled task to run as the gMSA account with PowerShell:
* Option A: `schtasks`
```powershell theme={null}
schtasks /change /TN \SharpHound /RU "$($env:USERDOMAIN)\t0_gMSA_SHS$" /RP
```
* Option B: `New-ScheduledTaskPrincipal`
```powershell theme={null}
$principal = New-ScheduledTaskPrincipal -UserID "$($env:USERDOMAIN)\t0_gMSA_SHS$" -LogonType Password -RunLevel Highest
Set-ScheduledTask -TaskName SharpHound -Principal $principal
```
9. You should see a message stating that command was successful. If you open the scheduled task you should see that the account it will run as is the gMSA account.
### Test the SharpHound scheduled task
To test the scheduled task running as the gMSA account, right click on the scheduled task and click **Run**.
When completed, a zip file should appear in `C:\Program Files\SharpHound\Results\`, and a log file in `C:\Program Files\SharpHound\Logs\`.
***
Thank you to [@robertstrom](https://github.com/robertstrom) for your contribution and permission in modifying your [original docs](https://github.com/robertstrom/SharphoundgMSA/tree/main) for inclusion in BloodHound's documentation for other users!