> ## Documentation Index
> Fetch the complete documentation index at: https://bloodhound.specterops.io/llms.txt
> Use this file to discover all available pages before exploring further.
# Zones
> Organize and categorize objects in your environment using Privilege Zones.
export const tab_1 = "zone"
export const tab_0 = "Zones"
 Zones define hierarchical privilege levels in your environment based on a tiered administration model. The most common tiering model is [Microsoft's Enterprise Access Model](https://learn.microsoft.com/en-us/security/privileged-access-workstations/privileged-access-access-model).
BloodHound uses zones to measure risk and detect violations. Each zone has a specific tier level (**Tier Zero** is the default and highest).
BloodHound Enterprise customers can [create](/analyze-data/privilege-zones/zones) additional zones to match their organization's security model. However, analyzing them requires the **Privilege Zone Analysis** feature (available for purchase). For more information, contact your sales representative.
The **{tab_0}** tab provides different views depending on which edition of BloodHound you're using. The **Summary View** is available in BloodHound Enterprise only, while the **Details View** is available in both BloodHound Enterprise and BloodHound Community Edition.
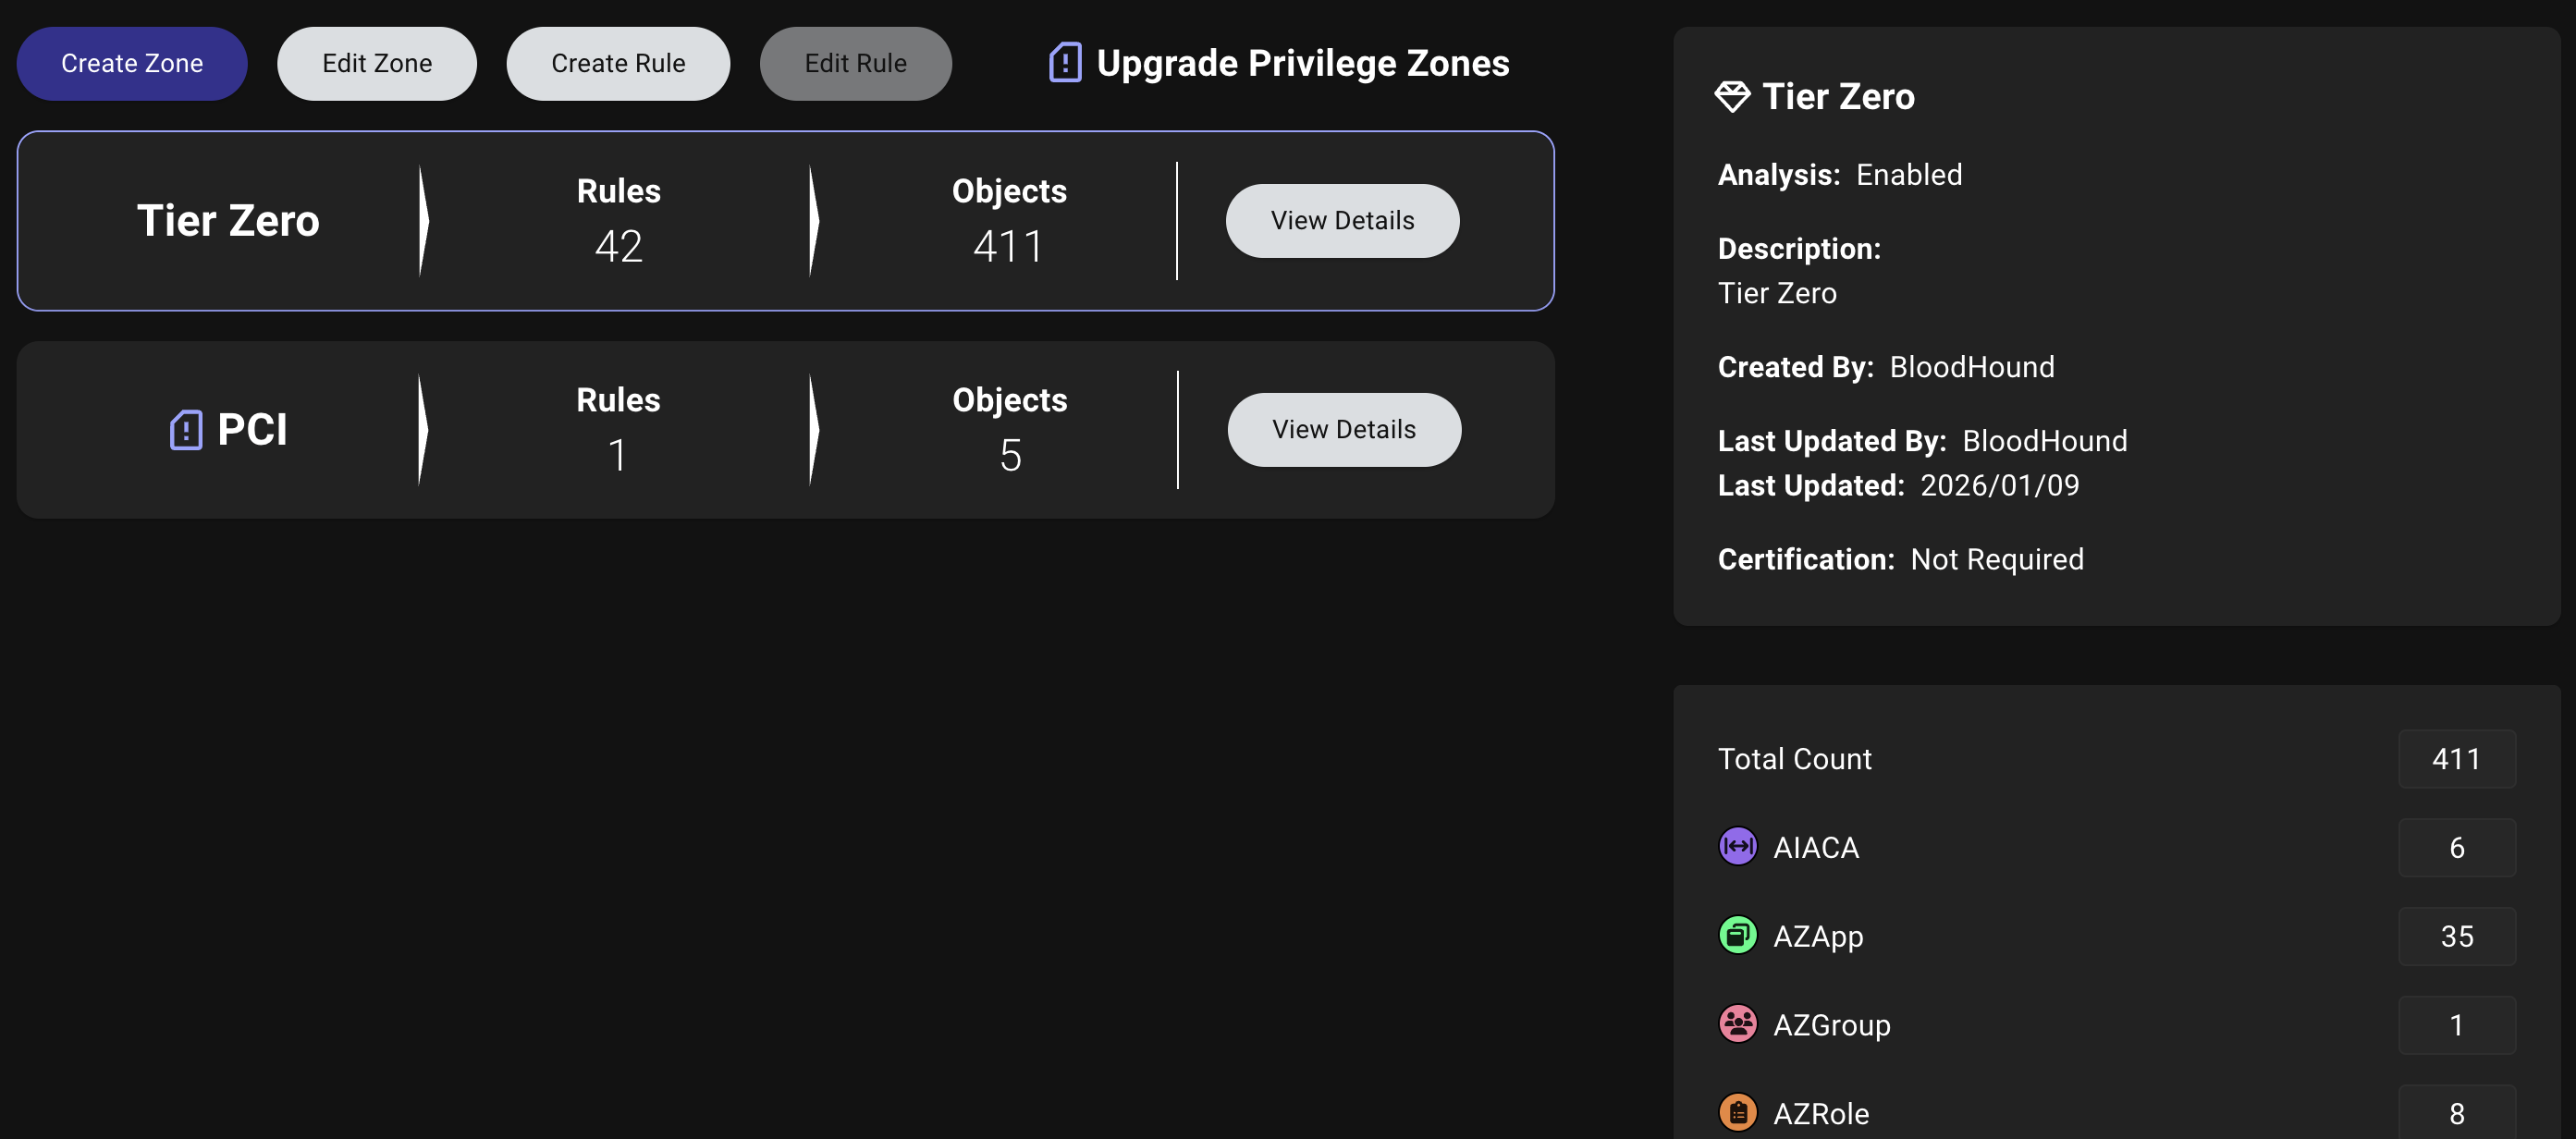
The **Summary View** shows zone names and their hierarchy relative to other zones (the top zone is most critical), rule counts, and object counts.
Zones define hierarchical privilege levels in your environment based on a tiered administration model. The most common tiering model is [Microsoft's Enterprise Access Model](https://learn.microsoft.com/en-us/security/privileged-access-workstations/privileged-access-access-model).
BloodHound uses zones to measure risk and detect violations. Each zone has a specific tier level (**Tier Zero** is the default and highest).
BloodHound Enterprise customers can [create](/analyze-data/privilege-zones/zones) additional zones to match their organization's security model. However, analyzing them requires the **Privilege Zone Analysis** feature (available for purchase). For more information, contact your sales representative.
The **{tab_0}** tab provides different views depending on which edition of BloodHound you're using. The **Summary View** is available in BloodHound Enterprise only, while the **Details View** is available in both BloodHound Enterprise and BloodHound Community Edition.
The **Summary View** shows zone names and their hierarchy relative to other zones (the top zone is most critical), rule counts, and object counts.
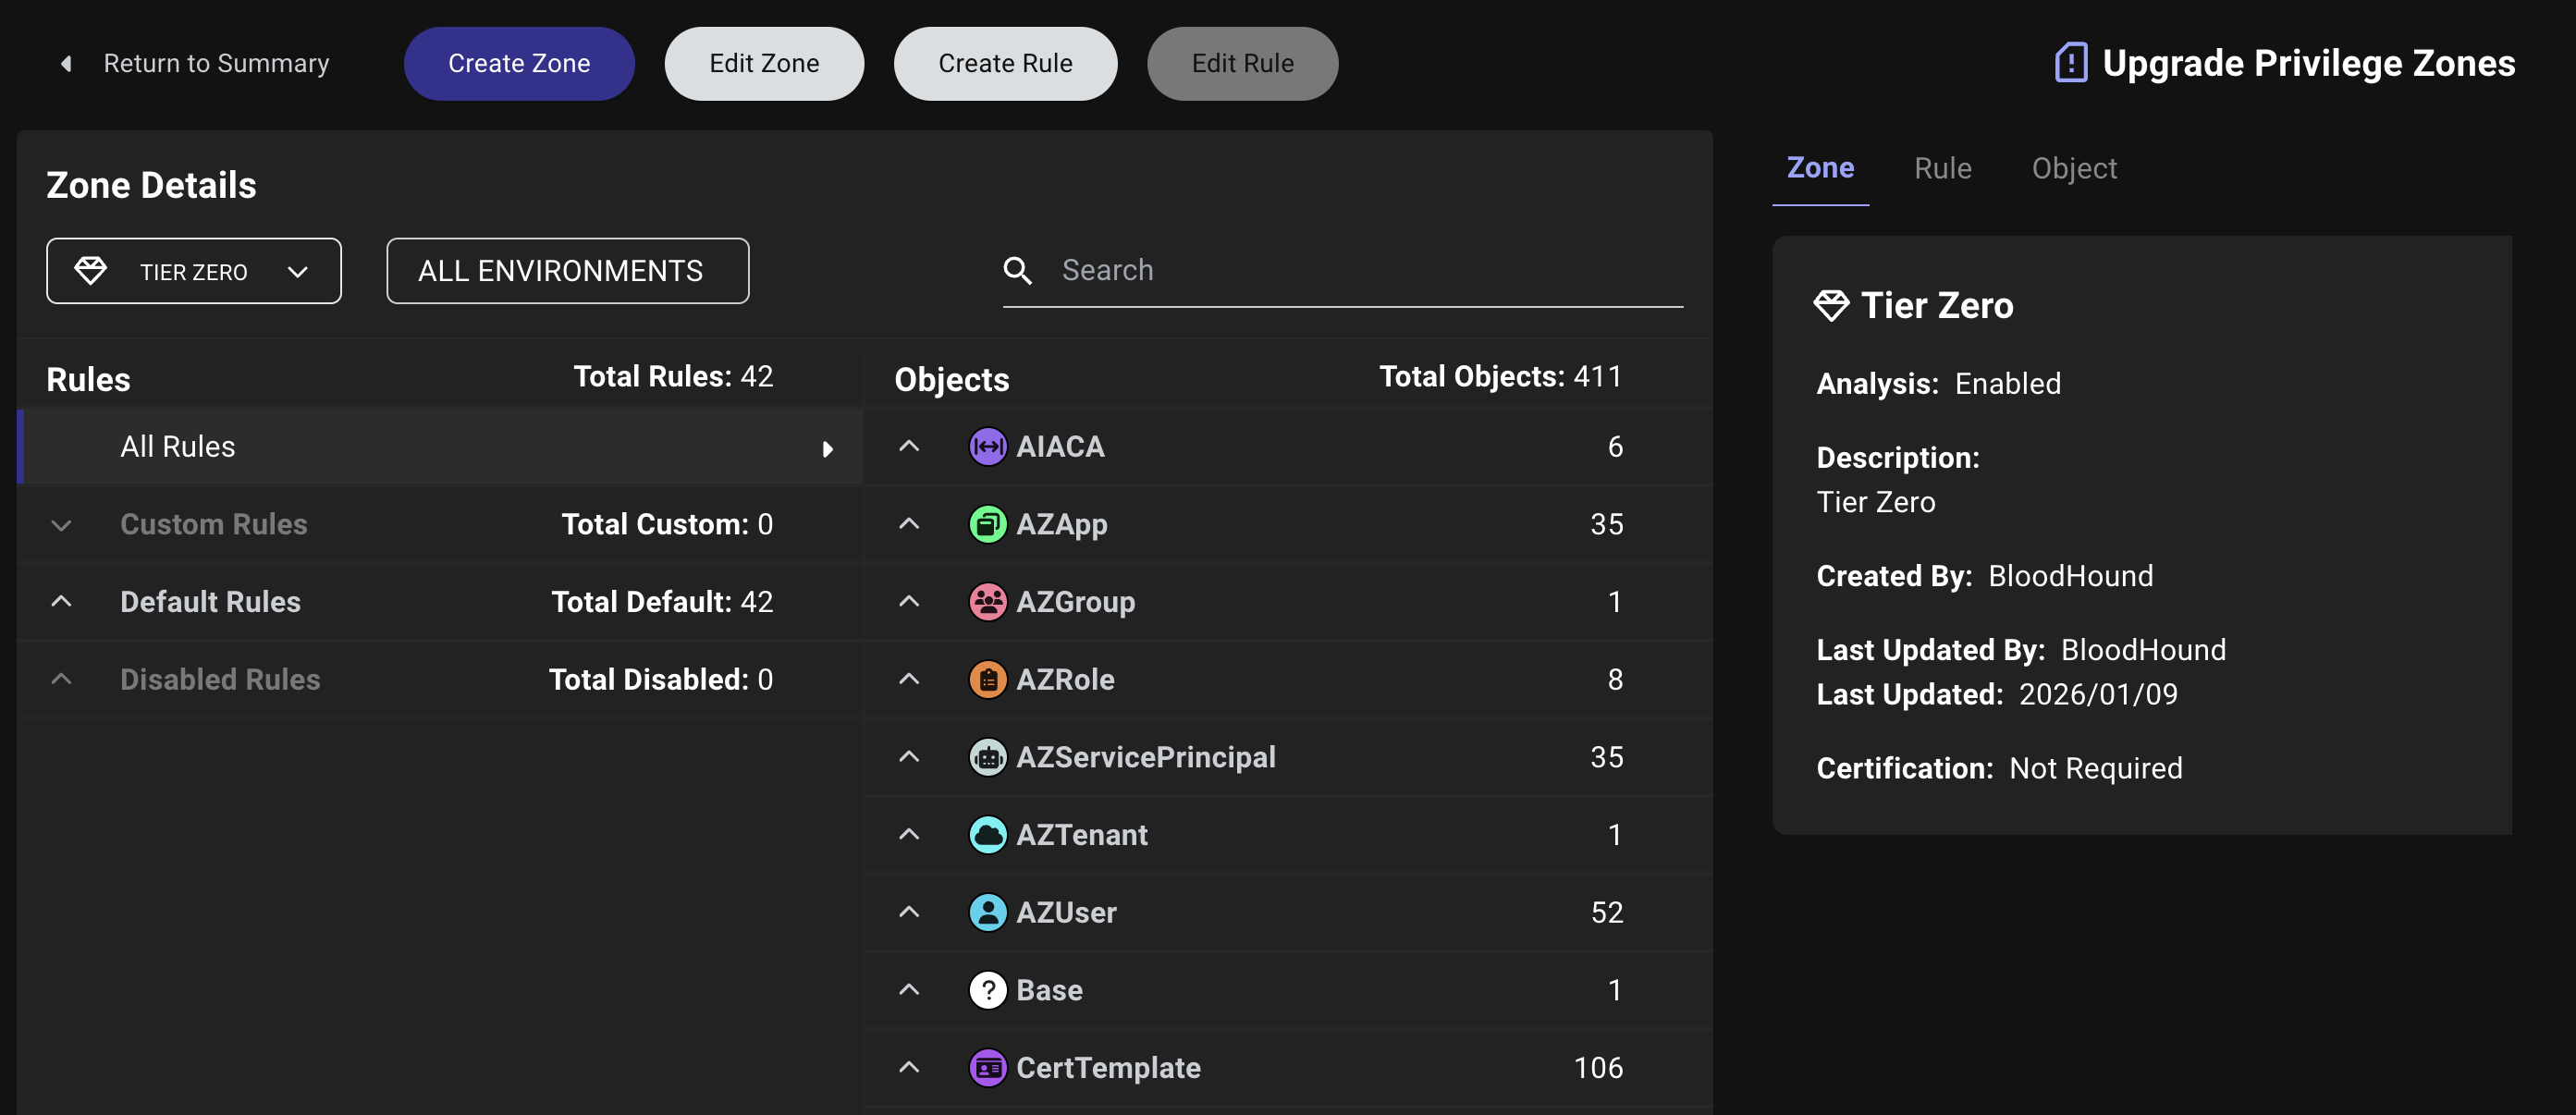
 The **Details View** displays all rules configured for the selected zone and the objects that they pull into the zone (organized by node type). Use the dropdown menus to filter the view by specific zones, identity providers, and services in your network environment.
Select a rule or object to display more details in the right panel, including:
* Rule definition and Cypher query
* Object properties and relationships
BloodHound displays objects for enabled rules only. To view objects related to a disabled rule, you must re-enable it.
The **Details View** displays all rules configured for the selected zone and the objects that they pull into the zone (organized by node type). Use the dropdown menus to filter the view by specific zones, identity providers, and services in your network environment.
Select a rule or object to display more details in the right panel, including:
* Rule definition and Cypher query
* Object properties and relationships
BloodHound displays objects for enabled rules only. To view objects related to a disabled rule, you must re-enable it.
 ### Create a zone
Enterprise Edition
Creating a zone involves configuring the zone details and defining a rule.
See [Rules](/analyze-data/privilege-zones/rules) for more detailed information about defining rules. The content in this section provides a high-level overview only.
In the left menu, click **Privilege Zones** > **Zones** > **Create Zone**.
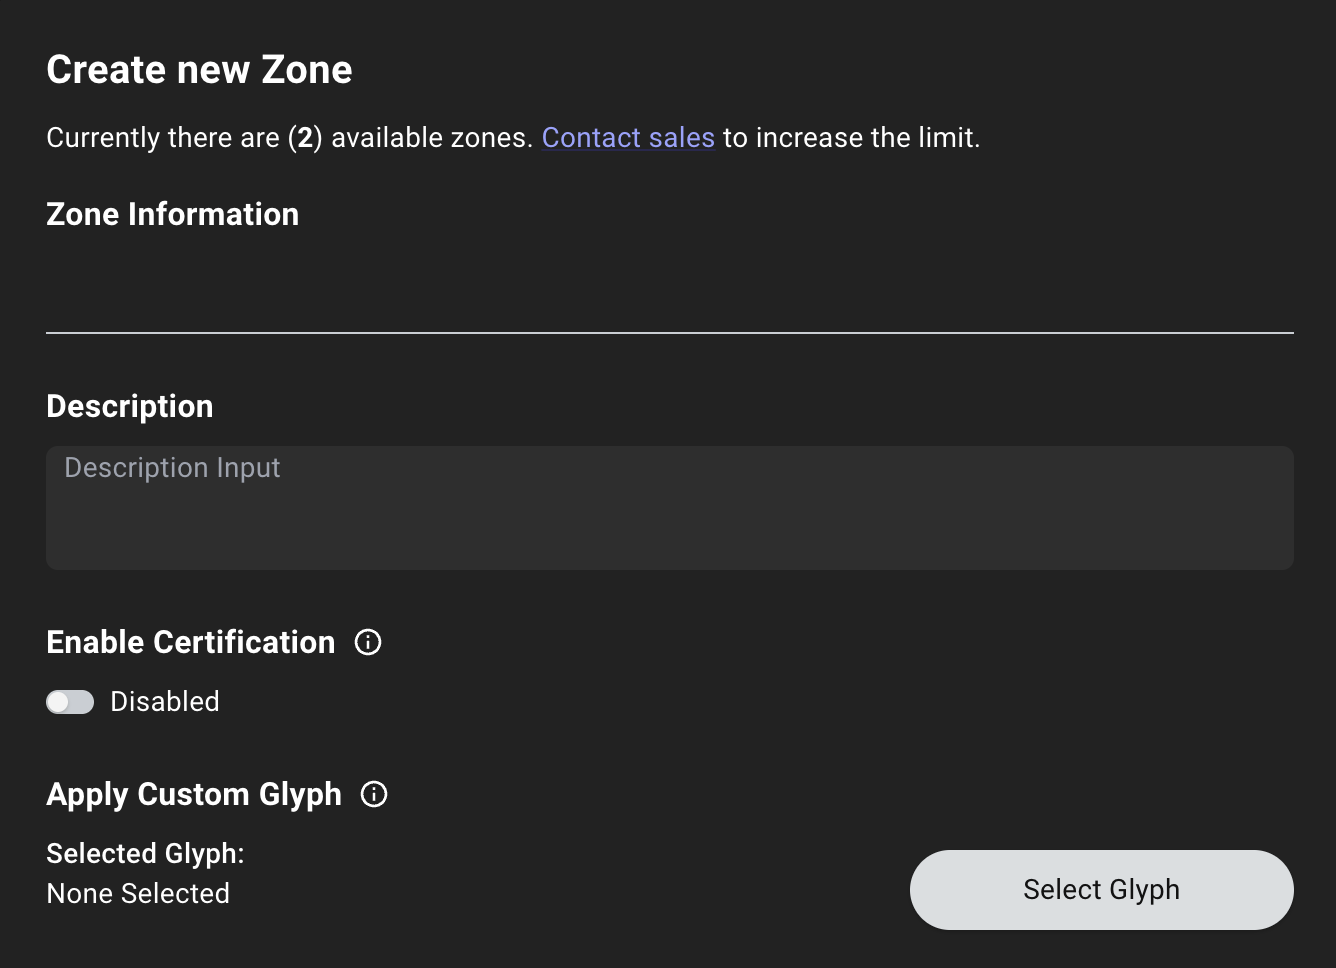
Enter all relevant information about the zone:
| Field | Required? | Description |
| -------------------- | :-------: | ------------------------------------------------------------------------------------------------------------------ |
| Name | Yes | A unique name for the zone (e.g., Server Tier) |
| Description | No | A brief description of the zone's purpose and scope (e.g., PCI assets) |
| Enable Certification | No | An option to mandate [certification](/analyze-data/privilege-zones/certification) for all objects within this zone |
| Enable Analysis | No | An option to include this zone in risk analysis and Attack Path Findings |
| Apply Custom Glyph | No | An option to apply a custom glyph to visually distinguish objects within this zone on the **Explore** page |
### Create a zone
Enterprise Edition
Creating a zone involves configuring the zone details and defining a rule.
See [Rules](/analyze-data/privilege-zones/rules) for more detailed information about defining rules. The content in this section provides a high-level overview only.
In the left menu, click **Privilege Zones** > **Zones** > **Create Zone**.
Enter all relevant information about the zone:
| Field | Required? | Description |
| -------------------- | :-------: | ------------------------------------------------------------------------------------------------------------------ |
| Name | Yes | A unique name for the zone (e.g., Server Tier) |
| Description | No | A brief description of the zone's purpose and scope (e.g., PCI assets) |
| Enable Certification | No | An option to mandate [certification](/analyze-data/privilege-zones/certification) for all objects within this zone |
| Enable Analysis | No | An option to include this zone in risk analysis and Attack Path Findings |
| Apply Custom Glyph | No | An option to apply a custom glyph to visually distinguish objects within this zone on the **Explore** page |
 Click **Define Rule** to save your new Privilege Zone and continue on to define the objects to include in the zone.
See [Rules](/analyze-data/privilege-zones/rules) for more detailed information about defining rules. The content in this section provides a high-level overview only.
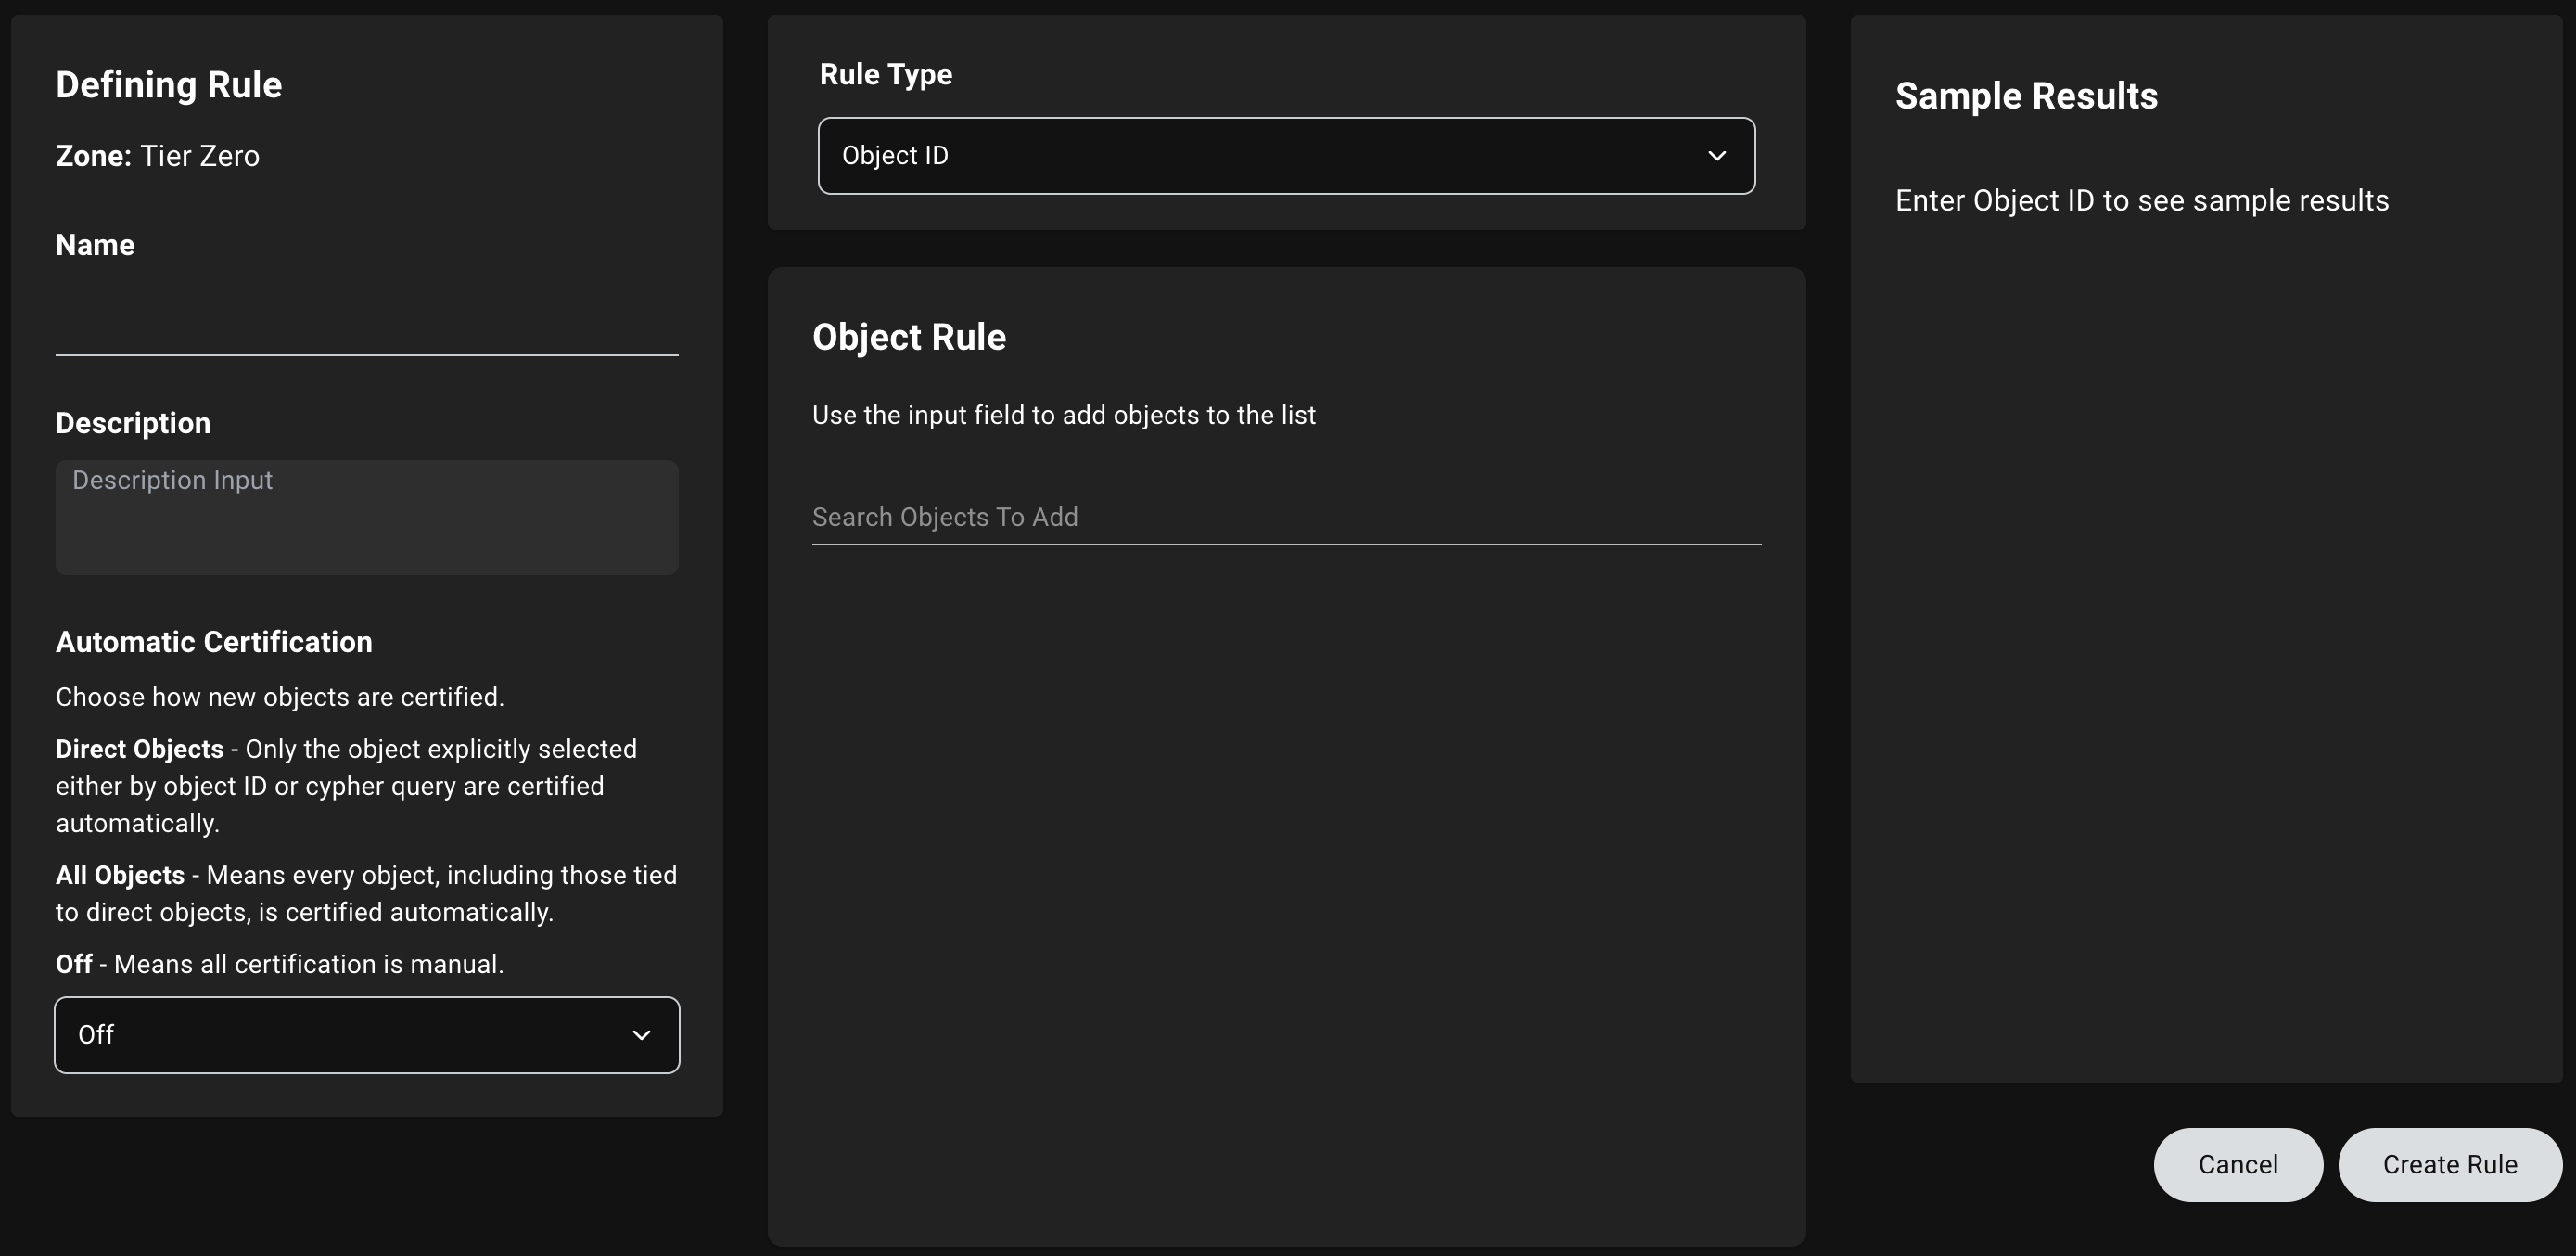
When defining a rule during the zone creation process, provide the following information:
| Field | Required? | Description |
| ----------------------- | :-------: | ------------------------------------------------------------------------------------------------------------------ |
| Name | Yes | A unique name for the rule (e.g., PCI Assets) |
| Description | No | A brief description of the rule's purpose and scope (e.g., PCI assets) |
| Rule Type | Yes | The type of rule to use (e.g., Object ID or Cypher) |
| Automatic Certification | No | An option to choose how BloodHound Enterprise [certifies](/analyze-data/privilege-zones/certification) new objects |
Click **Define Rule** to save your new Privilege Zone and continue on to define the objects to include in the zone.
See [Rules](/analyze-data/privilege-zones/rules) for more detailed information about defining rules. The content in this section provides a high-level overview only.
When defining a rule during the zone creation process, provide the following information:
| Field | Required? | Description |
| ----------------------- | :-------: | ------------------------------------------------------------------------------------------------------------------ |
| Name | Yes | A unique name for the rule (e.g., PCI Assets) |
| Description | No | A brief description of the rule's purpose and scope (e.g., PCI assets) |
| Rule Type | Yes | The type of rule to use (e.g., Object ID or Cypher) |
| Automatic Certification | No | An option to choose how BloodHound Enterprise [certifies](/analyze-data/privilege-zones/certification) new objects |
 Click **Save** to finish creating the zone.
### Edit a zone
Editing options depend on which edition of BloodHound you're using. In BloodHound Enterprise, you can edit all zone properties. In BloodHound Community Edition, you can edit the default **Tier Zero** zone description.
To edit a zone, follow these steps:
1. In the left menu, click **Privilege Zones**.
2. By default, the **Tier Zero** zone is pre-selected. To edit a different zone in BloodHound Enterprise, select the zone you want to edit.
**Tier Zero** is the only available zone for BloodHound Community Edition.
Click **Save** to finish creating the zone.
### Edit a zone
Editing options depend on which edition of BloodHound you're using. In BloodHound Enterprise, you can edit all zone properties. In BloodHound Community Edition, you can edit the default **Tier Zero** zone description.
To edit a zone, follow these steps:
1. In the left menu, click **Privilege Zones**.
2. By default, the **Tier Zero** zone is pre-selected. To edit a different zone in BloodHound Enterprise, select the zone you want to edit.
**Tier Zero** is the only available zone for BloodHound Community Edition.
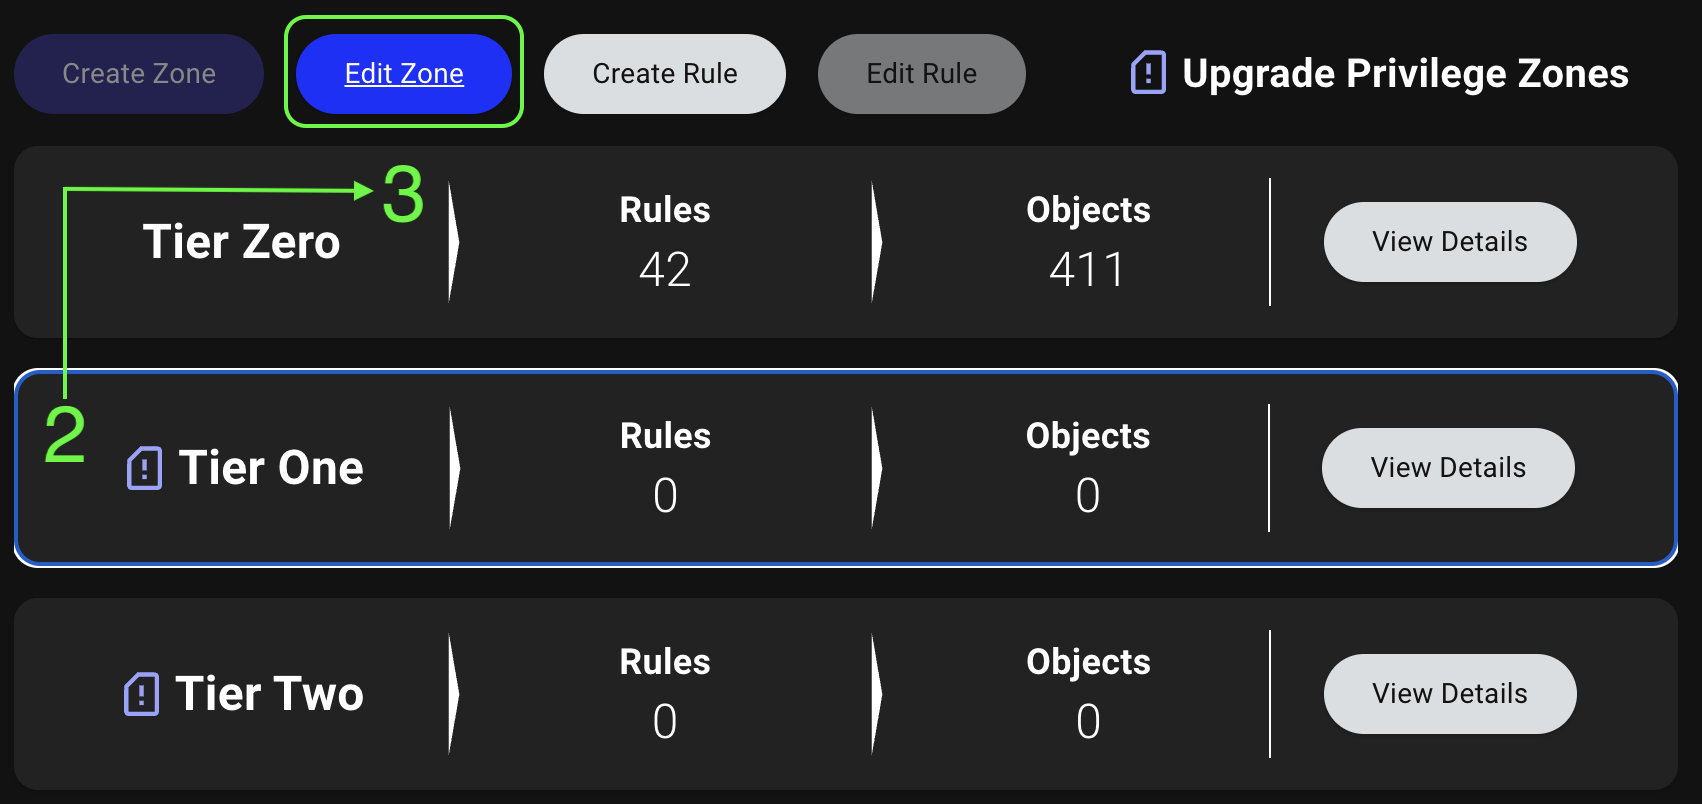 3. Click **Edit Zone**.
Modify one of the available fields.
For example, you can modify the zone's name, description, [certification](/analyze-data/privilege-zones/certification) and analysis settings, and custom glyph.
In BloodHound Community Edition, you can edit the default **Tier Zero** zone description only.
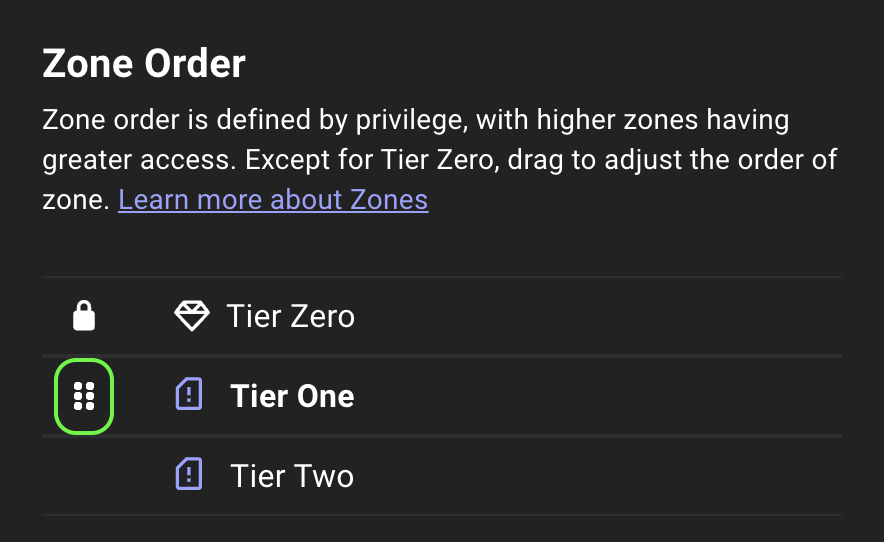
You can also change the zone's hierarchical position by using the (vertical grip control) in the **Zone Order** panel to reorder it.
Zone order is defined by privilege level, with the highest-privileged zone at the top.
3. Click **Edit Zone**.
Modify one of the available fields.
For example, you can modify the zone's name, description, [certification](/analyze-data/privilege-zones/certification) and analysis settings, and custom glyph.
In BloodHound Community Edition, you can edit the default **Tier Zero** zone description only.
You can also change the zone's hierarchical position by using the (vertical grip control) in the **Zone Order** panel to reorder it.
Zone order is defined by privilege level, with the highest-privileged zone at the top.
 Click **Save Edits** to apply your changes.
### Delete a zone
Enterprise Edition
You cannot delete the default **Tier Zero** zone, but you can edit its properties.
Deleting a {tab_1} is irreversible.
To delete an existing zone, follow these steps:
Navigate to the **Zones** tab, select the zone you want to delete, and click **Edit Zone**.
To delete the zone:
1. Click **Delete Zone** at the top of the page.
2. Confirm your action in the dialog.
Click **Save Edits** to apply your changes.
### Delete a zone
Enterprise Edition
You cannot delete the default **Tier Zero** zone, but you can edit its properties.
Deleting a {tab_1} is irreversible.
To delete an existing zone, follow these steps:
Navigate to the **Zones** tab, select the zone you want to delete, and click **Edit Zone**.
To delete the zone:
1. Click **Delete Zone** at the top of the page.
2. Confirm your action in the dialog.
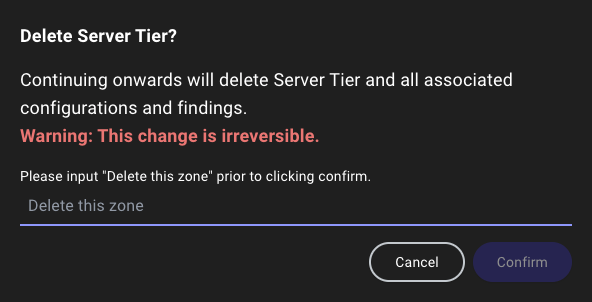 3. Click **Confirm** to delete the zone.
Zone deletion is not available in BloodHound Community Edition.
3. Click **Confirm** to delete the zone.
Zone deletion is not available in BloodHound Community Edition.